2. Recovering vSphere and Platform Services Controller from Recovery Mode
3. Running Ollama on multiple-GPUs without AVX/AVX2
4. pfSense IKEv2 VPN with Microsoft NPS, AD Auth and MFA
5. Azure ARC Bulk Powershell Enrolment
A while ago I was working on a project to decommission the old TACACS server and we chose to replace it with Radius for Cisco router authentication.
After trying a few different radius packages (on Linux) one of our engineers said that he had luck in the past with Radiator – a closed source radius package for Linux. The Radiator software http://open.com.au/radiator/index.html is probably under-utilised for basic authentication, but has been rock solid in our production environment for 6 months+.
What we now have is a radius server that accepts authentication requests from our Cisco devices, checks whether the username or Calling-Station-Id is in a blacklist, authenticates them against LDAP to our Domain Controller and then checks the users group membership to allow them to authenticate. All failed and accepted attempts are also logged.
Whilst the documentation is huge and detailed (376 pages) I couldn’t find any specific examples on the net to tie everything we wanted together. So below is a sample configuration for what we are running as detailed above. Essentially we make a Radius user on the domain who can read LDAP (because we don’t allow anon ldap queries right?). We also make a RadiusSG security group which will contain the users that we want to allow login to our devices (because we don’t want to allow a terminal login for all our other AD users).
Note, I have also included a clients-group1.cfg file to specify each NAS into nice groups. I use this option to create multiple includes to split devices by region/country.
file: /etc/radiator/radius.cfg
#Foreground
LogStdout
LogDir          /var/log/radius
DbDir           /etc/radiator
# Use a low trace level in production systems. Increase
# it to 4 or 5 for debugging, or use the -trace flag to radiusd
Trace           3
# You will probably want to add other Clients to suit your site,
# one for each NAS you want to work with
# INCLUDE OUR REGION SETTINGS
include %D/clients-group1.cfg
<Realm DEFAULT>
# LOG ALL FAILED REQUESTS TO /var/log/radius/<YEAR>-<MONTH>-attempts-failed.log
<AuthLog FILE>
Filename %L/%Y-%m-attempts-failed.log
LogFailure 1
LogSuccess 0
FailureFormat %d/%m/%Y %H:%M:%S FAIL Username: %U Password: %P from %{Calling-Station-Id} on %{NAS-IP-Address}
</AuthLog>
# LOG ALL ACCEPTED REQUESTS TO /var/log/radius/<YEAR>-<MONTH>-attempts-ok.log
<AuthLog FILE>
Filename %L/%Y-%m-attempts-ok.log
LogSuccess 1
LogFailure 0
SuccessFormat %d/%m/%Y %H:%M:%S  OK  Username: %U Password: <hidden> from %{Calling-Station-Id} on %{NAS-IP-Address}
</AuthLog>
# CHECK BAD USERNAMES THEN BAD IP’S THEN LDAP FOR AUTHENTICATION
<AuthBy GROUP>
# FLOW THROUGH OUR BLACKLIST MODULES
AuthByPolicy ContinueUntilReject
#CHECK FOR BAD USERNAMES
<AuthBy FILE>
Blacklist
Filename %D/reject-usernames
</AuthBy>
#CHECK FOR BAD IP’S
<AuthBy FILE>
Blacklist
AuthenticateAttribute Calling-Station-Id
Filename %D/reject-ip
</AuthBy>
#CHECK AGAINST OUR AD VIA LDAP
<AuthBy LDAP2>
# SPECIFY THE DOMAIN CONTROLLER ADDRESS AND LDAP PARAMS
Host <INTERNALIPOFDOMAINCONTROLLER>
SSLVerify none
UseTLS
Port 3268
# OUR DC WONT ALLOW ANON READING SO WE HAVE TO AUTH AS A VALID USER
AuthDN cn=Radius, OU=Service Accounts, DC=<DOMAINHERE>, DC=prd
AuthPassword <RadiusUSERPASSWORDHERE>
# USE THE CACHE FOR MULTIPLE ATTEMPTS WHICH SAVES LDAP QUERIES
CachePasswords
# START SEARCHING LDAP FROM THIS DN FORWARDS
BaseDN DC=<DOMAINHERE>, DC=prd
UsernameAttr sAMAccountName
ServerChecksPassword
# REQUIRE GROUP MEMBERSHIP
SearchFilter (&(%0=%1)(memberOf=CN=RadiusGroup SG,  OU=Security Groups, DC=<DOMAINHERE>, DC=prd))
</AuthBy>
</AuthBy GROUP>
</Realm>
I have also created some scripts to poll for top IP offenders (bruteforce attempts etc) so I will most likely post these details soon.
I wanted to share some info on a recent issue I faced with Microsoft Hyper-V Server SP1 and trunking.
We are in an environment where we wanted to deploy a Hyper-V host to a site and have a trunk from a Cisco switch so that we could throw guests into different VLAN’s. Sounds relatively simple, and in the VMware environment it is, but Hyper-V proved a little more difficult to grasp.
Let me just run through a brief explanation of how the host is setup. We built the Hyper-V Server host, gave it an IP, added it to the domain and registered it in DNS. In SMVMM 2012 we defined a logical network in the fabric and added the VLAN and IP subnet (in CIDR) to the network site. We did not define an IP address pool for the logical network, as DHCP will be taking care of this for us. Next we added the host to VMM. We then deployed the host to the site and proceeded to modify the network settings to configure trunking remotely.
This was our downfall.
Remotely – in the host properties, we enabled logical network connectivity from out logical network, changed the NIC to trunk and made sure the subnet and VLAN details were correct. We then added the virtual network interface and granted host access through a VLAN so that we could still manage the host. Then we applied all the changed to the host.
What we did not know is that the host would apply settings one by one, and NOT send all config to the host to apply. What happened was that the host applied the trunking details and then could not apply the virtual network details as the host became offline.
After reading a tonne of unhelpful articles we solved the problem via the following:
- Cabling the second NIC.
- The second NIC got an IP via DHCP and hence moved the DNS record for the host.
- As the host was added to VMM using DNS, the network settings were applied properly which meant that the virtual network was created, bringing our trunked host back online.
- Once the host was up DNS had registered both IP’s so that we could safely shut down the second NIC, or allocate it to a management only NIC.
Hope this helps either explain a brief overview of trunking in Hyper-V or provide a solution to a similar problem.
Two weeks ago I was fortunate enough to attend Cisco Live (previously networkers).
Part of my goal there was to get clued up on IPv6 transition methods, addressing and all related matter. One of the breakout sessions I attended was on IPv6 security threats and mitigation. All in all very informative, but the major advice for networks not currently running IPv6 was to monitor your IPv6 flows to see what applications and operating systems were doing. Technologies like ISATAP are bound to break security boundaries by tunneling via IPv4 and this is something you should be aware of on your network.
Today I started this quest just by running a regular wireshark session filtering via IPv6. Without a tap or a port span I could only observe multicast traffic, but I picked up on the below packets.
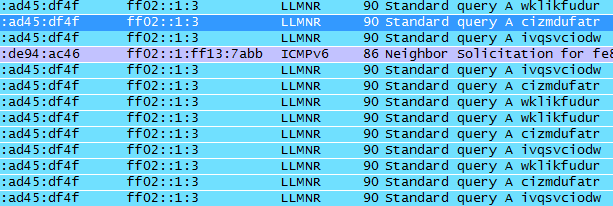
My immediate thought was a users PC was infected with a virus that was acting as part of a botnet and that this PC was using IPv6 to perform its DNS lookups. I went searching for 10 character IPv6 DNS lookups. Luckily what I found meant it wasn’t part of a botnet but I definitely wasn’t expecting what I found. This case has been documented before, so this is definitely nothing new and the fact that this happens in both IPv4 and IPv6 isn’t a suprise. Here are the references I found:
http://code.google.com/p/chromium/issues/detail?id=47262
http://groups.google.com/a/chromium.org/group/chromium-discuss/browse_thread/thread/17bd3e93f3c68448?pli=1
https://isc.sans.edu/diary.html?storyid=10312
http://groups.google.com/a/googleproductforums.com/forum/#!category-topic/chrome/report-a-problem-and-get-troubleshooting-help/dQ92XhrDjfk
As the reports suggest it’s a feature of Chrome to perform fake DNS lookups to determine if your ISP is performing DNS hijacking. In my case our DNS suffix provided by our DHCP server did not get appended, nor was the request a truncation of a proper URL nor was it over IPv4 – but it is most definitely the cause of the events I saw on the network.
As the quest for IPv6 and related security problems goes on I’m sure to throw more stuff up here.
Just scrolling through /. and noticed this article:
“Michael Geist reports that last week State of Maryland prosecutors were able to obtain a warrant ordering Verisign, the company that manages the dot-com domain name registry, to redirect the website to a warning page advising that it has been seized by the U.S. Department of Homeland Security. The message from the case is clear: all dot-com, dot-net, and dot-org domain names are subject to U.S. jurisdiction regardless of where they operate or where they were registered. This grants the U.S. a form of ‘super-jurisdiction’ over Internet activities, since most other countries are limited to jurisdiction with a real and substantial connection.”
I’ve been fearful of this for a while and watching this develop over the last year or so. I’ve never understood the legailities involved with the US seizing a site with it’s information when it’s clearly hosted in another country. I guess the loophole has been the ownership of the .com registrar, allowing a pivot for governments to obtain the remainder of the information past the actual domain name. A loophole which is now firmly stated.
I guess the only hope now is one that comes from more awareness. If you don’t want to have your domain seized due to the content on your site – don’t register it through a .com .net or .org.
Tonight I’ve been upgrading a CallManager 7.1.3 cluster to 7.1.5. This is a minor upgrade, but still follows upgrade procedures as usual.
I experienced two issues which I just need to note down.
Firstly, upon a switch version to the new partition CallManager takes A LONG TIME to start its services. The trap that I fell into was that I SSH’d to the box to check how the service start was going when I was greeted with this:
Requesting service status, please wait…
System SSH [STARTED]
Cluster Manager [STOPPED] Service Not Started
Service Manager [Not Running]
Warning: Service Manager need to be running for all Call Processing Applications
I started to freak out thinking that my new upgraded partition was fkd. I played with all sorts of starts and restarts shown below:
admin:utils service start Cluster Manager
Service Stopped
Cluster Manager [STOPPED]

admin:utils service start Service Manager
Starting servM
admin:
I rebooted the box hoping that something had got stuck and that it just needed a kick. When it came back up and SSH showed the same thing I tried to start services that I knew I hit the following:
admin:utils service start Cisco Database Layer Monitor
Service Manager [Not Running]
Warning: Service Manager need to be running for all Call Processing Applications
admin:utils service start Cisco Database Layer Monitor
Service Manager [Not Running]
Warning: Service Manager need to be running for all Call Processing Applications
admin:utils service start Cluster Manager
Service Stopped
Cluster Manager [STOPPED]
By this time I was freaking so I moved away for a few mins to work on something else. I came back and checked the service list again, and everything had started! So I guess the moral here is that 1. services don’t show as starting when they are starting for the first time. 2. an upgrade and switch partition takes a long time!
The second issue I had was a box not rebooting to its switched partition. I tried to force the switch but hit the following:
admin:utils system switch-version

Active Master Version: 7.1.3.32009-2
Inactive Master Version: 7.1.5.30000-1

If you are switching to an earlier release, you must run:
utils dbreplication reset all
from the publisher after all the nodes are switched over.
Do you really want to switch between versions ?

Enter (yes/no)? yes

Switching Version and Restarting the Appliance …

Switch version duration can vary depending on the database size
and platform configuration.  Please continue to monitor the
switchover process from here.

Waiting ………………………….

Operation failed

ERROR: Acquiring lock failed
I started to freak again. Then I found this page: http://iptbuzz.blogspot.com.au/2011/10/switch-version-doesnt-switch.html props to the guy who wrote that, because it worked perfectly! I manually rebooted the box and then forced a switch version and rebooted again and everything was gravy.
I’m yet to play with 8.x as we are waiting for 9 with proper VM support, but I hope that Cisco manage to fix their dodgey CCM scripting!
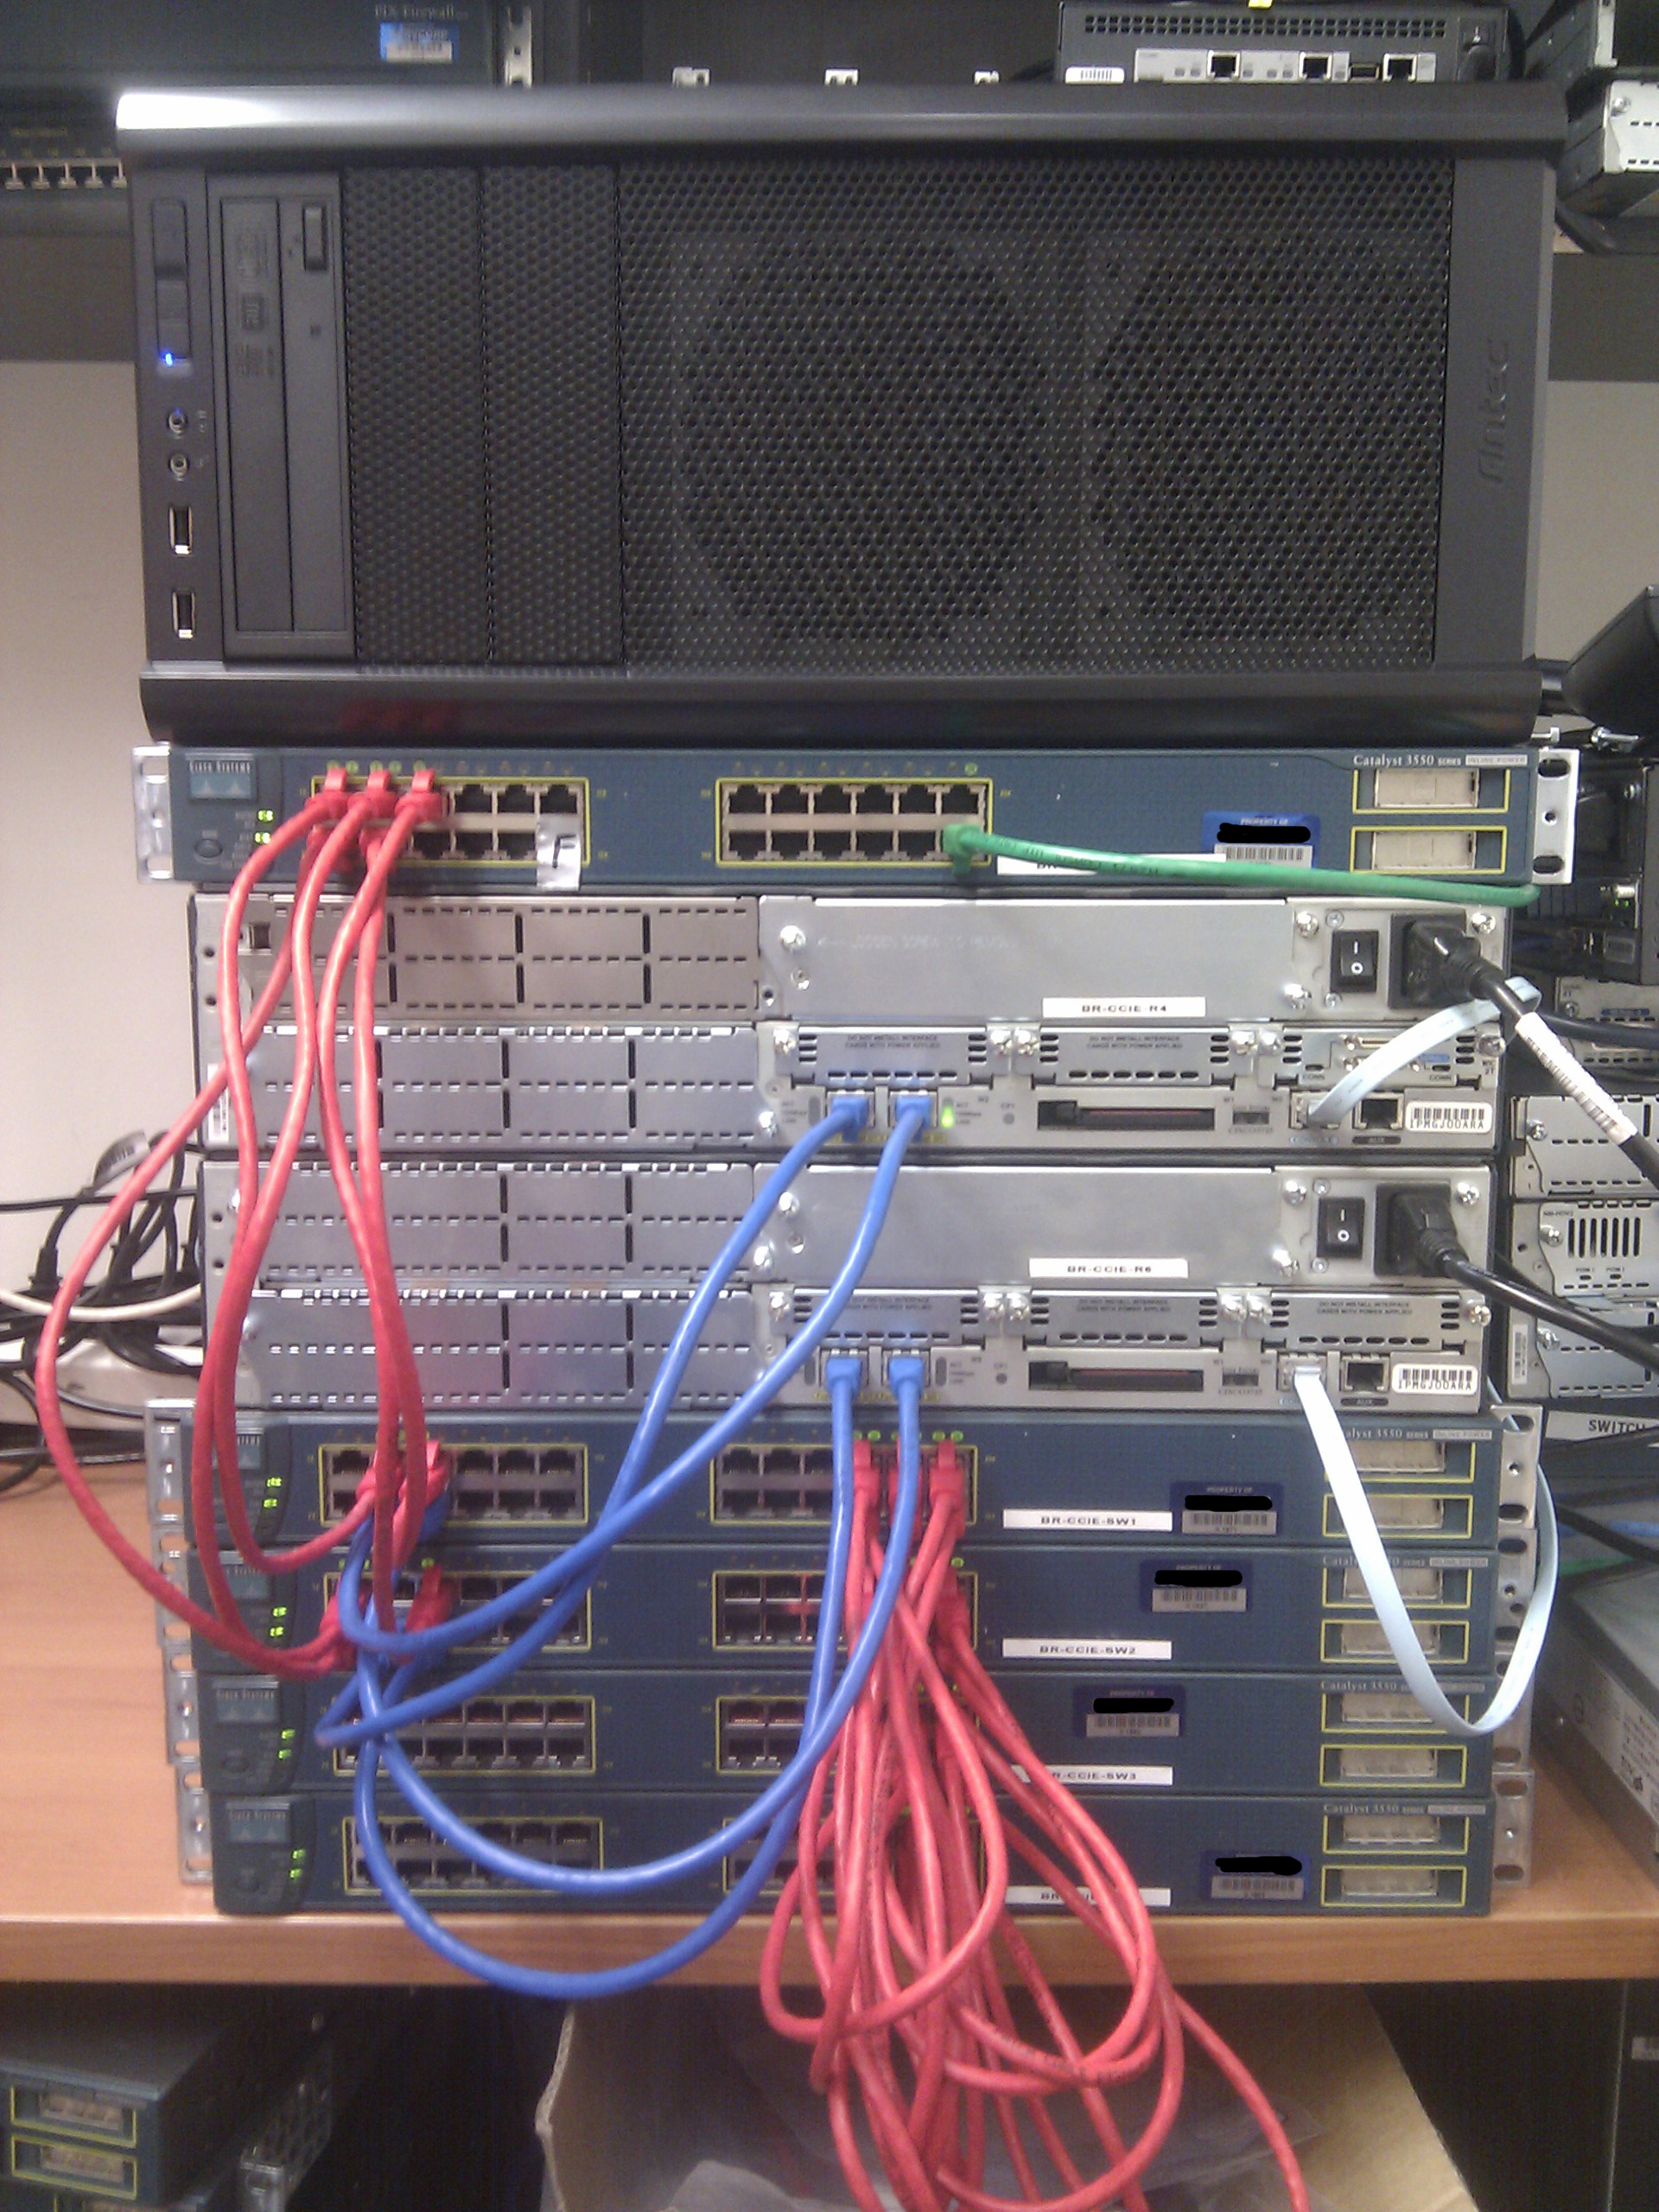
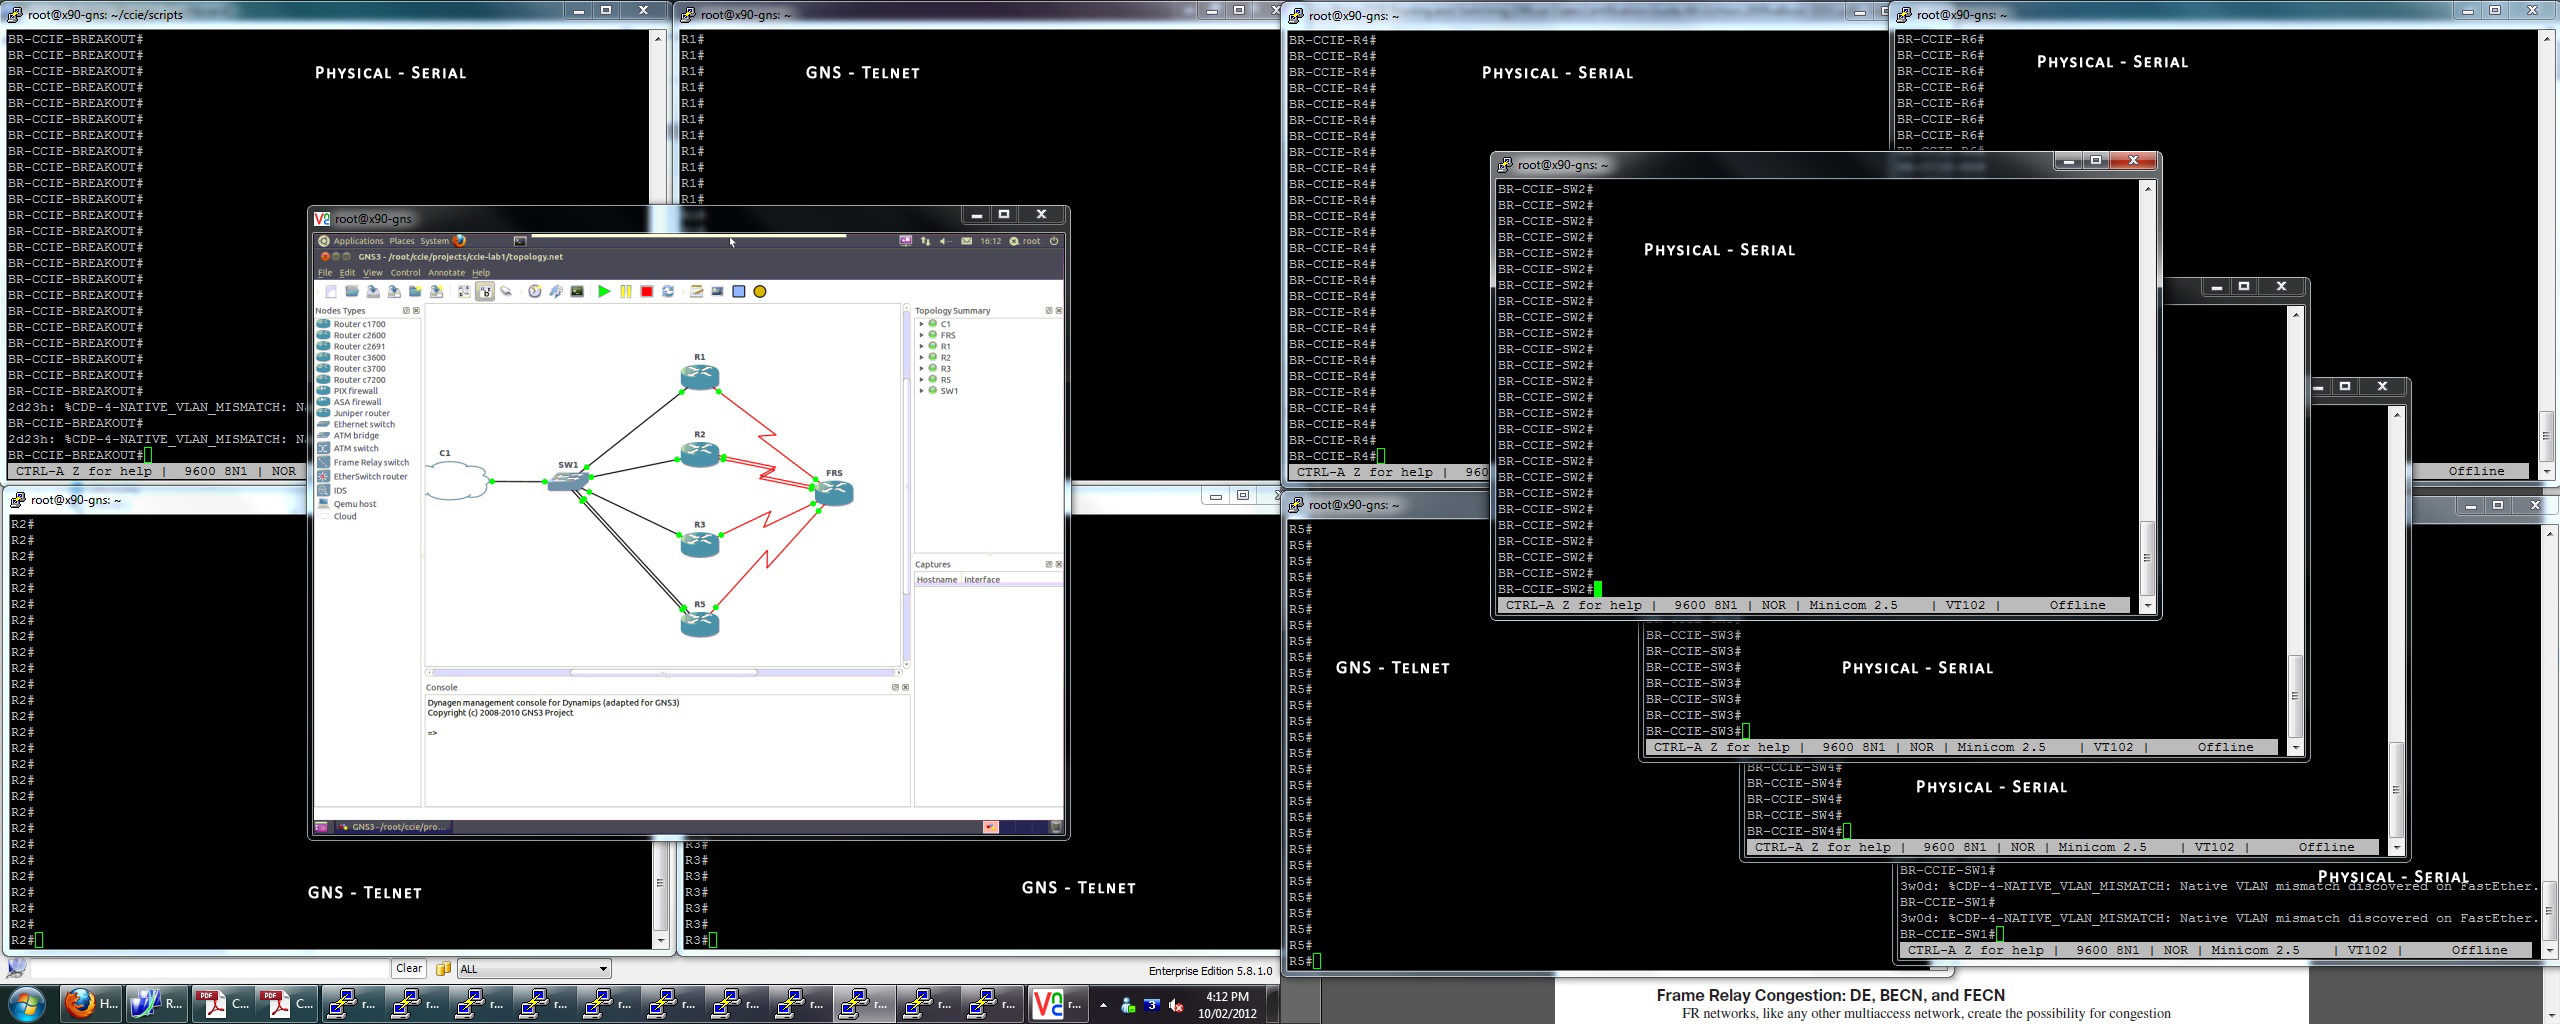
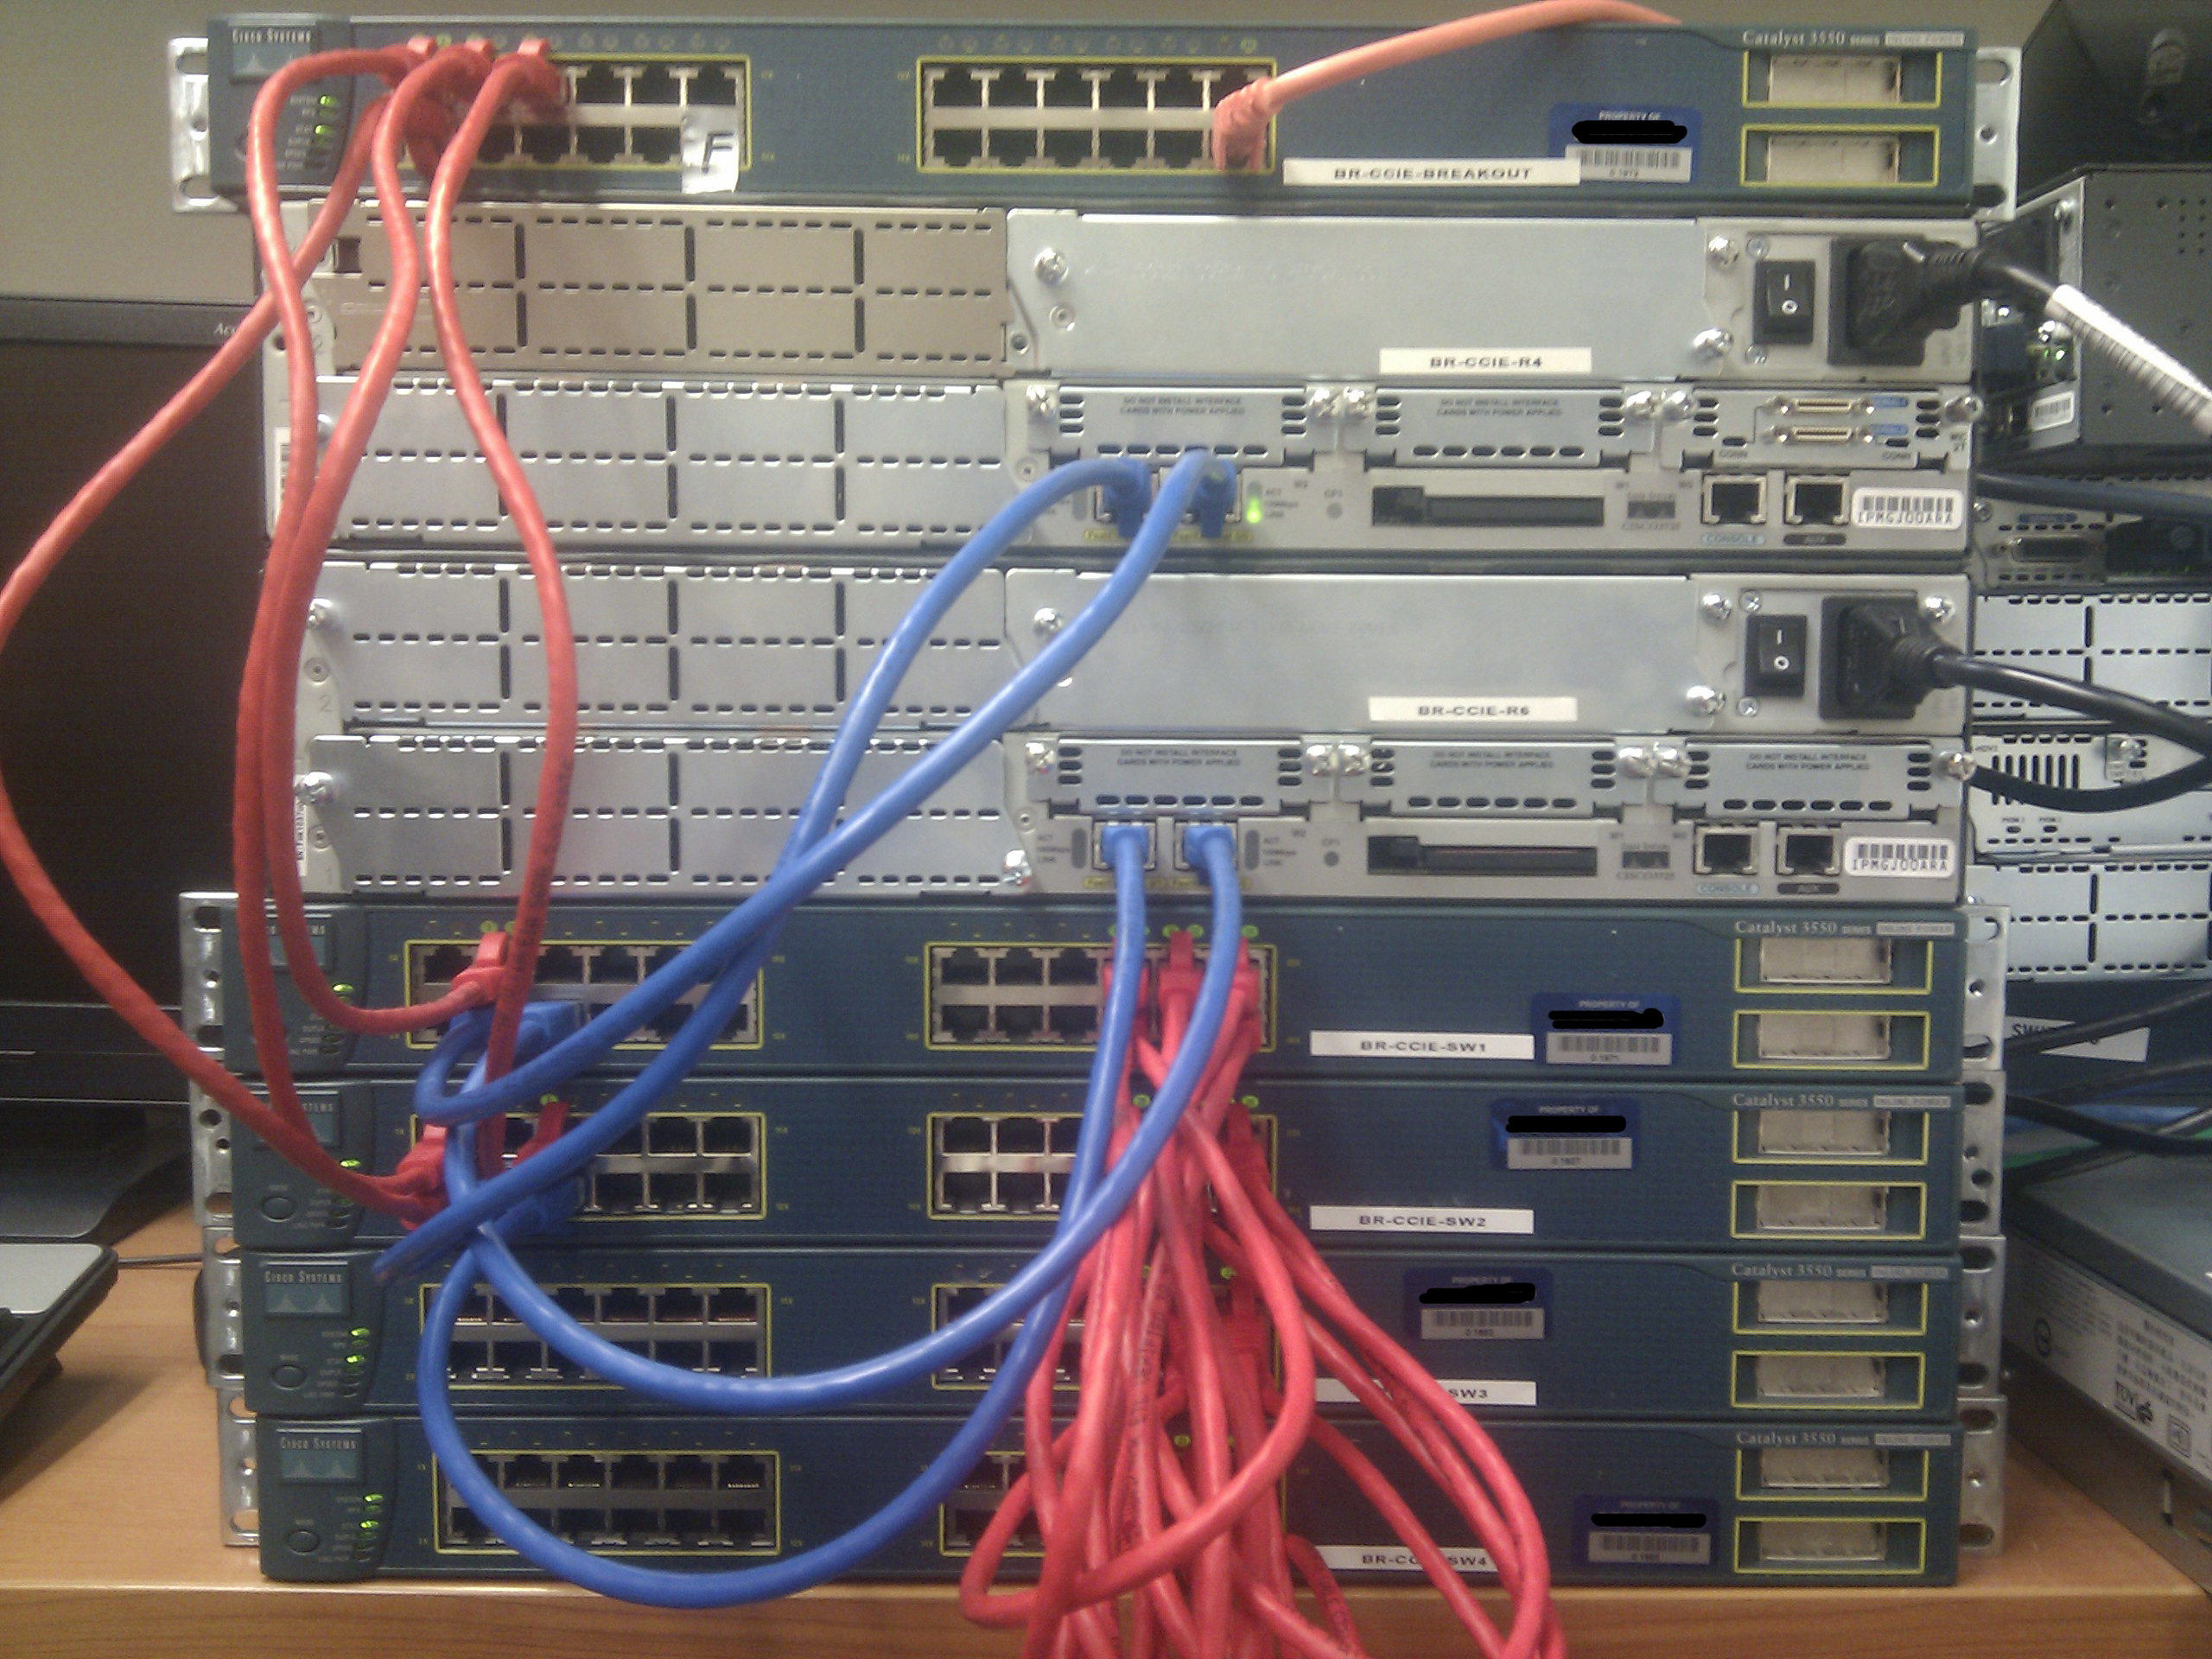
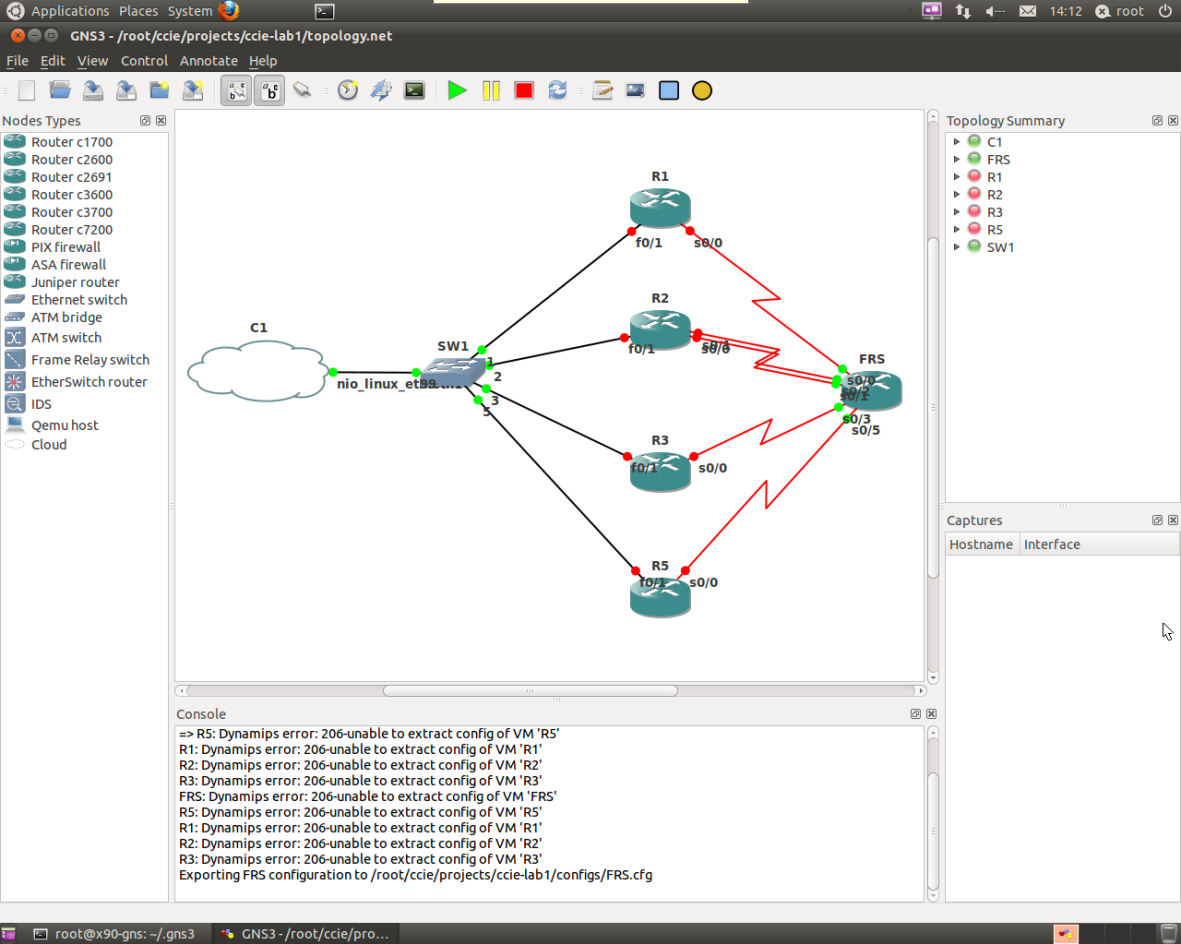
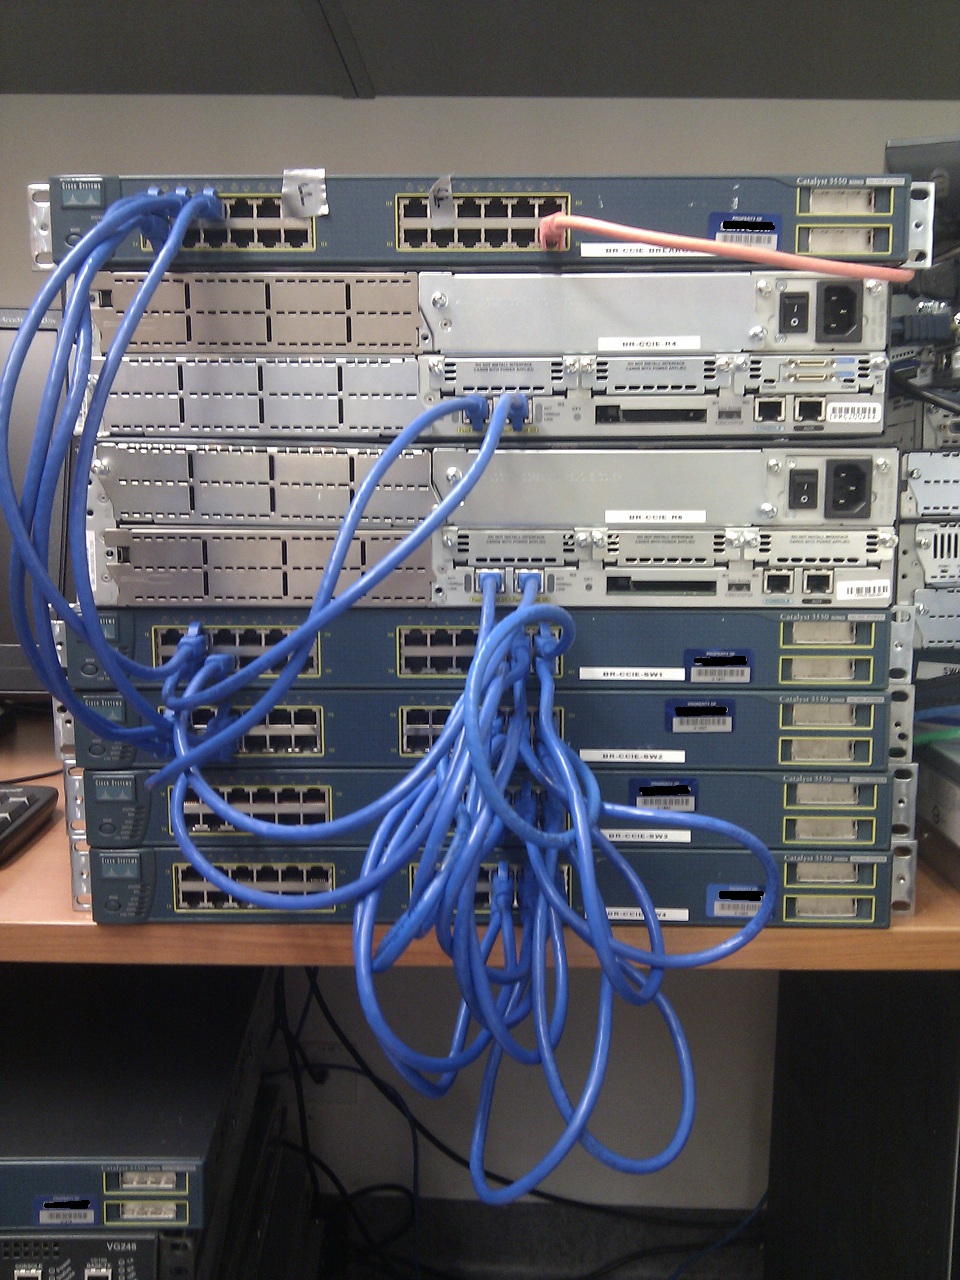
I thankfully received the extra 6 usb to serial cables today aswell as the Sunix USB PCI adapter. The GNS machine was rebooted, the drivers were loaded for the Sunix automatically and the additional usb to serial cables were registered without a hitch! For the first time since I started this quest I am able to console and telnet to all of my devices – I guess now the actual work starts.
Below are some new photos of the lab and telnet/console sessions to all of the devices.

More ranting and rambling bound to come now that config can begin.
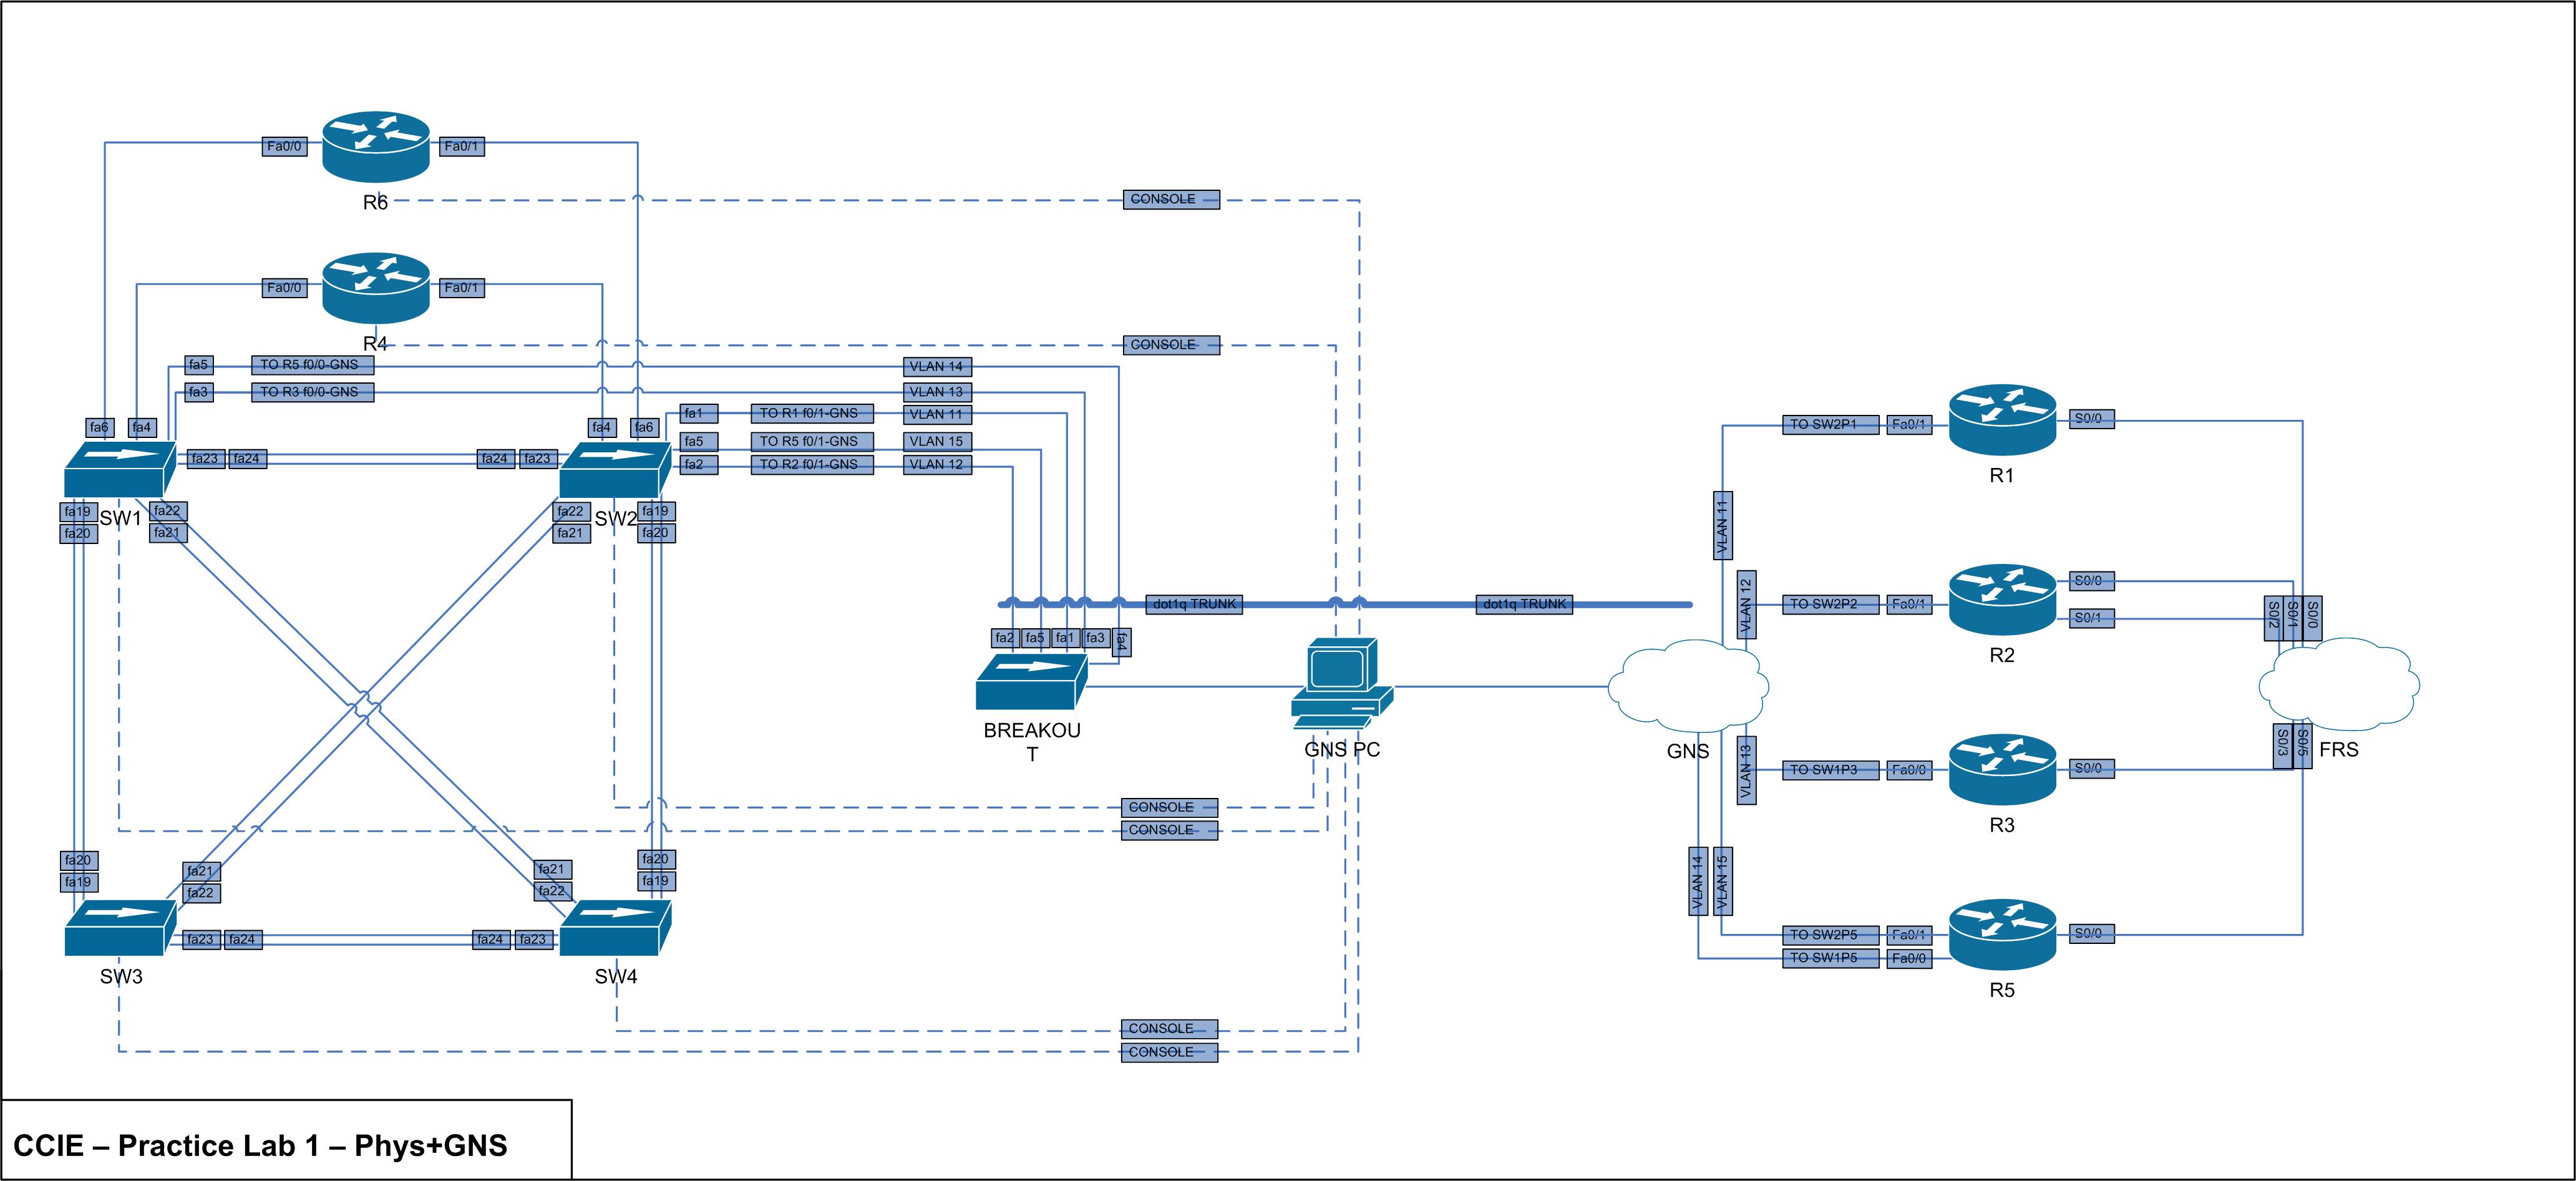
It turns out I forgot an interface from SW1 to R5. Below is the new physical overview with accompanying GNS changes.

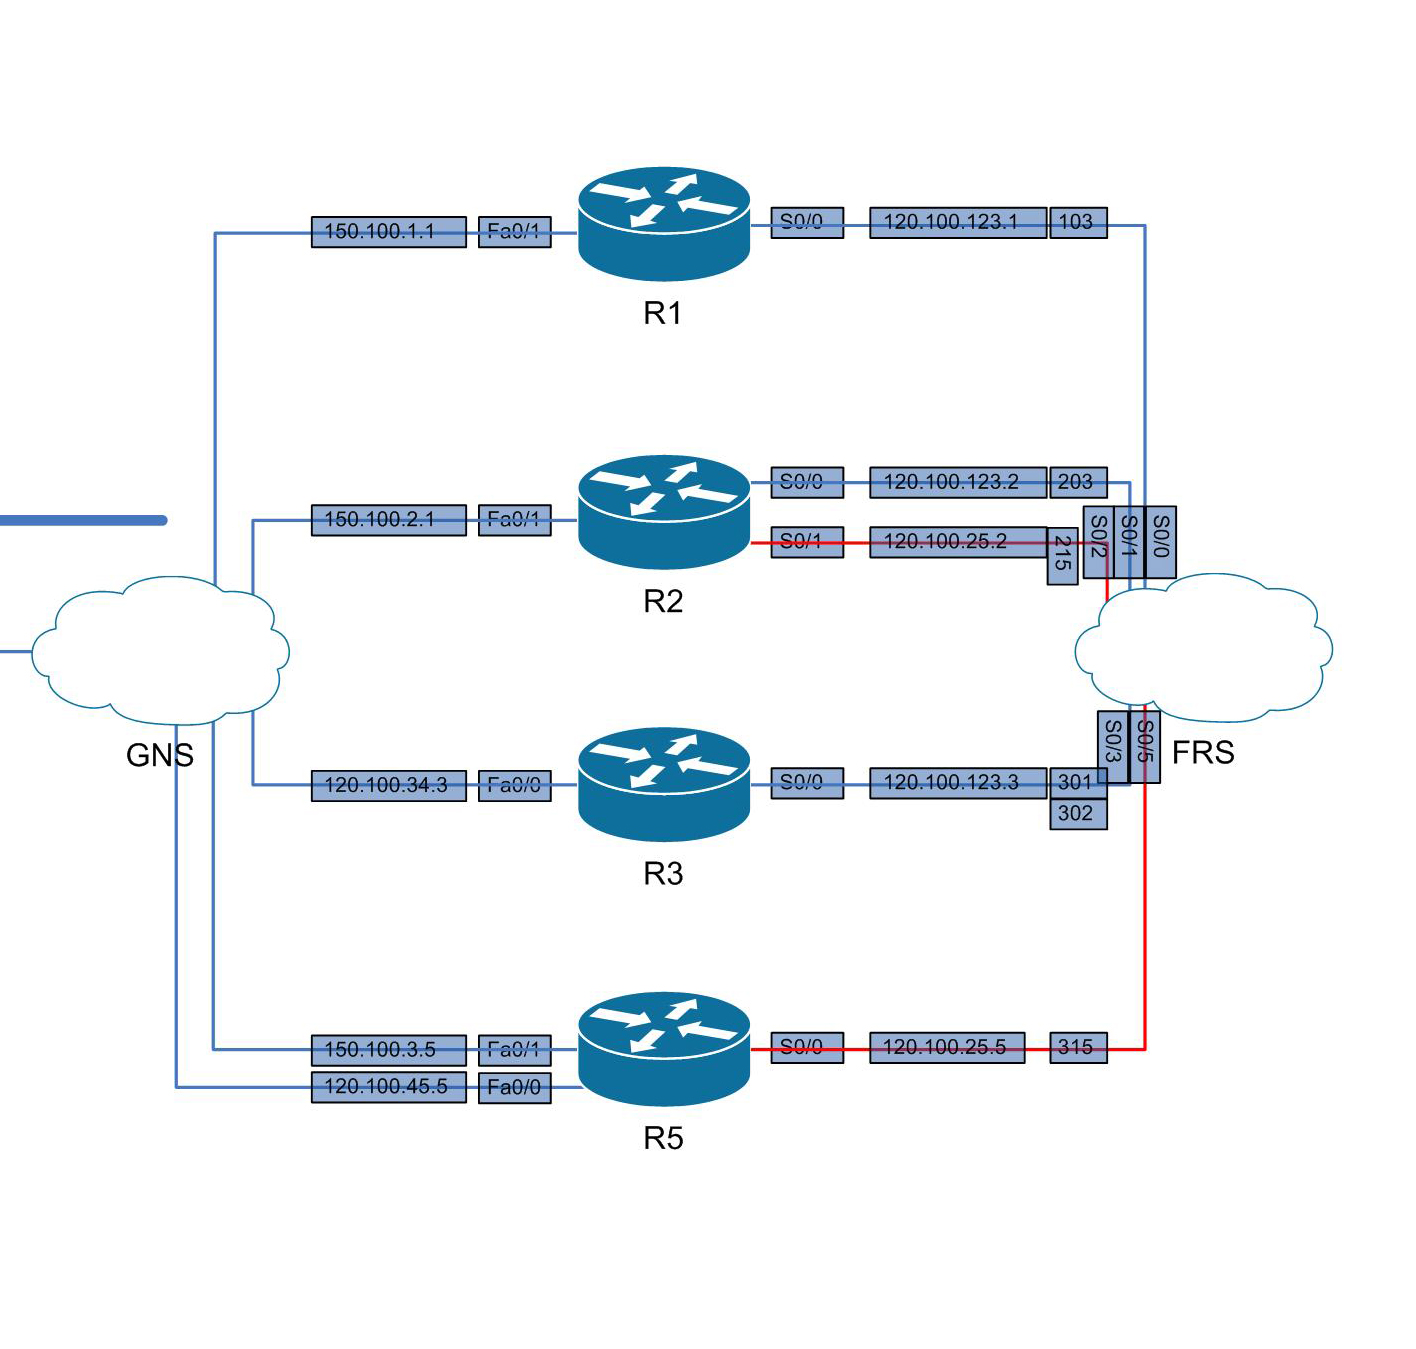
I’ve also set up the GNS routers with IP’s and associated frame relay commands. See below for the network overview containing IP’s + DLCI’s and the generic + frame relay config for each device.
Frame Relay Switch
hostname BR-CCIE-FRS
!
service password-encryption
!
no ip domain-lookup
!
enable secret 5 $1$GDhQ$Hufu4XUQWFqeQjap6/r7x1
!
frame-relay switching
!
interface Serial0/0
description TO BR-CCIE-R1 s0/0
no ip address
encapsulation frame-relay
clock rate 56000
frame-relay intf-type dce
frame-relay route 103 interface Serial0/3 301
!
interface Serial0/1
description TO BR-CCIE-R2 s0/0
no ip address
encapsulation frame-relay
clock rate 56000
frame-relay intf-type dce
frame-relay route 203 interface Serial0/3 302
!
interface Serial0/2
description TO BR-CCIE-R2 s0/1
no ip address
encapsulation frame-relay
clock rate 56000
frame-relay intf-type dce
frame-relay route 215 interface Serial0/5 315
!
interface Serial0/3
description TO BR-CCIE-R3 s0/0
no ip address
encapsulation frame-relay
clock rate 56000
frame-relay intf-type dce
frame-relay route 301 interface Serial0/0 103
frame-relay route 302 interface Serial0/1 203
!
interface Serial0/5
description TO BR-CCIE-R5 s0/0
no ip address
encapsulation frame-relay
clock rate 56000
frame-relay intf-type dce
frame-relay route 315 interface Serial0/2 215
!
line con 0
password cisco
logging synchronous
login
!
line vty 0 4
password cisco
logging synchronous
login
R1
hostname BR-CCIE-R1
!
service password-encryption
!
no ip domain-lookup
!
enable secret 5 $1$GDhQ$Hufu4XUQWFqeQjap6/r7x1
!
interface Loopback0
ip address 120.100.1.1 255.255.255.0
!
interface Serial0/0
description TO BR-CCIE-FRS s0/0
ip address 120.100.123.1 255.255.255.0
encapsulation frame-relay
clock rate 56000
frame-relay map ip 120.100.123.3 103
!
interface FastEthernet0/1
description TO BR-CCIE-SW2 fa0/1
ip address 150.100.1.1 255.255.255.0
speed 100
full-duplex
!
line con 0
password cisco
logging synchronous
login
!
line vty 0 4
password cisco
logging synchronous
login
R2
hostname BR-CCIE-R2
!
service password-encryption
!
no ip domain-lookup
!
enable secret 5 $1$GDhQ$Hufu4XUQWFqeQjap6/r7x1
!
interface Loopback0
ip address 120.100.2.1 255.255.255.0
!
interface Serial0/0
description TO BR-CCIE-FRS s0/1
ip address 120.100.123.2 255.255.255.0
encapsulation frame-relay
clock rate 56000
!
interface FastEthernet0/1
description TO BR-CCIE-SW2 fa0/2
ip address 150.100.2.1 255.255.255.0
speed 100
full-duplex
!
interface Serial0/1
description TO BR-CCIE-FRS s0/2
ip address 120.100.25.2 255.255.255.0
encapsulation frame-relay
clock rate 56000
frame-relay map ip 120.100.25.5 215
!
line con 0
password cisco
logging synchronous
login
!
line vty 0 4
password cisco
logging synchronous
login
R3
hostname BR-CCIE-R3
!
service password-encryption
!
no ip domain-lookup
!
enable secret 5 $1$GDhQ$Hufu4XUQWFqeQjap6/r7x1
!
interface Loopback0
ip address 120.100.3.1 255.255.255.0
!
interface FastEthernet0/0
description TO BR-CCIE-SW1 fa0/3
ip address 120.100.34.3 255.255.255.0
speed 100
full-duplex
!
interface Serial0/0
description TO BR-CCIE-FRS s0/3
ip address 120.100.123.3 255.255.255.0
encapsulation frame-relay
clock rate 56000
frame-relay map ip 120.100.123.2 302
frame-relay map ip 120.100.123.1 301
!
line con 0
password cisco
logging synchronous
login
!
line vty 0 4
password cisco
logging synchronous
login
R5
hostname BR-CCIE-R5
!
service password-encryption
!
no ip domain-lookup
!
enable secret 5 $1$GDhQ$Hufu4XUQWFqeQjap6/r7x1
!
interface Loopback0
ip address 120.100.5.1 255.255.255.0
!
interface FastEthernet0/0
description TO BR-CCIE-SW1 fa0/5
ip address 120.100.45.5 255.255.255.0
speed 100
full-duplex
!
interface Serial0/0
ip address 120.100.25.5 255.255.255.0
encapsulation frame-relay
clock rate 56000
frame-relay map ip 120.100.25.2 315
!
interface FastEthernet0/1
description TO BR-CCIE-SW2 fa0/5
ip address 150.100.3.5 255.255.255.0
speed 100
full-duplex
!
line con 0
password cisco
logging synchronous
login
!
line vty 0 4
password cisco
logging synchronous
login
Like the minicom scripts, I’ve also hardset the GNS console port numbers so I can configure console scripts. It’s very straightforward:
nano br-ccie-frs
telnet 127.0.0.1 2000
chmod 777 br-ccie-frs
Everything is still rolling well. Even though there are no routing protocols or heavy packets running yet, the X2 is handling the 5 routers without a hitch.
It’s taken me a full month to get prepared for the CCIE labs – and subsequently a full month to start studying. A whole month is a lot of time for extra learning, cramming and exam preparation, but it shouldn’t come to effect me too much – but now its time to roll.
Now here’s the first update in many as things get underway…
The physical lab has been altered slightly to accomodate for the hardware and GNS setup. It is still based on a mix of physical and virtual equipment in the topology outlined in the Cisco CCIE R&S v4 Practice Lab 1. Unfortunately the 3550’s don’t support auto MDIX like the 3560’s do, so new 0.5M CAT6 cross over cables were purchased to cable the switches together.
Logically I did want to run a seperate management VLAN over the switches to get telnet access to them and save on cabling costs, but I’ve scrapped that idea due to possible issues in killing a switch or vty sessions whilst being remote. The only physical change this has caused is the purchase of new console cables (hardware specs further on).
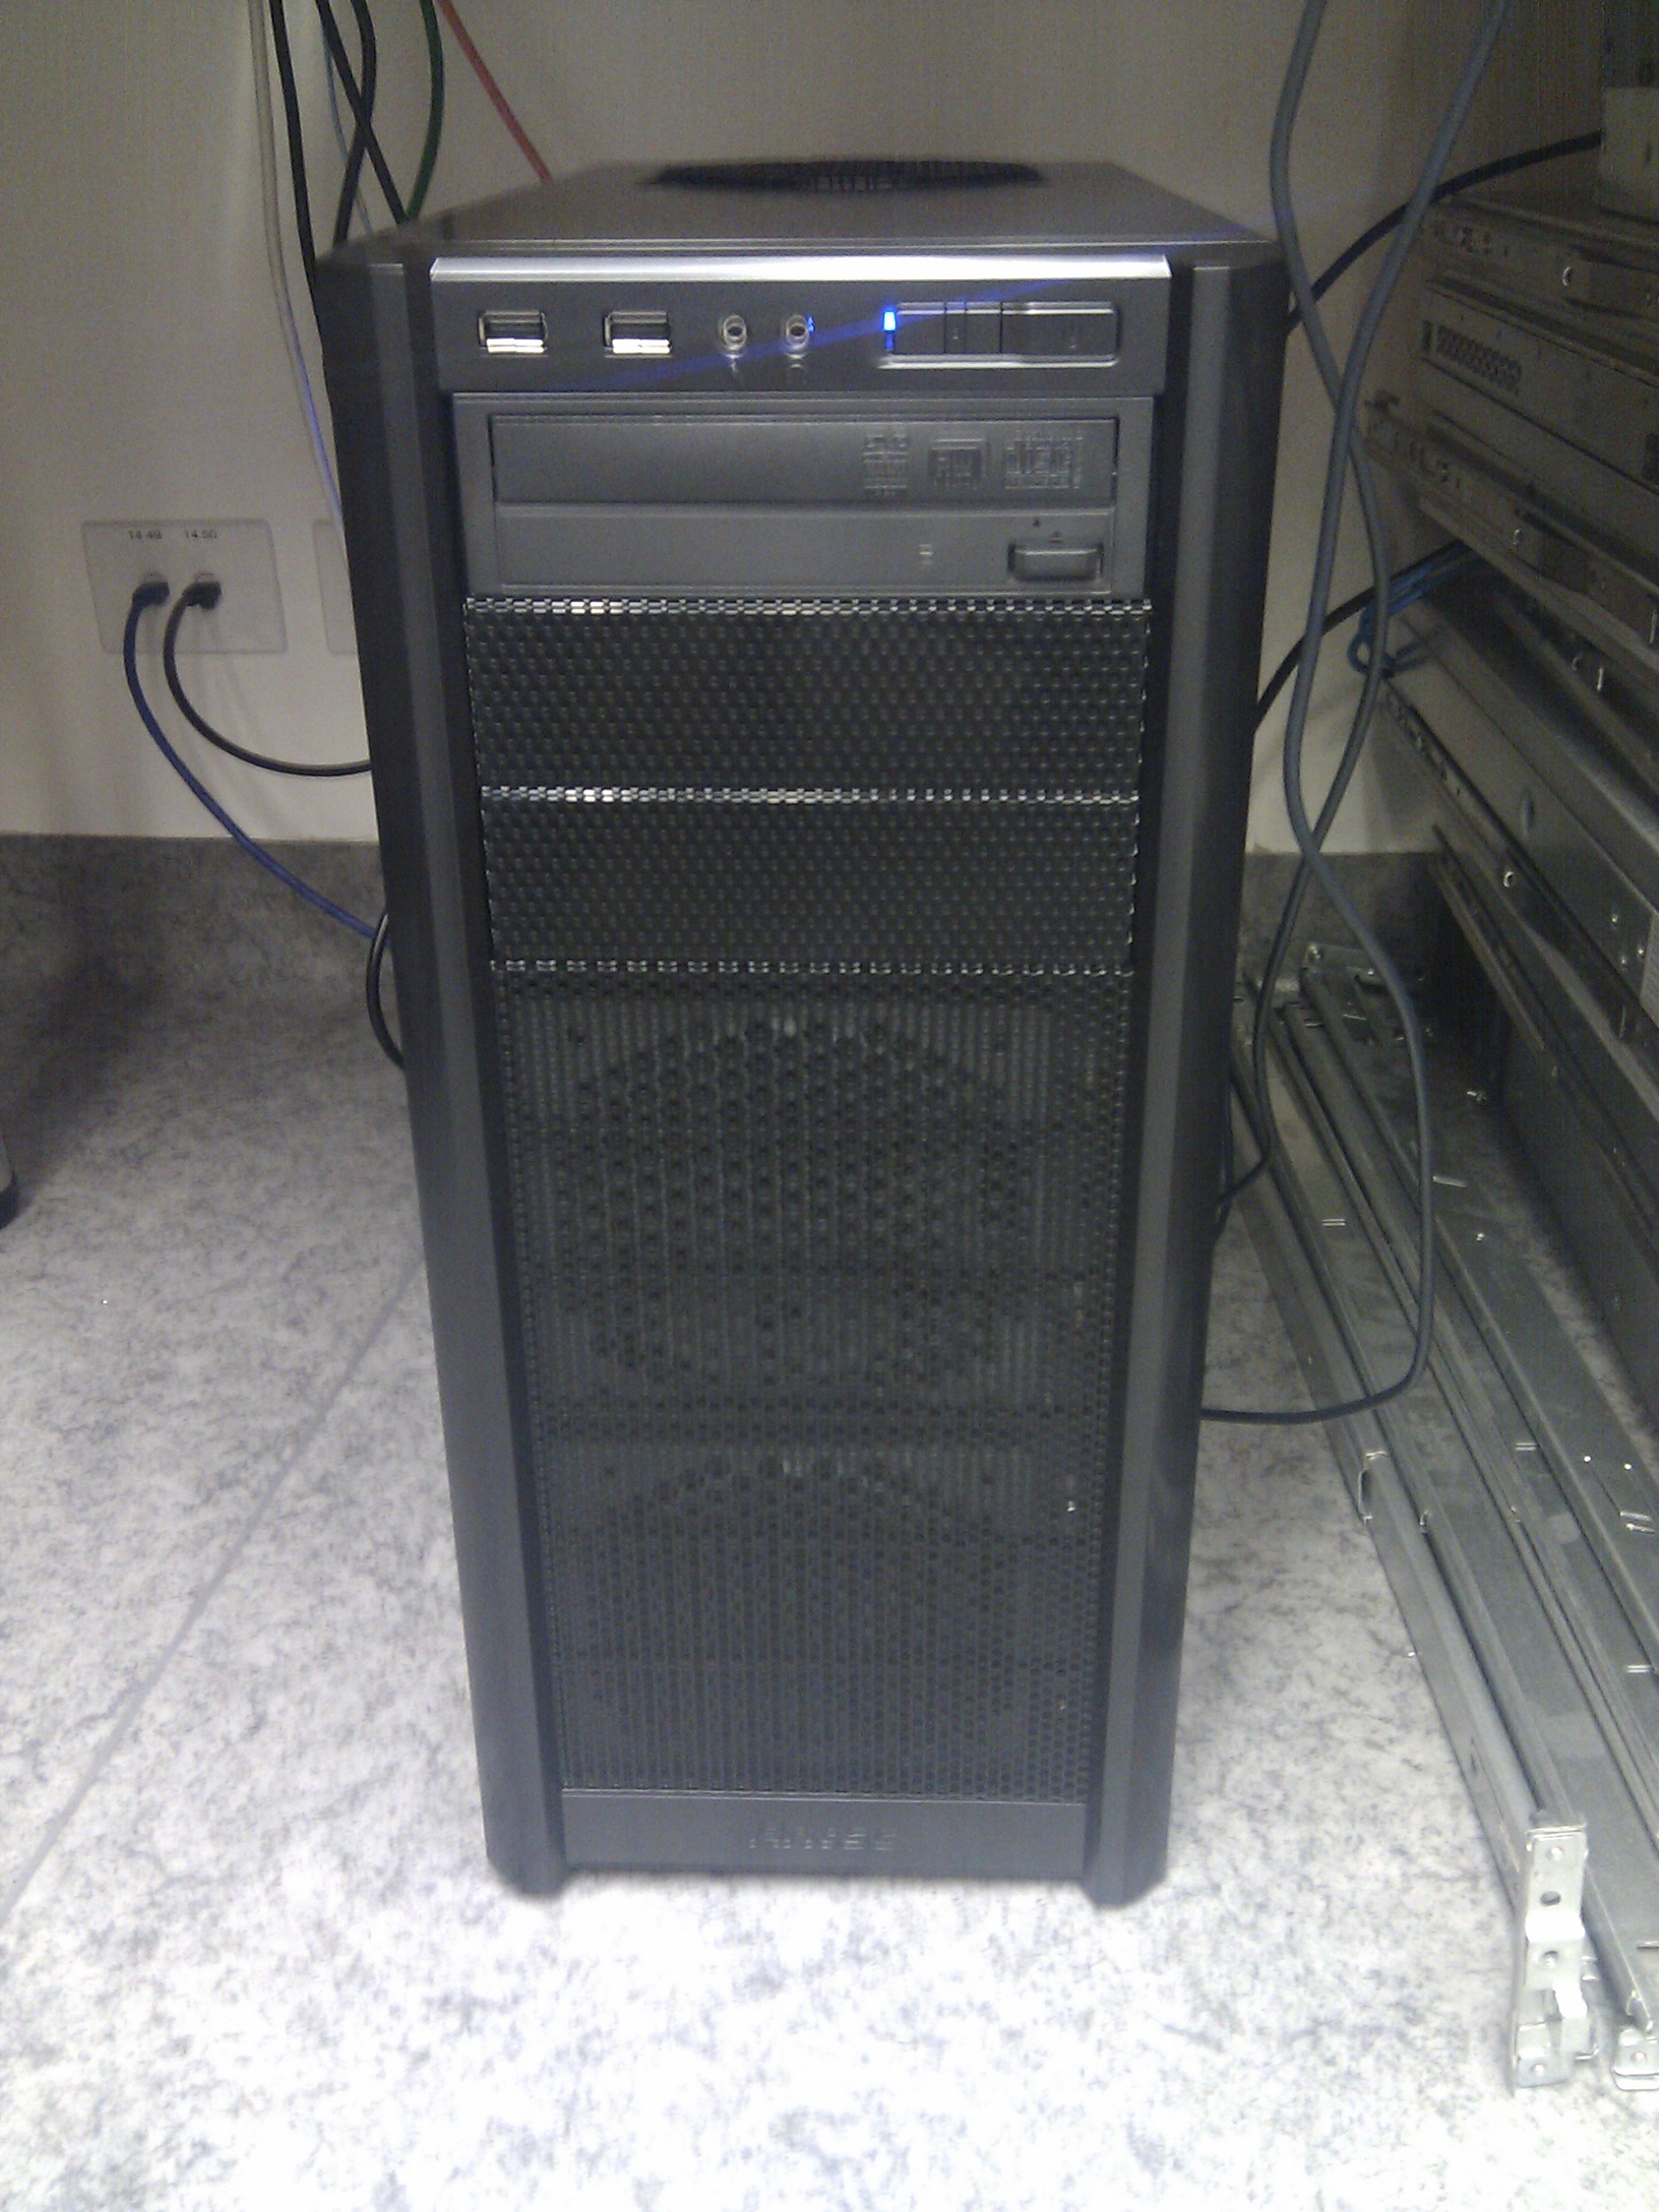
The GNS3 box has been configured up and is running happily. Instead of forking out ~$900 for a new i7 box I’ve reused an old AMD x2 I had lying around. The only parts I needed for this was a new case, PSU and DVD drive, so I opted to try this first to keep costs down in the interrum. If the X2 (with mobo limited to 4gb) can’t handle the GNS load I’ll have to invest in a new i7 down the road (which wouldn’t be too bad as it could multitask as a F@H client when not being used) but for now were with the AMD.
Heres the hardware specs for those interested:
AMD Athlon64 X2 6000+
Asus M2N-MX
4x 1GB Kingston DDR2 in dual channel
D-Link DGE-530TX
As for software – I’ve got everything running inside Ubuntu 11.04 x64 Desktop. I wasn’t sure how external hypervisors linked to a trunked NIC work in GNS3, so I didn’t opt for the server version and instead I’m running GNS on screen. If I can figure out external hypervisors I may change this but for now it’s working well enough. The DGE-530TX worked out of the box with no special driver support needed and the vlan and 80211 packages are happy enough on top of it.
As many threads on the net suggest – GNS needs root permission in order to bind the Linux Ethernet NIO needed for trunk access. Both sudo and gksudo works when launching GNS, but I lost all the pretty skinning and icons – so I’ve logged in locally as root and running GNS from roots x11 session. This is definitely not best practice especially for boxes with internet accessible remote access, but for me this thing is only doing GNS so security issues don’t phase me.
As for console access I’m running 7 Astrotek USB to Serial Converter (205153). This seems to be detected natively however I forgot to check the dmesg output and loaded the prolific pl2303 driver anyway. The devices successfully register as /dev/ttyUSBX and my original thought was to use socat to bind a tcp port to the tty device. This worked to an extent. I’ve played a fair amount with the socat raw device options, but whatever I tried socat still liked to put double crlf and crnl at the end of lines. The major pain in this was I could not do a show run as the ouput was killed by the second crnl. For anyone interested in what I was trying with socat:
socat TCP4-LISTEN:8890 /dev/ttyUSB0,raw,b9600,cs8,parenb=0.
I have instead decided to setup script files that launch a minicom session. The only downside to this is I need multiple ssh sessions to the GNS box with each of them a minicom session, or kill and relaunch the minicom scripts as neeeded. Here’s one of the minicom script examples:
minicom -b 9600 -8 -D /dev/ttyUSB0
The rest of the software setup is pretty generic, I’ve just used tutes from googling on anything I’ve got stuck on regarding linux+GNS3 but the install and configure is pretty straight forward.
As an overview I’m running the below in physical/virtual:
Physical:
3550 – Breakout trunked to GNS PC
3725 – R4
3725 – R6
3550 – SW1
3550 – SW2
3550 – SW3
3550 – SW4
Virtual:
3725 – R1
3725 – R2
3725 – R3
3725 – R5
3725 – Frame Relay Switch
All switches are running c3550-ipbasek9-mz.122-35.SE5 and all routers are running c3725-adventerprisek9-mz.124-15.T14.
Below is the outline of the topology I’m working with. This is a just a physical overview except for the L2 logic when GNS becomes involved.
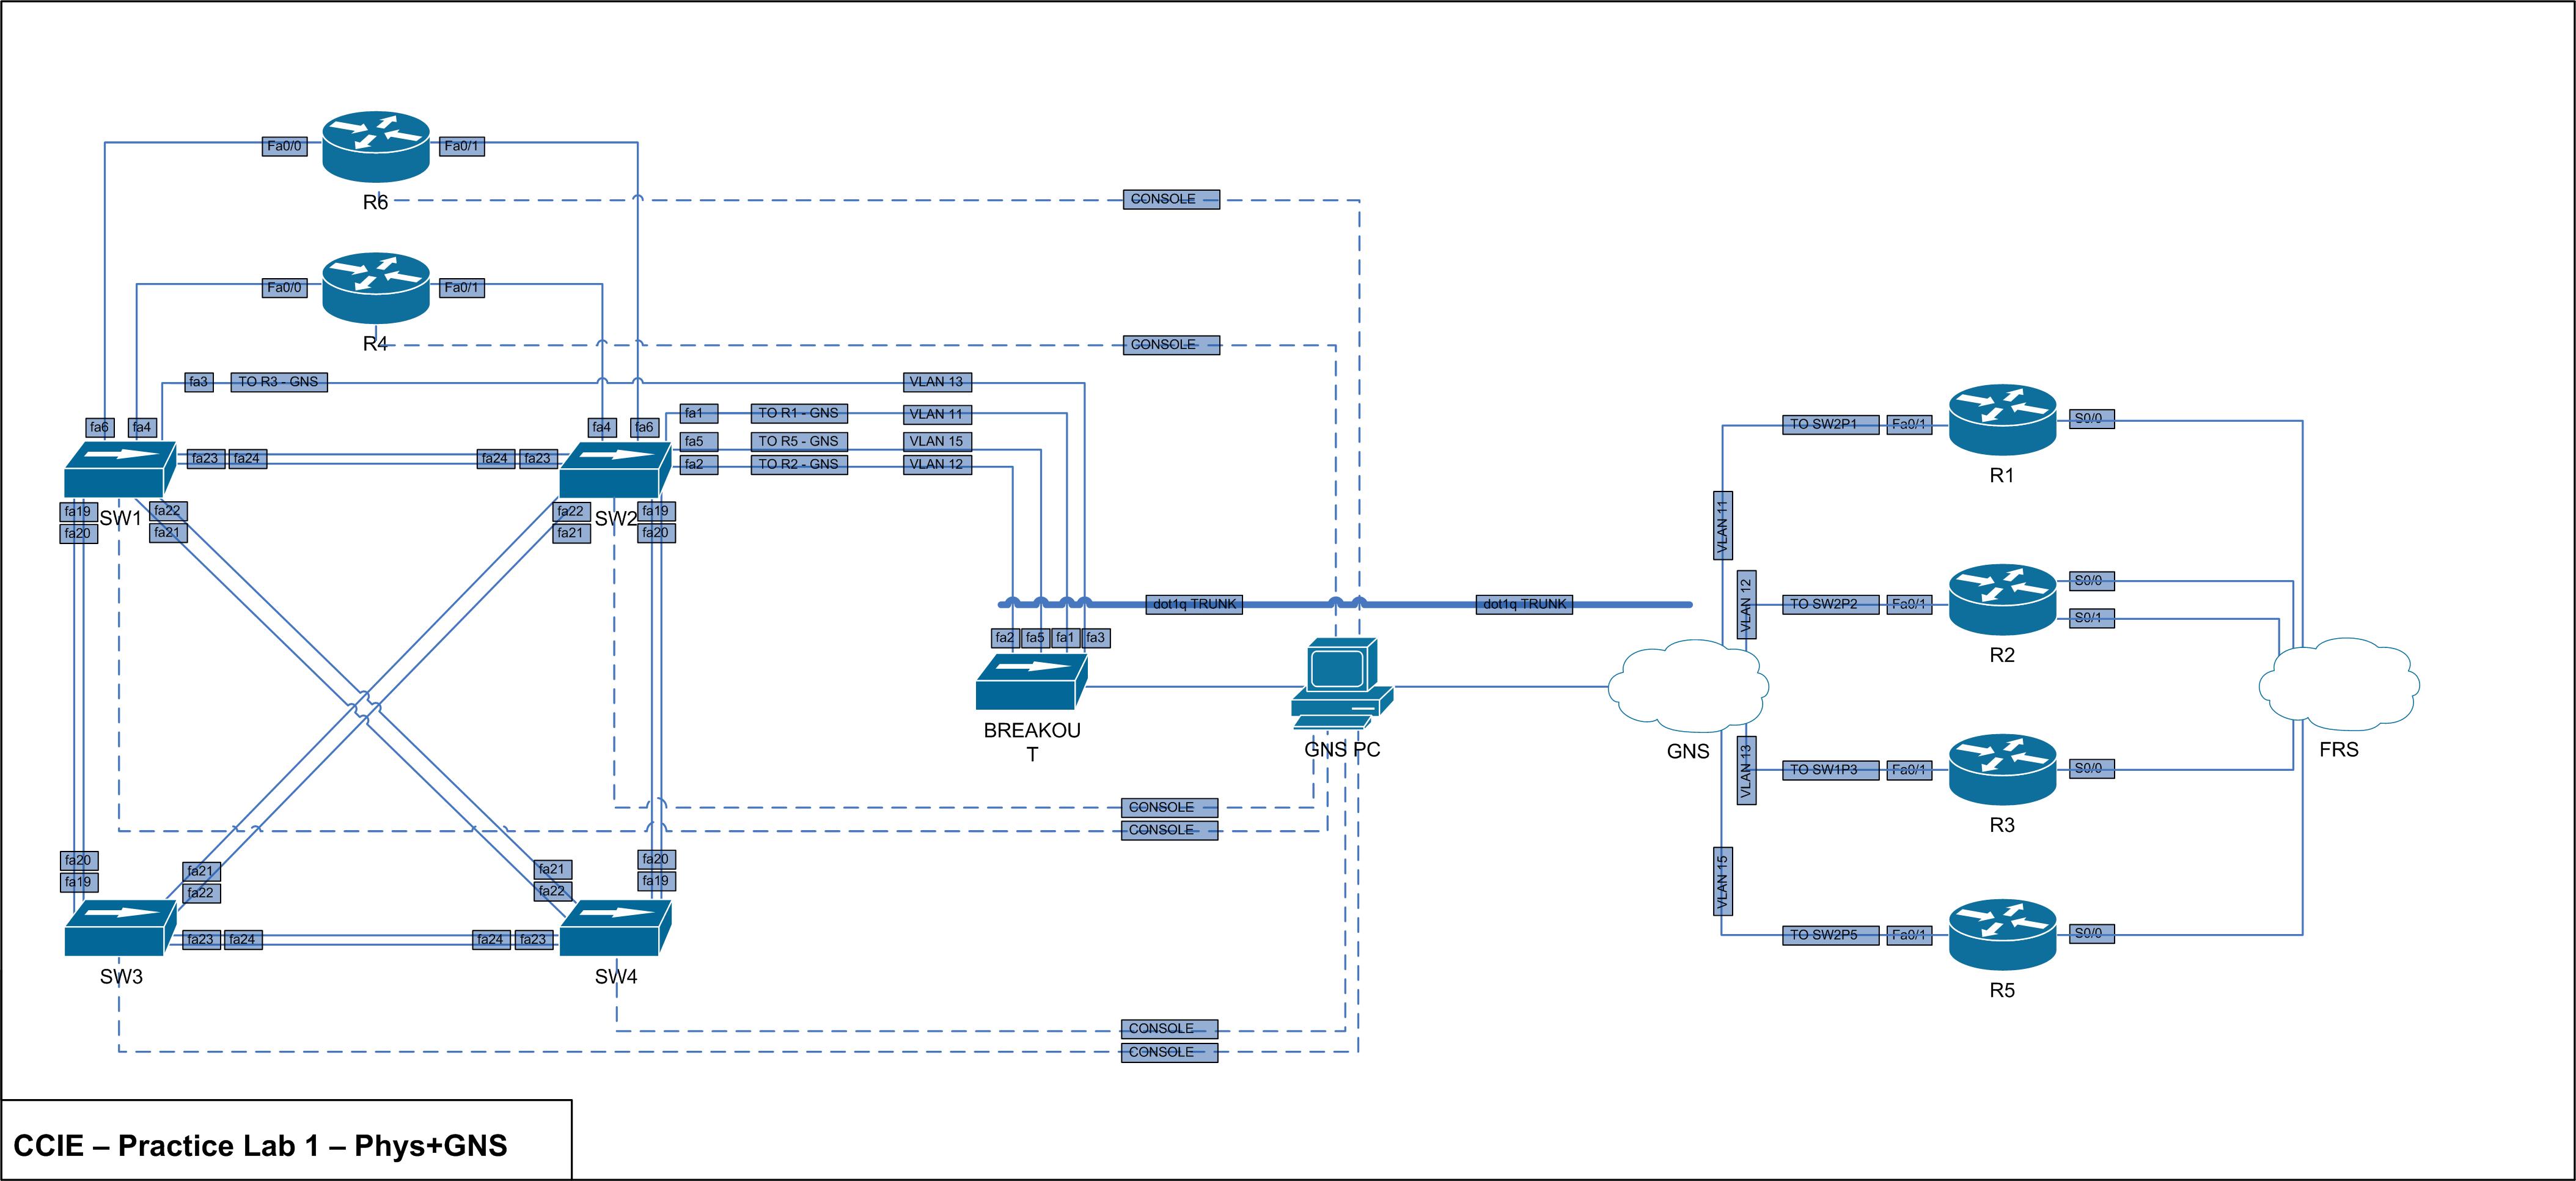
The total cost of the R&S is slowly rising:
Antec Three Hundred Tower Gaming Case – $65
Corsair CX-500 V2 500W Builder Series Power Supply $79.99
Sony AD7280SGB SATA Internal DOUBLE Layer Multiformat DVD Bunner $26.80
Sunix USB 2.0 PCI Card $15.90
Astrotek USB to Serial Converter x7 $144.20
Cabac 0.5M CAT6 Crossover – Not yet invoiced
Total: $331.89
I’m sure that cost is set to rise, especially if i hit a hardware barrier with either my GNS PC or running the 3550 switches.
I’ll be posting config examples that I’m using to connect everything up and just general rambling on the subject. Keep posted.
Well I’ve been massively lazy over the past year. I finished my CCNP and CCNASec but never did the certs, leaving my original CCNA to rot.
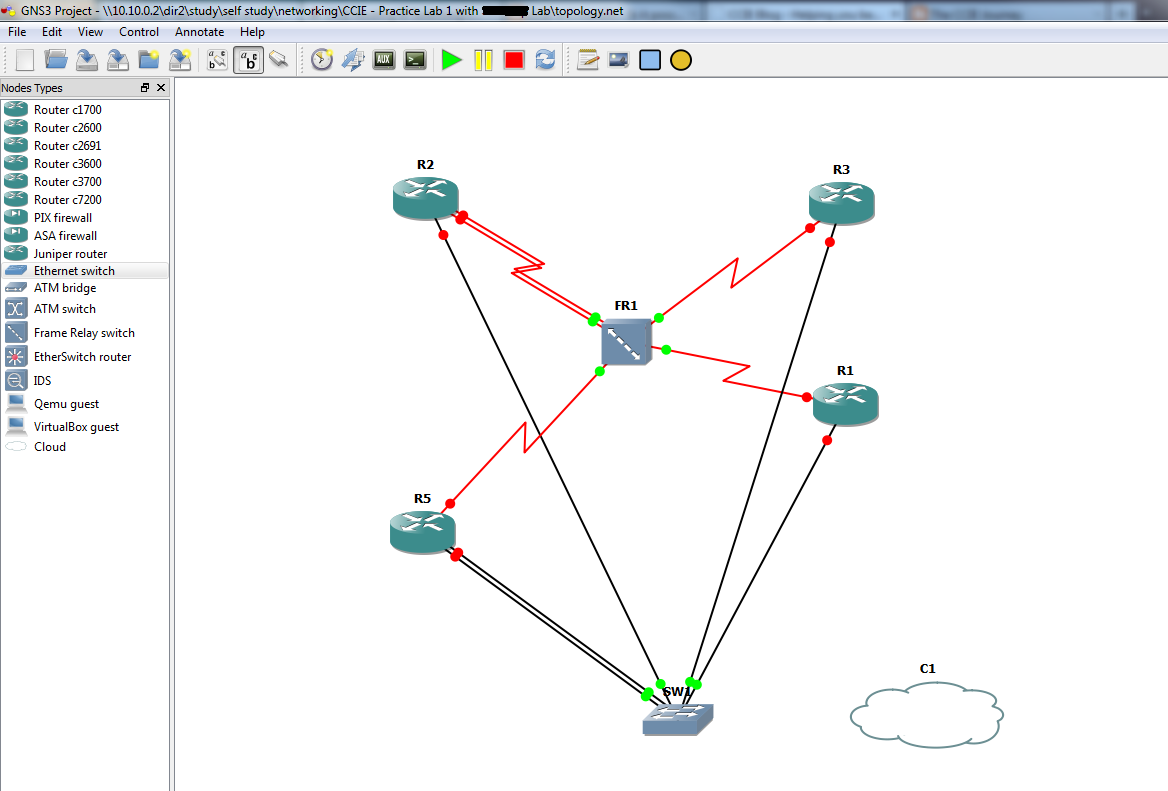
Now its time to study, finish and pass my CCIE R&S – in 6 months.
I’m sure there will be a lot of ranting and rambling here so keep hold while I throw myself at this.
In the meantime heres the first practice lab from the CCIE R&S v4 practice labs using a combo of 4x 3550’s 2x 3725’s and GNS using a trunked breakout switch.
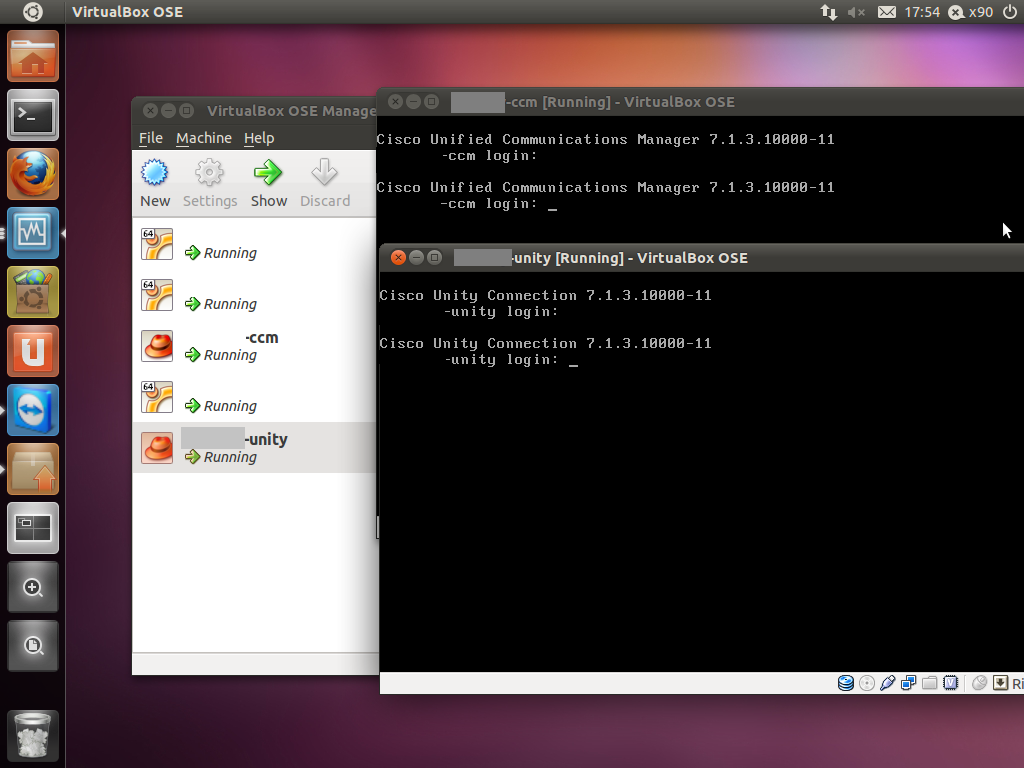
Recently I’ve upgraded my server hardware to support more RAM for the ever-expanding VM list that I’ve got. In the mix of doing this, I thought it would be a great time to install Cisco CallManager 7 in a virtual environment and get rid of CME from my 2621XM. I knew I wanted to move the host environment over to linux as it neatly allocates the 16GB of ram I put in it (rather than Win7 like previous) however I wasn’t sure on what I would use to run my VM’s. As the box I build was completely custom, ESXi wasn’t an option and I needed to run VMWare or (presumably) VirtualBox to get support of CallManager. VMWare haven’t released an update to their Server product in a long time so I was reluctant to load Server back on, so I gave VirtualBox a go. Before reading on, note, I have successfully installed and am currently running CallManager 7.1.3.10000-11 and Unity Connection 7.1.3.10000-11 (yes, its possible). I know 713 is old, I’m in the process of testing 8 and will post details shortly.
Here’s an overview of what I wanted to achieve.
– PSTN ADSL2 connection into modem/router
– PPPoE from 2621XM
– SIP trunk to provider
– IPSEC VPN Server
– Server running VirtualBox
– CCM7 with SIP trunk to 2621XM
– UC7 integrated with CCM7
Future plans are to have the new server run GNS to complete my CCIE R&S lab, so I’ll throw details up when I complete that.
The PSTN->MODEM->2621XM I have already preconfigured, but I’ll whack it here for shitsngigs anyway. It’s not a full config, but I’m sure most of it is self explanatory. NOTE, it also includes translations and dialpeers for the SIP trunk setup explained later.
2621XM+PPPoE+VPN
ip dhcp pool p100
network X.X.X.X 255.255.255.0
default-router X.X.X.X
dns-server 203.0.178.191
option 150 ip CCMIPADDR
!
ip dhcp pool p200
network X.Y.X.X 255.255.255.0
default-router X.Y.X.X
dns-server 203.0.178.191
!
!
vpdn enable
!
vpdn-group 1
! Default L2TP VPDN group
! Default PPTP VPDN group
accept-dialin
protocol any
l2tp tunnel receive-window 256
!
!
!
!
voice service voip
allow-connections sip to sip
sip
bind control source-interface FastEthernet0/1
bind media source-interface FastEthernet0/1
localhost dns:iinetphone.iinet.net.au
!
!
voice class codec 1
codec preference 1 g711ulaw
!
voice class codec 2
codec preference 1 g729r8
!
!
!
voice class h323 1
h225 timeout tcp establish 3
!
!
!
!
!
!
!
!
!
!
voice translation-rule 1
rule 1 /1000/ /02XXXXXXXX/
!
voice translation-rule 2
rule 1 /02XXXXXXXX/ /1000/
rule 2 /XXXXXXXX/ /1000/
!
voice translation-rule 3
rule 1 /^0*/ //
!
!
voice translation-profile sip-incoming
translate called 2
!
voice translation-profile sip-outgoing
translate calling 1
translate called 3
!
crypto isakmp policy 100
encr 3des
authentication pre-share
group 2
!
crypto isakmp client configuration group VPN
key XXX
dns 61.88.88.88
pool VPN_ADDRESSES
acl VPN
netmask 255.255.255.0
!
!
crypto ipsec transform-set VPN_SET esp-3des esp-md5-hmac
!
crypto dynamic-map VPN_MAP 1
set transform-set VPN_SET
reverse-route
!
!
crypto map VPN client authentication list LOCAL_AUTH
crypto map VPN isakmp authorization list LOCAL_AUTH
crypto map VPN client configuration address respond
crypto map VPN 100 ipsec-isakmp dynamic VPN_MAP
!
!
!
!
!
!
bba-group pppoe global
!
!
interface FastEthernet0/0
description LINK TO MODEM WAN SIDE
no ip address
duplex auto
speed auto
pppoe enable group global
pppoe-client dial-pool-number 1
no cdp enable
!
interface Serial0/0
no ip address
shutdown
!
interface FastEthernet0/1
description LINK TO SWITCH LAN SIDE
ip address X.X.X.X 255.255.255.0
ip nat inside
ip virtual-reassembly
duplex auto
speed auto
!
!
interface Virtual-Template1
mtu 1492
no ip address
ppp authentication chap
!
interface Dialer0
ip address negotiated
ip access-group WAN_IN in
ip access-group WAN_OUT out
ip nat outside
ip virtual-reassembly
encapsulation ppp
dialer pool 1
dialer-group 1
ppp authentication chap pap callin
ppp chap hostname XXXX
ppp chap password XXXX
ppp pap sent-username XXXX password XXXX
crypto map VPN
!
ip local pool VPN_ADDRESSES X.X.X.X X.X.X.X
ip forward-protocol nd
ip route 0.0.0.0 0.0.0.0 Dialer0
!
!
!
ip access-list extended NAT
remark DENY LOCAL TO VPN
deny   ip X.X.X.X 0.0.0.255 X.Z.X.X 0.0.0.255
remark DENY VPN TO LOCAL
deny   ip X.Z.X.X 0.0.0.255 X.X.X.X 0.0.0.255
remark PERMIT ALL ELSE
permit ip any any
ip access-list extended VPN
remark PERMIT LOCAL TO VPN
permit ip X.X.X.X 0.0.0.255 X.Z.X.X 0.0.0.255
remark PERMIT VPN TO LOCAL
permit ip X.Z.X.X 0.0.0.255 X.X.X.X 0.0.0.255
!
access-list 101 permit ip any any
dialer-list 1 protocol ip list 101
!
!
!
!
control-plane
!
!
!
!
!
sccp local FastEthernet0/1
sccp ccm CCMIPADDR identifier 1
sccp
!
sccp ccm group 1
bind interface FastEthernet0/1
associate ccm 1 priority 1
!
!
dial-peer voice 1 voip
description iiNet incoming to ccm
translation-profile incoming sip-incoming
destination-pattern ....
voice-class codec 1
session protocol sipv2
session target ipv4:CCMIPADDR
incoming called-number .T
dtmf-relay sip-notify rtp-nte
!
dial-peer voice 2 voip
description ccm outgoing to iiNet
translation-profile outgoing sip-outgoing
destination-pattern 0T
voice-class codec 1
session protocol sipv2
session target dns:sip.nsw.iinet.net.au
dtmf-relay sip-notify rtp-nte
!
!
sip-ua
credentials username 02XXXXXXXX password XXXX realm iinetphone.iinet.net.au
authentication username 02XXXXXXXX password XXXX realm iinetphone.iinet.net.au
no remote-party-id
retry invite 4
retry response 3
retry bye 2
retry cancel 2
retry register 5
timers register 300
mwi-server dns:sip.nsw.iinet.net.au expires 3600 port 5060 transport udp unsolicited
registrar dns:sip.nsw.iinet.net.au expires 3600
sip-server dns:sip.nsw.iinet.net.au
!
VirtualBox
For the linux host, I ended up going with Ubuntu 64bit. I really wanted to get away from Ubuntu and try fedora, but in the end I had a need to get this up and running as soon as possible for work resources, so I defaulted back to Ubuntu.
Installing VirtualBox is relatively straightforward:
wget http://download.virtualbox.org/virtualbox/4.1.4/virtualbox-4.1_4.1.4-74291~Ubuntu~natty_amd64.deb
apt-get install virtualbox-4.1_4.1.4-74291~Ubuntu~natty_amd64.deb
or you can add it to it your sources list using the following url
deb http://download.virtualbox.org/virtualbox/debian natty contrib
CCM7
Installing CallManager into VirtualBox took a bit of research and the following articles were imperative to getting it working:
http://blog.chackraview.net/2010/01/03/gain-root-access-on-cisco-unified-communication-manager/
http://ubuntuforums.org/showthread.php?t=1029144
http://iddles.co.uk/blogs/index.php/2010/02/cisco-cucmcall-manager-running-on-suns-virtual-box/
http://www.davidrickard.net/2008/12/12/callmanager-in-vmware/
http://www.markholloway.com/blog/?p=543
To start the process, the first thing that must happen is for CallManager to be installed in VMWare. Server, player whatever, you just need to install it and copy the vmdk file afterwards. I built all my VM’s using 2048MB of RAM and 80GB SCSI HDD’s. The install process took a fair while but it does successfully complete – as opposed to VirtualBox where it does not find a valid hardware platform at the hardware verification phase and the installation halts.
Once you’ve got the VMDK files from VMWare, create a new VM in VirtualBox with the following specs:
– 2048MB RAM
– EF – IO APIC
– EF – HW clock in UTC time
– EF – PAE/NX
– HWV – VT-x/AMD-V (if your processor supports it. fyi im running on an i7)
– Mount the VMDK on a Lsilogic SCSI controller
– Mount the CentOS disk as outlined in Chackra Blog (note, I used CentOS-5.6-i386-bin-1of7.iso which worked fine)
– Enable Serial Port COM1 (this I found resolved kernel errors that were showing on the VM that I googled and found a link to the Cisco support forum (sorry can’t find link to give credit atm)
Boot the VM off of the CentOS disk follow the VirtualBox hardware config as outlined in the Ubuntu support forums, and then follow Chackra Blog’s guide to gaining root. The below is an except, full cred goes to those on the Ubuntu forums and Chackra’s blog.
– Issue from a root shell:
VBoxManage setextradata "<VM name>" "VBoxInternal/Devices/pcbios/0/Config/DmiBIOSVersion" "6
VBoxManage setextradata "<VM name>" "VBoxInternal/Devices/pcbios/0/Config/DmiSystemVendor" "VMware"
VBoxManage setextradata "<VM name>" "VBoxInternal/Devices/pcbios/0/Config/DmiBIOSVendor" "Phoenix Technologies LTD"
VBoxManage setextradata "<VM name>" "VBoxInternal/Devices/pcbios/0/Config/DmiSystemProduct" "VMware Virtual Platform"
– Once the VM has booted to the CentOS disk type linux rescue
– You don’t need to start networking
– Change to your CCM disk by issuing chroot /mnt/sysimage
– Issue chattr -i /etc/passwd /etc/group /etc/shadow /etc/gshadow
– useradd YOURUSER (NOTE, this user should NOT be the same as your platform or application username. For example my platform and application username is x90, but my linux user is x90root)
– passwd YOURUSER
– chmod 666 /etc/sudoers
– vi /etc/sudoers
– At the end of the file add:
YOURUSER ALL=(ALL) ALL
– chattr +i /etc/passwd /etc/group /etc/shadow /etc/gshadow
– chmod 444 /etc/sudoers
– Restart your VM
If you now SSH to you CCM, log in as the new user that you created and you will notice that it drops you to a regular bash shell instead of the CCM shell. You’re now free to edit files on the box, including those doing the HW verification 😉
Next we need to edit the hardware validation script. The below is an except, full cred goes to Kevster’s blog.
– vi /usr/local/bin/base_scripts/hardware_check.sh
– Look for the check_deployment function and edit accordingly:
function check_deployment()
{
local tmp_deployment

initProductLibrary
tmp_deployment="$deployment"

# Check the deployment
#    isHardwareValidForDeployment $tmp_deployment
#    rc=$?
#   if [ $rc -ne 0 ]; then
#         log info "$tmp_deployment deployment Not Supported"
#         return 1
#    fi
# Deployment is supported by this hardware
log info "$tmp_deployment deployment Is Supported"
return 0
}
Restart the VM. NOTE, both my CCM and UC do not shut down cleanly – they both get to a point and produce a massive amount of errors. Once it hits this stage, I force shut the VM. So far, I’ve never had a problem with doing this.
Once the VM restarts, it will take a long while before the services become ready (or at least for me). Unity Connection especially takes 15mins ish to fully start and register with CCM.
Now onto the CCM->2621XM SIP trunk.
Take a look at the config above to see how the dial-peers and translations work. NOTE, i’m using dummy internal numbers, that are translated to the real number at the SIP GW. This is why there are translation rules on the GW. I could probably achieve this in CUCM, but this is the way I’ve done it for now. Also note that I’m using 0 as my dialout code, so this is stripped through a translation too.
The SIP trunk in CUCM is actually one of the easiest parts of the setup. It’s really just a matter of building the RP, RL and RG information and adding a new SIP trunk with the local interface of the router as the SIP server. As long as you’ve got allow-connections sip to sip in your voice service, there shouldn’t be any reason why you can’t route calls out via the external SIP provider.
Using this config, I’ve successfully registered my 7940 handset and IP communicator locally and over VPN and been able to route calls. Voicemail works without a problem, however I haven’t done anything too funky yet, mainly just testing integration of the ports. From what I can see, processor usage is reasonably minimal and RAM usage against 16GB is negligible, so it should be able to handle the 10 DLU’s included with the VM copy without a problem. However if more is needed, I’m sure if you think about the way Cisco does it’s licensing you’ll be able to go past the 10 without a problem.