2. Recovering vSphere and Platform Services Controller from Recovery Mode
3. Running Ollama on multiple-GPUs without AVX/AVX2
4. pfSense IKEv2 VPN with Microsoft NPS, AD Auth and MFA
5. Azure ARC Bulk Powershell Enrolment
I recently had to upgrade older Ubuntu distributions from 18.04->20.04->22.04->24.04 which had Nagios running on them.
Between 20.04 and 22.04 libssl has had a version change which breaks Nagios from starting once the OS has been upgraded. This is a pretty common problem with lots of different software breaking because of libssl after upgrades.
Nagios specifically breaks with:
/usr/local/nagios/bin/nagios: error while loading shared libraries: libssl.so.1.1: cannot open shared object file: No such file or directory.
The easiest way to recover from this is to just rebuild from source:
./configure --with-nagios-user=nagios --with-nagios-group=nagcmd --with-openssl
make all
sudo make install
sudo make install-init
sudo make install-commandmode
sudo systemctl restart nagios
sudo systemctl status nagios
Apache also requires new modules for PHP as 8.1 with 22.04 and 8.3 with 24.04 was introduced during the upgrade. That change is pretty straight forward to enable support for it in Apache:
sudo a2enmod php8.1
or
sudo a2enmod php8.3
I had a SAN which went into emergency mode the other day which caused running VM's in vSphere to either pause or to mark disks in read only mode. Most problematic to this was the actual vSphere guest VM and the Platform Services Controller VM. Both of these marked /dev/sda3 as read only and on a forced reboot they entered Recovery Mode.
Luckily for me running a fsck successfully recovered the disk. I used the details from here which worked perfectly. For brevity all it was was:
e2fsck -y /dev/sda3
I have been playing extensively with LLM's, especially self-hosting models to experiment with different models, prompts and their sentiments.
Using Ollama has been one of the quickest ways to get running with local models but it also offers some nice features like API support.
I have a multi-GPU machine running 5x GeForce 1060's, which whilst older, still perform well for a lab environment. Unfortunately the CPU running the system is a cheap Celeron processor which doesn't have AVX or AVX2 support which is needed for Ollama to run GPU inference on. This took me ages to find to understand why GPU inference wasn't supported even though CUDA showed the 5x 1060's. Some of the output I was seeing was:
time=2024-09-26T03:41:50.015Z level=INFO source=common.go:49 msg="Dynamic LLM libraries" runners="[cpu cpu_avx cpu_avx2 cuda_v11 cuda_v12 rocm_v60102]"
time=2024-09-26T03:41:50.020Z level=INFO source=gpu.go:199 msg="looking for compatible GPUs"
time=2024-09-26T03:41:50.035Z level=WARN source=gpu.go:224 msg="CPU does not have minimum vector extensions, GPU inference disabled" required=avx detected="no vector extensions"
time=2024-09-26T03:41:50.035Z level=INFO source=types.go:107 msg="inference compute" id=0 library=cpu variant="no vector extensions" compute="" driver=0.0 name="" total="15.6 GiB" available="14.9 GiB"
You can see that GPU inference gets disabled because the CPU doesn't meet AVX requirements. This is a different output from what I've seen on some bug trackers, I am not sure if it's a version change or perhaps my CPU reports differently, but underlying issue is the same.
Luckily there is an ongoing Github issue - https://github.com/ollama/ollama/issues/2187 which is tracking the need for AVX/2 even to run on GPU. In that thread there are a few workarounds based on the version of Ollama you're using. On v0.3.12 I modified:
gpu/cpu_common.go I added a new line below line 15 to: return CPUCapabilityAVX
llm/generate/gen_linux.sh I commented out line 54 and added a new line below to: COMMON_CMAKE_DEFS="-DBUILD_SHARED_LIBS=off -DCMAKE_POSITION_INDEPENDENT_CODE=on -DGGML_NATIVE=off -DGGML_AVX=off -DGGML_AVX2=off -DGGML_AVX512=off -DGGML_FMA=off -DGGML_F16C=off -DGGML_OPENMP=off"
Once you build from source this bypasses the AVX/2 checks and you can run on GPU. When you run ollama now you can see:
time=2024-09-26T05:49:07.785Z level=INFO source=common.go:49 msg="Dynamic LLM libraries" runners="[cpu_avx2 cuda_v12 cpu cpu_avx]"
time=2024-09-26T05:49:07.786Z level=INFO source=gpu.go:199 msg="looking for compatible GPUs"
time=2024-09-26T05:49:08.703Z level=INFO source=types.go:107 msg="inference compute" id=GPU-e2f3f39f-9a70-1d92-f7da-25ab5291fda8 library=cuda variant=v12 compute=6.1 driver=12.6 name="NVIDIA GeForce GTX 1060 6GB" total="5.9 GiB" available="5.9 GiB"
time=2024-09-26T05:49:08.703Z level=INFO source=types.go:107 msg="inference compute" id=GPU-39bccb3b-5d42-81d2-5f84-ede96f34c3e6 library=cuda variant=v12 compute=6.1 driver=12.6 name="NVIDIA GeForce GTX 1060 6GB" total="5.9 GiB" available="5.9 GiB"
time=2024-09-26T05:49:08.703Z level=INFO source=types.go:107 msg="inference compute" id=GPU-58a48fa9-8b0f-5691-8a71-51e761b4fddc library=cuda variant=v12 compute=6.1 driver=12.6 name="NVIDIA GeForce GTX 1060 6GB" total="5.9 GiB" available="5.9 GiB"
time=2024-09-26T05:49:08.703Z level=INFO source=types.go:107 msg="inference compute" id=GPU-3176d686-d810-04ca-fbda-8f0340bb8faf library=cuda variant=v12 compute=6.1 driver=12.6 name="NVIDIA GeForce GTX 1060 6GB" total="5.9 GiB" available="5.9 GiB"
time=2024-09-26T05:49:08.703Z level=INFO source=types.go:107 msg="inference compute" id=GPU-d09f4bbc-cf74-dc70-8c22-4898d8267937 library=cuda variant=v12 compute=6.1 driver=12.6 name="NVIDIA GeForce GTX 1060 6GB" total="5.9 GiB" available="5.9 GiB"
time=2024-09-26T05:50:03.095Z level=INFO source=sched.go:730 msg="new model will fit in available VRAM, loading" model=/home/x/.ollama/models/blobs/sha256-ff1d1fc78170d787ee1201778e2dd65ea211654ca5fb7d69b5a2e7b123a50373 library=cuda parallel=4 required="16.7 GiB"
time=2024-09-26T05:50:03.095Z level=INFO source=server.go:103 msg="system memory" total="15.6 GiB" free="14.9 GiB" free_swap="4.0 GiB"
Depending on the size of the model you can see Ollama load the model into the GPU's, and when running inference it seems to stripe the query across the cards, although I'm sure that this is just a symptom of memory registers rather than actual striping workload.
You can check the usage, card status etc on nvidia-smi:
x@x:~$ nvidia-smi
Thu Sep 26 05:50:53 2024
+-----------------------------------------------------------------------------------------+
| NVIDIA-SMI 560.35.03              Driver Version: 560.35.03      CUDA Version: 12.6     |
|-----------------------------------------+------------------------+----------------------+
| GPU  Name                 Persistence-M | Bus-Id          Disp.A | Volatile Uncorr. ECC |
| Fan  Temp   Perf          Pwr:Usage/Cap |           Memory-Usage | GPU-Util  Compute M. |
|                                         |                        |               MIG M. |
|=========================================+========================+======================|
|   0  NVIDIA GeForce GTX 1060 6GB    Off |   00000000:02:00.0 Off |                  N/A |
|  0%   44C    P5             11W /  180W |    2695MiB /   6144MiB |      0%      Default |
|                                         |                        |                  N/A |
+-----------------------------------------+------------------------+----------------------+
|   1  NVIDIA GeForce GTX 1060 6GB    Off |   00000000:03:00.0 Off |                  N/A |
|  0%   44C    P2             29W /  180W |    2097MiB /   6144MiB |      0%      Default |
|                                         |                        |                  N/A |
+-----------------------------------------+------------------------+----------------------+
|   2  NVIDIA GeForce GTX 1060 6GB    Off |   00000000:04:00.0 Off |                  N/A |
|  0%   41C    P2             28W /  180W |    2097MiB /   6144MiB |      0%      Default |
|                                         |                        |                  N/A |
+-----------------------------------------+------------------------+----------------------+
|   3  NVIDIA GeForce GTX 1060 6GB    Off |   00000000:05:00.0 Off |                  N/A |
|  0%   40C    P2             33W /  180W |    2097MiB /   6144MiB |      0%      Default |
|                                         |                        |                  N/A |
+-----------------------------------------+------------------------+----------------------+
|   4  NVIDIA GeForce GTX 1060 6GB    Off |   00000000:06:00.0 Off |                  N/A |
|  0%   35C    P8              5W /  180W |    1927MiB /   6144MiB |      0%      Default |
|                                         |                        |                  N/A |
+-----------------------------------------+------------------------+----------------------+

+-----------------------------------------------------------------------------------------+
| Processes:                                                                              |
|  GPU   GI   CI        PID   Type   Process name                              GPU Memory |
|        ID   ID                                                               Usage      |
|=========================================================================================|
|    0   N/A  N/A      1445      C   ...unners/cuda_v12/ollama_llama_server       2688MiB |
|    1   N/A  N/A      1445      C   ...unners/cuda_v12/ollama_llama_server       2090MiB |
|    2   N/A  N/A      1445      C   ...unners/cuda_v12/ollama_llama_server       2090MiB |
|    3   N/A  N/A      1445      C   ...unners/cuda_v12/ollama_llama_server       2090MiB |
|    4   N/A  N/A      1445      C   ...unners/cuda_v12/ollama_llama_server       1920MiB |
+-----------------------------------------------------------------------------------------+

- Add an authentication server with a type of RADIUS.
- Select the protocol as MS-CHAPv2.
- Create a shared secret.
- Make the Authentication Timeout as 60.
- The RADIUS NAS IP Attribute doesn’t seem to have any impact for me, but for cleanliness of MS Event Logs I set this to WAN.
- Key Exchange Version: IKEv2.
- Authentication Method: EAP-RADIUS.
- My Identifier: IP address (use the WAN Interface IP Address) or change this to the FQDN of your public cert.
- Peer Identifier: any
- My Certificate: use a newly created self-signed cert, or your public cert.
- Encryption Algorithms:
- AES256-GCM, 128bits, SHA256, 16
- AES256-GCM, 128bits, SHA256, 2
- AES, 256bits, SHA256, 14
- AES, 256bits, SHA1, 14
- MOBIKE: Enable
- Mode: Tunnel
- Local Network: expose your routes etc here
- Protocol: ESP
- Encryption Algorithms:
- AES, 256bits
- AES128-GCM, 128bits
- AES256-GCM, Auto
- Hash Algorithms:
- SHA256, SHA384, SHA512
- PFS Key Group: 14
- User Authentication: your RADIUS authentication server (NPS)
- Virtual Address Pool: Provide a virtual address
- RADIUS Advanced Parameters:
- Retransmit Timeout: 60
- Retransmit Tries: 1
- Network List: Ticked
- DNS Servers: Ticked
- Add a RADIUS Client
- The Address must be the internal interface of your pfSense
- Set the shared secret to what you set on the pfSense RADIUS secret config
- Add a new network policy
- Enable the policy
- Grant access
- Ignore user account dial-in properties: Ticked
- Conditions: setup for your liking, ie group membership
- Constraints: add an EAP Type of Microsoft: Secured password (EAP-MSCHAP v2) and set the number of Authentication retries to 1. You can remove all other authentication methods.
- Install the NPS extension for Microsoft Entra Multifactor Authentication.
- You can follow all the defaults here, there is nothing specific to RADIUS/pfSense
- In my environment I had to change the registry for the OTP settings. The Microsoft guide said that this is no longer needed, but I still had to do it.
- New String: HKLM\Software\Microsoft\AzureMFA value = FALSE
The Microsoft Azure landscape is changing drastically and it's doing a good job of moving resource management to a more modern view. Coupled with Microsoft's security initiatives (Intune, Defender, Sentinel, Copilots for Security), Azure ARC is a great way of managing on-prem servers for updates.
Microsoft has a few ways of enrolling on-prem machines into ARC, but it's tedious to do this without bulk enrolment. Currently they support Config Manager, Group Policy or Ansible bulk enrolment. There is a Powershell option, but I guess it's meant as a starting point for devs as it doesn't actually do much. Let's fix it and have it remote install via Powershell to domain joined machines.
Follow the initial steps of creating the subscription, resource group and service principal. Grab the latest "Basic Script" ie Powershell (as the below might be out of date) and wrap it around some Invoke-Command. Replace the values in <> that come from your script that it generates for you.
# Read machine names from CSV file
$machineNames = Import-Csv -Path "arc_machines.csv" | Select-Object -ExpandProperty MachineName
$credential = (Get-Credential)

# Iterate through each machine
foreach ($machineName in $machineNames) {
    try {
        # Invoke-Command to run commands in an elevated context on the remote machine
        Write-Host "Attempting to install on $machineName"
        Invoke-Command -ComputerName $machineName -Credential $credential -ScriptBlock {
            # Code to execute on the remote machine
            $ServicePrincipalId="";
            $ServicePrincipalClientSecret="";

            $env:SUBSCRIPTION_ID = "";
            $env:RESOURCE_GROUP = "";
            $env:TENANT_ID = "";
            $env:LOCATION = "";
            $env:AUTH_TYPE = "principal";
            $env:CORRELATION_ID = "";
            $env:CLOUD = "AzureCloud";

            [Net.ServicePointManager]::SecurityProtocol = [Net.ServicePointManager]::SecurityProtocol -bor 3072;

            # Download the installation package
            Invoke-WebRequest -UseBasicParsing -Uri "https://aka.ms/azcmagent-windows" -TimeoutSec 30 -OutFile "$env:TEMP\install_windows_azcmagent.ps1";

            # Install the hybrid agent
            & "$env:TEMP\install_windows_azcmagent.ps1";
            if ($LASTEXITCODE -ne 0) { exit 1; }

            # Run connect command
            & "$env:ProgramW6432\AzureConnectedMachineAgent\azcmagent.exe" connect --service-principal-id "$ServicePrincipalId" --service-principal-secret "$ServicePrincipalClientSecret" --resource-group "$env:RESOURCE_GROUP" --tenant-id "$env:TENANT_ID" --location "$env:LOCATION" --subscription-id "$env:SUBSCRIPTION_ID" --cloud "$env:CLOUD" --correlation-id "$env:CORRELATION_ID";
        }
    }
    catch {
        Write-Host "Error occurred while connecting to $machineName : $_" -ForegroundColor Red
    }
}
Next create the file arc_machines.csv with one column called MachineName and each row being the DNS/NETBIOS name of the machine you want to remote into. The script will ask for your domain creds when starting which will be used to Invoke-Command into the remote host. It'll then use the Service Principal to enroll the machine into ARC.
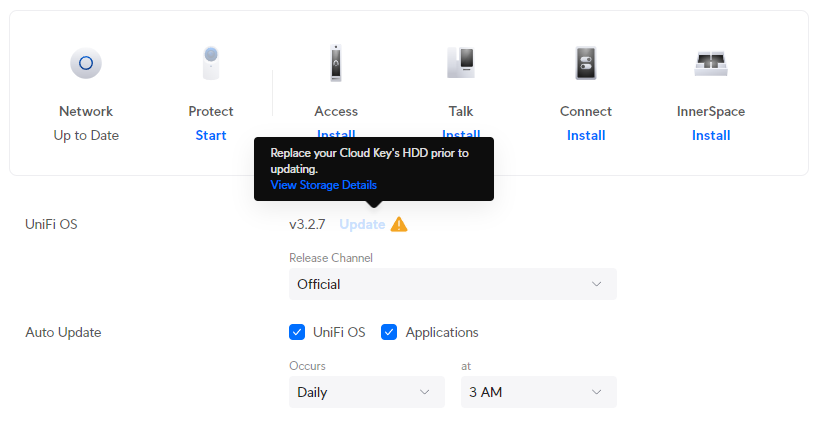
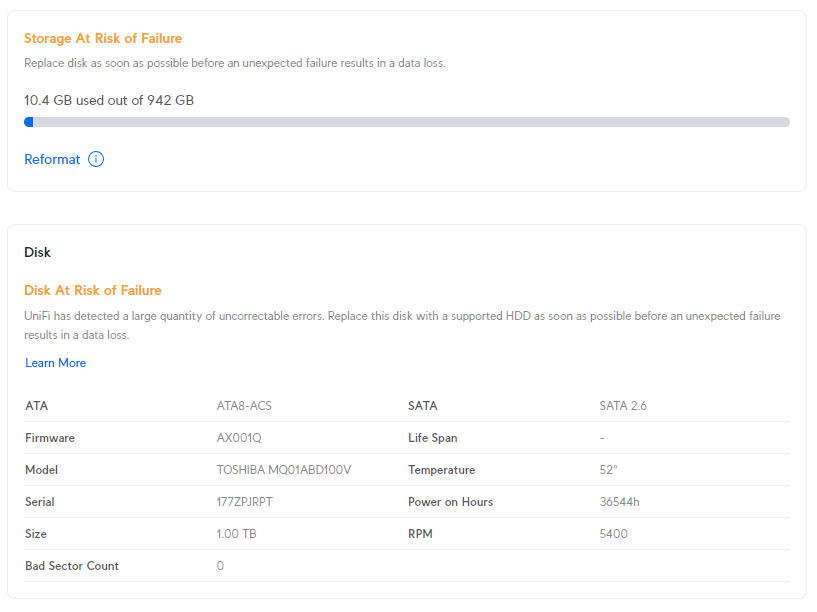
Ubiquiti Unifi OS devices now restrict updates to its own platform when it thinks a disk is unhealthy. This is the most pointless and infuriating UX change the Ubiquiti has made (and they've made a few terrible changes in the past).

At-risk disks are flagged:
- Bad sectors being reported on the disk
- Uncorrectable disk errors detected
- Failures reported in the disk’s Self-Monitoring, Analysis and Reporting Technology system (SMART)
- The disk has reached 70% of the manufacturer’s recommended read and write lifespan (SSDs)
To not allow updates to their own platform stagnates feature development, bug fixes and security enhancements. Sure, make the admin aware that they have an at-risk disk, but don't prevent them from getting your latest updates, that's just purposefully punishing your customers over things that are not their fault.
In my case, my disk was old, but still healthy. I am not sure whether the power on hours were a flag from SMART or maybe the temperature went over some arbitrary threshold they decided to implement.

I was able to work around this by manually upgrading the platform.
- Enable SSH on the controller
- Use the ubnt-systool and associated FW links as documented here: https://help.ui.com/hc/en-us/articles/204910064-UniFi-Advanced-Updating-Techniques
- Reboot and enjoy
If you don't want to pay for a Proxmox subscription you can still get updates through the no-subscription channel.
cd /etc/apt/sources.list.d
cp pve-enterprise.list pve-no-subscription.list
nano pve-no-subscription.list
Edit the pve-no-subscription.list to the below
deb http://download.proxmox.com/debian/pve bookworm pve-no-subscriptionRun updates, but only use dist-upgrade and not regular upgrade as it may break dependencies.
apt-get update
apt-get dist-upgradeI have a project where I routinely build and rebuild containers between two repos, in which one of the docker build steps pulls the latest compiled code from the others repo. When doing this, the Docker cache gets in the way as it caches the published code.
For example:
- Project 1 publishes compiled code to blob storage
- Project 2 pulls the compiled code and publishes a built container
Project 2's Dockerfile will look something like:
FROM ubuntu:22.04
RUN wget https://blob.core.windows.net/version-1.zip
RUN unzip /var/www/version-1.zip -d /var/www/
The issue is if I update the content of version-1.zip, Docker will cache this content in its build process and be out of date.
I came across a great solution on stackoverflow: https://stackoverflow.com/questions/35134713/disable-cache-for-specific-run-commands
This solution doesn't work completely for me, as I am using docker-compose up commands, not docker-compose build. However, after a little trial and error, I have the below workflow working:
FROM ubuntu:22.04
ARG CACHEBUST=1
RUN wget https://blob.core.windows.net/version-1.zip
RUN unzip /var/www/version-1.zip -d /var/www/
Run a build:
docker compose -f "docker-compose.yml" build --build-arg CACHEBUST=someuniquekeyRun an up:
docker compose -f "docker-compose.yml" up -d --buildThis way the first run Docker build is cache busted using whatever unique key you want, and the second Docker up uses the newly compiled cache. NOTE: you can omit the last --build to not trigger a new cached build if you like. Now I can selectively bust out of the cache at a particular step, which in a long Dockerfile, can save heaps of time. I guess you could even put multiple args at strategic places along your Dockerfile and be able to trigger a bust where it makes most sense.
du -shc * | sort -rhWSL is fantastic for allowing devs and engineers to mix and match environments and toolsets. It's saved me many times having to maintain VM's specifically for different environments and versions of software. Microsoft are doing a pretty good job these days at updating it to support new features and bug fixes, however, running WSL and Docker as a permanent part of your workflow it's not without it's flaws.
This post will be added to as I remember optimizations that I have used in the past, however, all of them are specific to running Linux images and containers, not Windows.
Keep the WSL Kernel up to date
Make sure to keep the WSL Kernel up to date to take advantage of all the fixes Microsoft push.
wsl --update
Preventing Docker memory hog
I routinely work from a system with 16GB of RAM and running a few docker images would chew all available memory through the WSL vmmem process which would in turn lock my machine. The best workaround I could find for this was to set an upper limit for WSL memory consumption. You can do this through editing the .wslconfig file in your Users directory.
[wsl2]
memory=3GB   # Limits VM memory in WSL 2 up to 3GB
processors=2 # Makes the WSL 2 VM use two virtual processors
You will need to reboot WSL for this to take effect.
wsl --shutdownNOTE: half memory sizes don't seem to work, I tried 3.5GB and it just let it run max RAM on the system.
Slow filesystem access rates
When performing any sort of intensive file actions to files hosted in Windows but accessed through WSL you'll notice it's incredibly slow. There are a lot of open cases about this on the WSL GitHub repo, but the underlying issue is how the filesystem is "mounted" between the Windows and WSL.
This bug is incredibly frustrating when working with containers that host nginx or Apache as page load times are in the multiple seconds irrespective of local or server caching. The best way around this issue is not have filesystem served from Windows, but serve it inside of the WSL distro. This used to be incredibly finicky to achieve but is easy now given the integration of tooling to WSL.
For example, say you have a single container that serves web content through Apache and that your development workflow means you have to modify the web content and see changes in realtime (ie React, Vue, webpack etc). Instead of building the docker container with files sourced from a windows directory, move the files to the WSL Linux filesystem (clone your Repo in Linux if you're working on committed files), then from the Linux commandline issue your build. Through the WSL2/Docker integration, the Docker socket will let you build inside of Linux using the Linux filesystem but run the container natively on your Windows host.
To edit your files inside the container, you can run VS Code from your Linux commandline which through the Code/WSL integration will let you edit your Linux filesystem.
Mounting into Linux FS
Keep in mind that if you do need to mount from Windows into your Linux filesystem for whatever reason you can do it via a private share that is automatically exposed.
\\wsl$If you have multiple distros installed they will be in their own directory under that root.
Tuning the Docker vhdx
Optimize-VHD -Path $Env:LOCALAPPDATA\Docker\wsl\data\ext4.vhdx -Mode FullThis command didn't do much for me. It took about 10minutes to run and only reduced my vhdx from 71.4GB to 70.2GB.
Error not binding port
I've had this recurring error every so often when restarting Windows and running Docker with WSL2. Every so often Docker compains it can't bind to a port that I need (like MySQL). Hunting down the cause of this is interesting - https://github.com/docker/for-win/issues/3171 - https://github.com/microsoft/WSL/issues/5306
The quick fix to this is:
net stop winnat
net start winnat