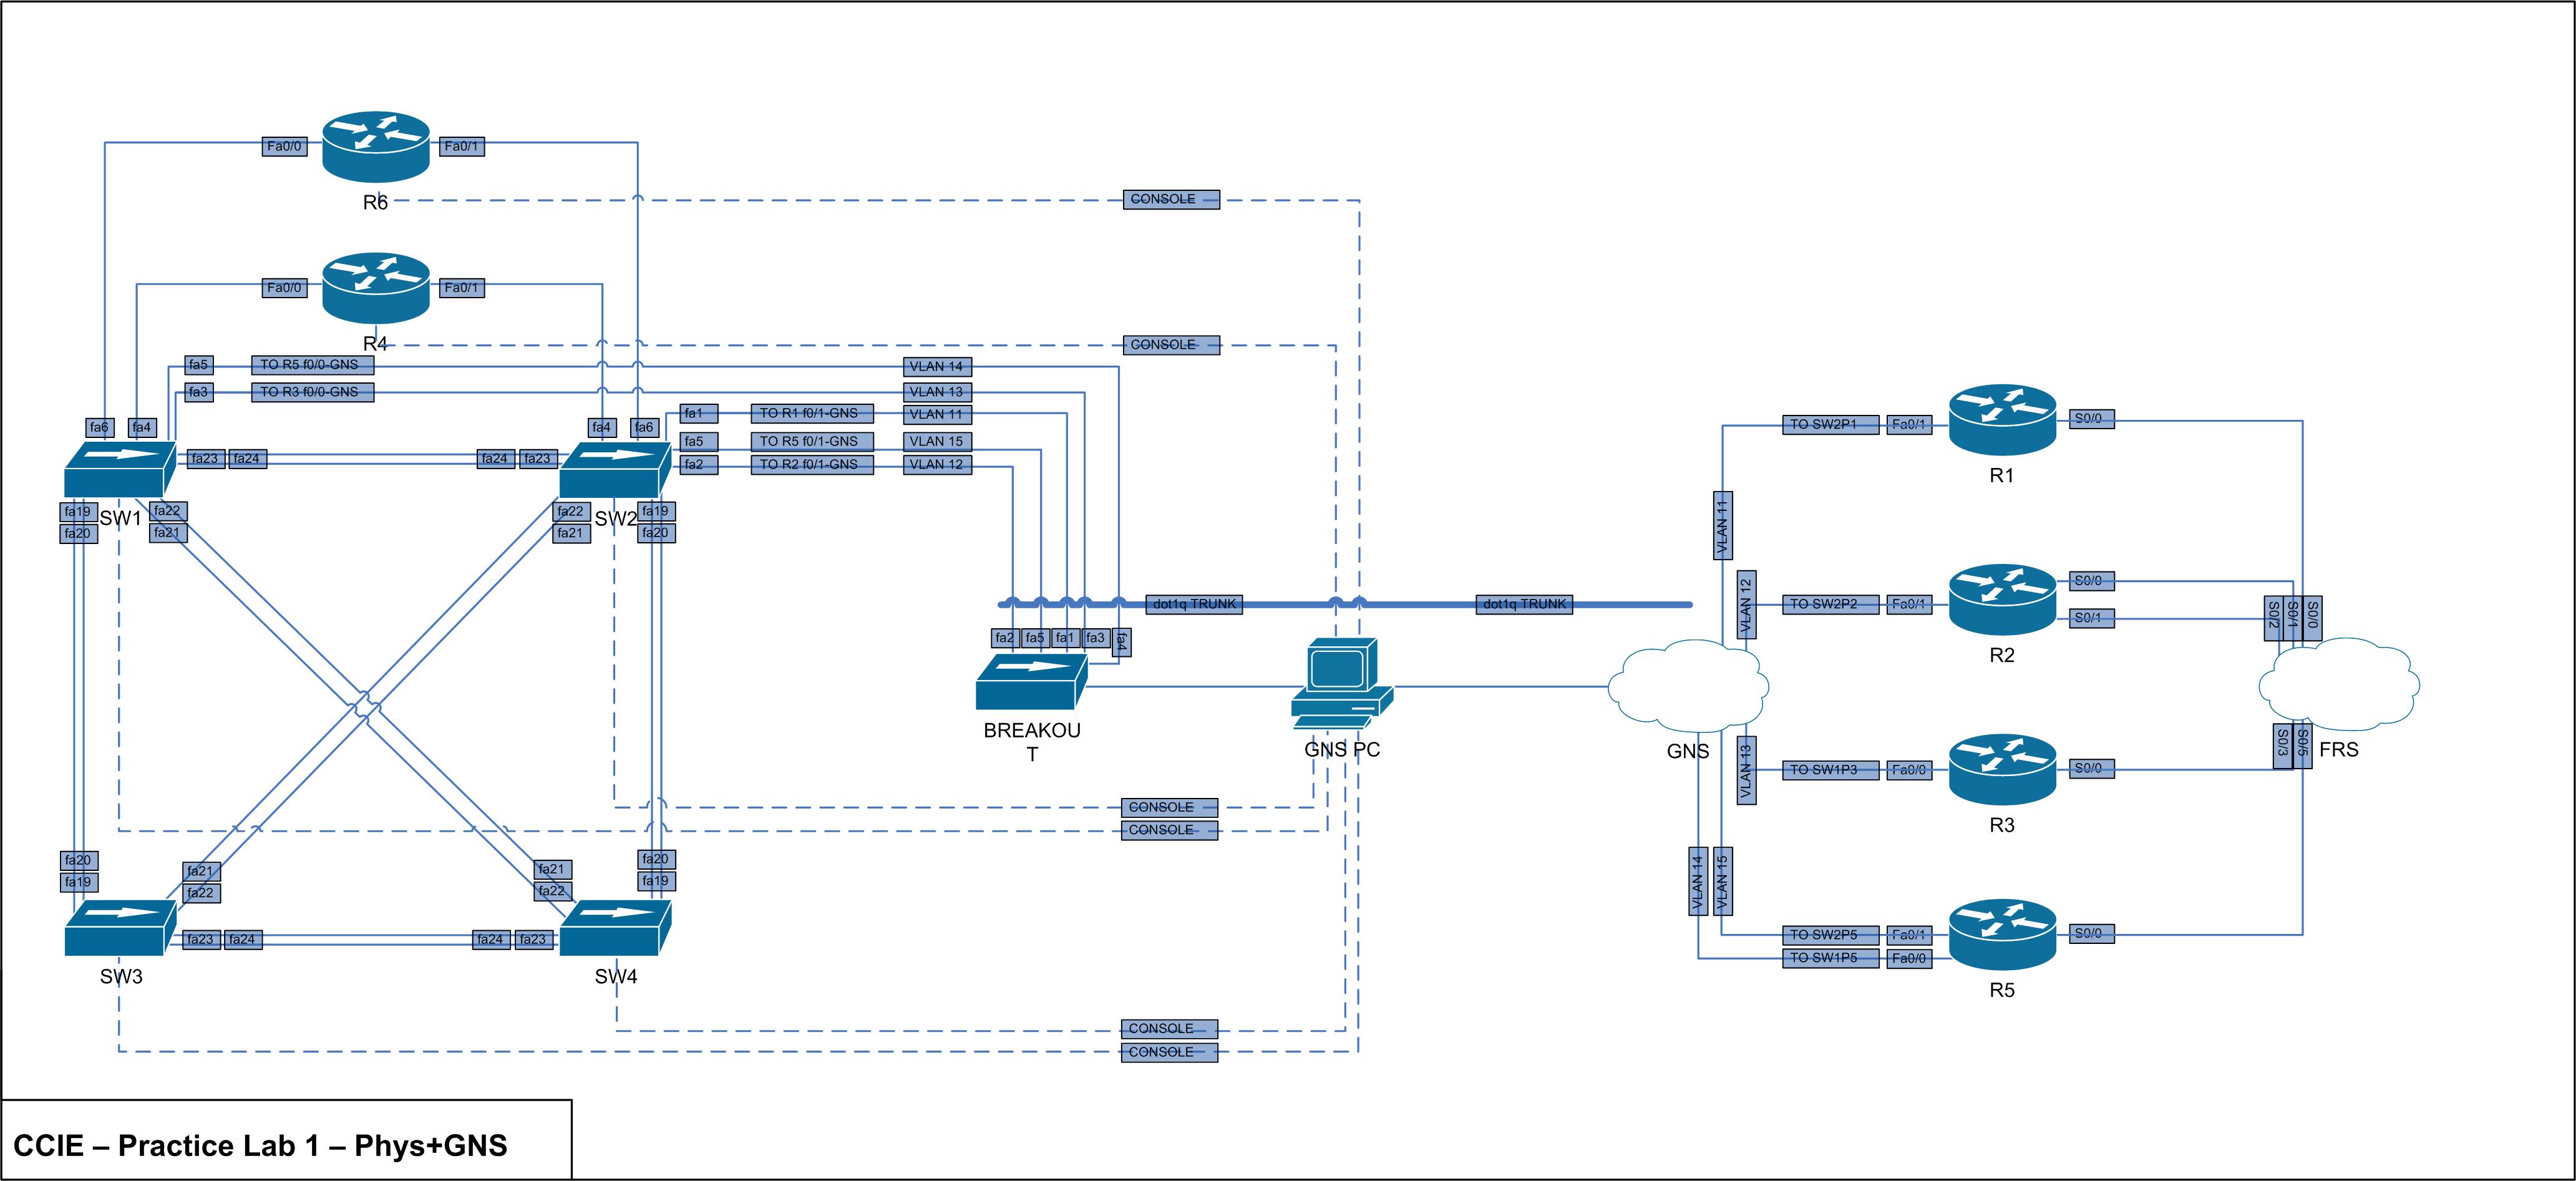
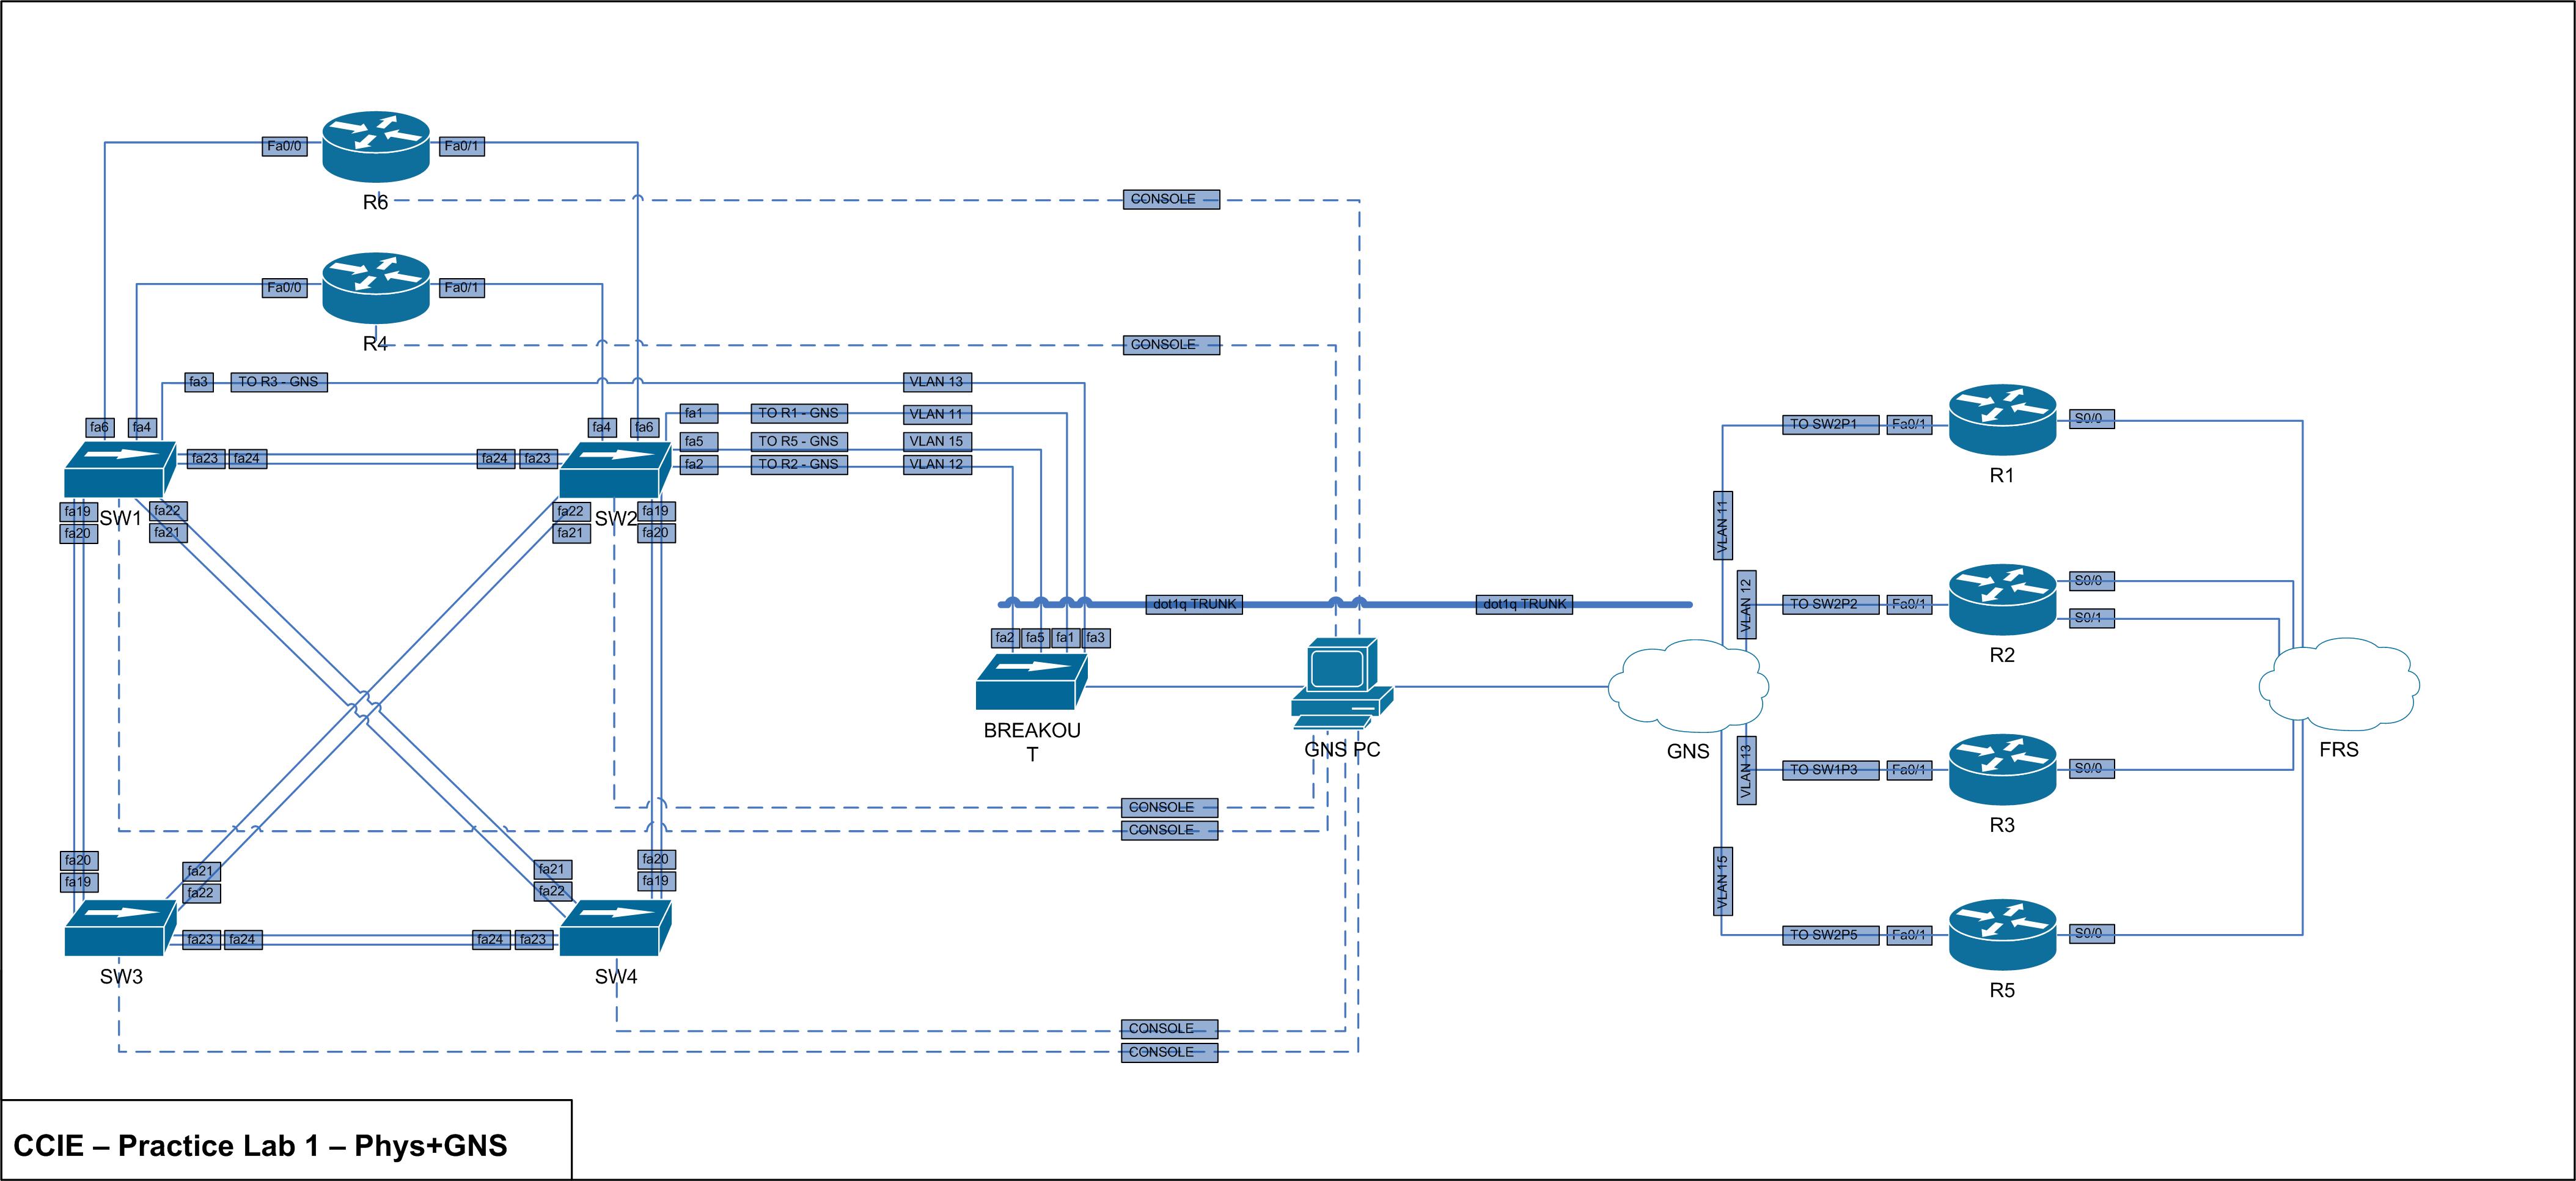
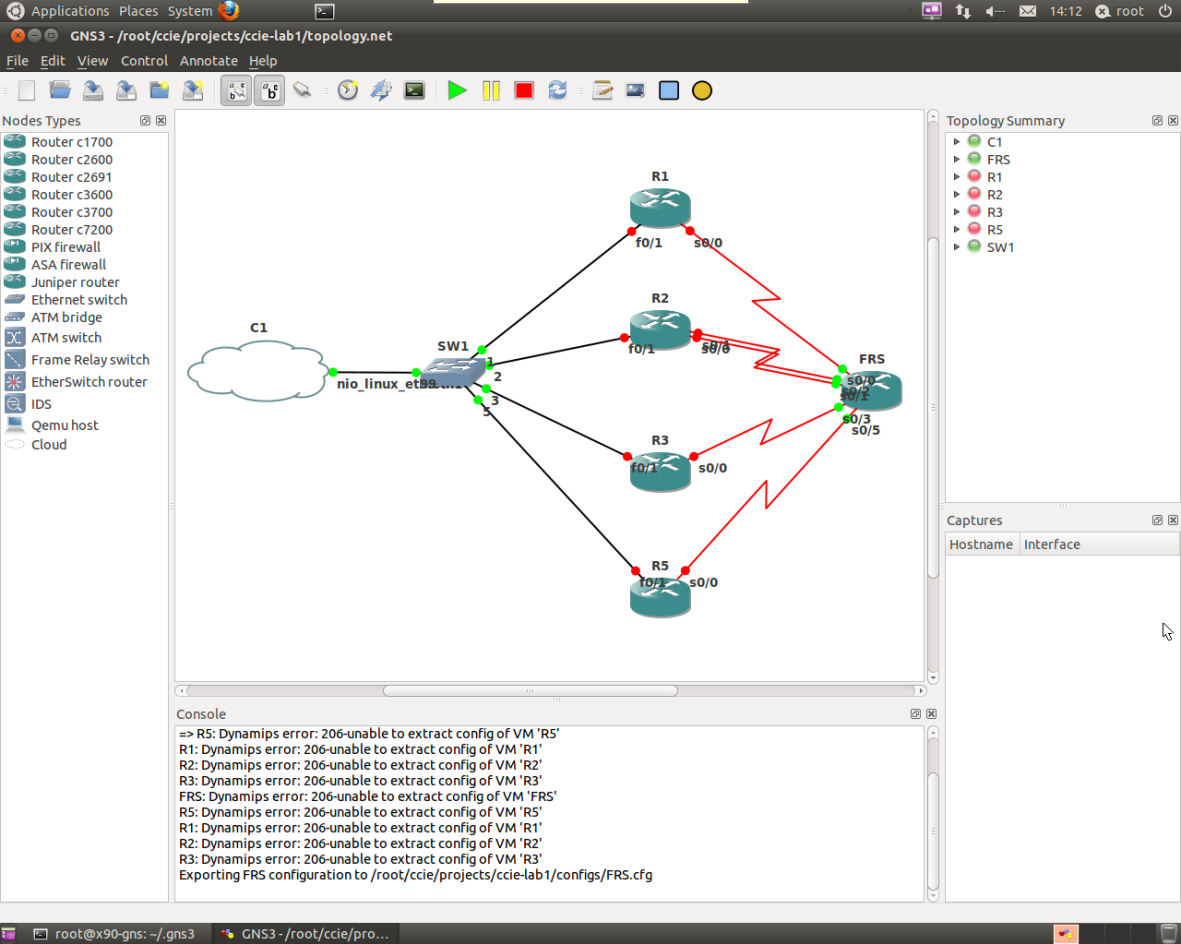
It turns out I forgot an interface from SW1 to R5. Below is the new physical overview with accompanying GNS changes.

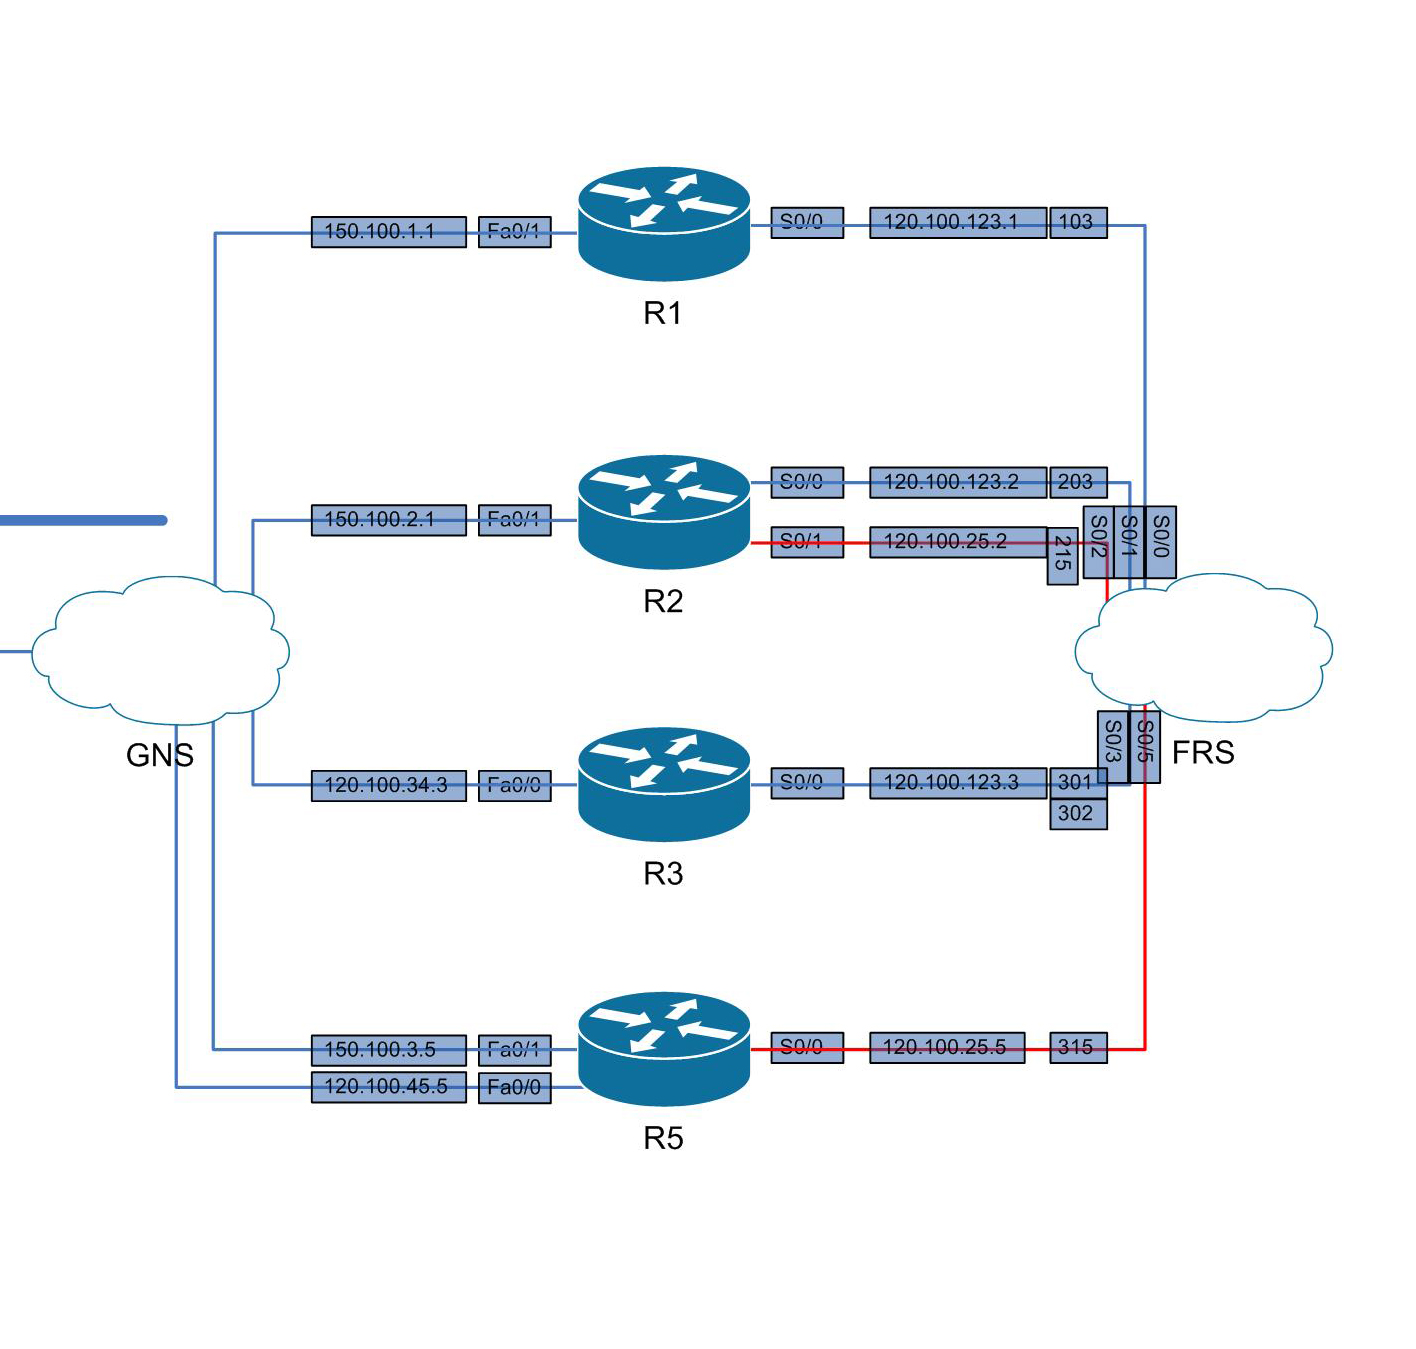
I’ve also set up the GNS routers with IP’s and associated frame relay commands. See below for the network overview containing IP’s + DLCI’s and the generic + frame relay config for each device.
Frame Relay Switch
hostname BR-CCIE-FRS
!
service password-encryption
!
no ip domain-lookup
!
enable secret 5 $1$GDhQ$Hufu4XUQWFqeQjap6/r7x1
!
frame-relay switching
!
interface Serial0/0
description TO BR-CCIE-R1 s0/0
no ip address
encapsulation frame-relay
clock rate 56000
frame-relay intf-type dce
frame-relay route 103 interface Serial0/3 301
!
interface Serial0/1
description TO BR-CCIE-R2 s0/0
no ip address
encapsulation frame-relay
clock rate 56000
frame-relay intf-type dce
frame-relay route 203 interface Serial0/3 302
!
interface Serial0/2
description TO BR-CCIE-R2 s0/1
no ip address
encapsulation frame-relay
clock rate 56000
frame-relay intf-type dce
frame-relay route 215 interface Serial0/5 315
!
interface Serial0/3
description TO BR-CCIE-R3 s0/0
no ip address
encapsulation frame-relay
clock rate 56000
frame-relay intf-type dce
frame-relay route 301 interface Serial0/0 103
frame-relay route 302 interface Serial0/1 203
!
interface Serial0/5
description TO BR-CCIE-R5 s0/0
no ip address
encapsulation frame-relay
clock rate 56000
frame-relay intf-type dce
frame-relay route 315 interface Serial0/2 215
!
line con 0
password cisco
logging synchronous
login
!
line vty 0 4
password cisco
logging synchronous
login
R1
hostname BR-CCIE-R1
!
service password-encryption
!
no ip domain-lookup
!
enable secret 5 $1$GDhQ$Hufu4XUQWFqeQjap6/r7x1
!
interface Loopback0
ip address 120.100.1.1 255.255.255.0
!
interface Serial0/0
description TO BR-CCIE-FRS s0/0
ip address 120.100.123.1 255.255.255.0
encapsulation frame-relay
clock rate 56000
frame-relay map ip 120.100.123.3 103
!
interface FastEthernet0/1
description TO BR-CCIE-SW2 fa0/1
ip address 150.100.1.1 255.255.255.0
speed 100
full-duplex
!
line con 0
password cisco
logging synchronous
login
!
line vty 0 4
password cisco
logging synchronous
login
R2
hostname BR-CCIE-R2
!
service password-encryption
!
no ip domain-lookup
!
enable secret 5 $1$GDhQ$Hufu4XUQWFqeQjap6/r7x1
!
interface Loopback0
ip address 120.100.2.1 255.255.255.0
!
interface Serial0/0
description TO BR-CCIE-FRS s0/1
ip address 120.100.123.2 255.255.255.0
encapsulation frame-relay
clock rate 56000
!
interface FastEthernet0/1
description TO BR-CCIE-SW2 fa0/2
ip address 150.100.2.1 255.255.255.0
speed 100
full-duplex
!
interface Serial0/1
description TO BR-CCIE-FRS s0/2
ip address 120.100.25.2 255.255.255.0
encapsulation frame-relay
clock rate 56000
frame-relay map ip 120.100.25.5 215
!
line con 0
password cisco
logging synchronous
login
!
line vty 0 4
password cisco
logging synchronous
login
R3
hostname BR-CCIE-R3
!
service password-encryption
!
no ip domain-lookup
!
enable secret 5 $1$GDhQ$Hufu4XUQWFqeQjap6/r7x1
!
interface Loopback0
ip address 120.100.3.1 255.255.255.0
!
interface FastEthernet0/0
description TO BR-CCIE-SW1 fa0/3
ip address 120.100.34.3 255.255.255.0
speed 100
full-duplex
!
interface Serial0/0
description TO BR-CCIE-FRS s0/3
ip address 120.100.123.3 255.255.255.0
encapsulation frame-relay
clock rate 56000
frame-relay map ip 120.100.123.2 302
frame-relay map ip 120.100.123.1 301
!
line con 0
password cisco
logging synchronous
login
!
line vty 0 4
password cisco
logging synchronous
login
R5
hostname BR-CCIE-R5
!
service password-encryption
!
no ip domain-lookup
!
enable secret 5 $1$GDhQ$Hufu4XUQWFqeQjap6/r7x1
!
interface Loopback0
ip address 120.100.5.1 255.255.255.0
!
interface FastEthernet0/0
description TO BR-CCIE-SW1 fa0/5
ip address 120.100.45.5 255.255.255.0
speed 100
full-duplex
!
interface Serial0/0
ip address 120.100.25.5 255.255.255.0
encapsulation frame-relay
clock rate 56000
frame-relay map ip 120.100.25.2 315
!
interface FastEthernet0/1
description TO BR-CCIE-SW2 fa0/5
ip address 150.100.3.5 255.255.255.0
speed 100
full-duplex
!
line con 0
password cisco
logging synchronous
login
!
line vty 0 4
password cisco
logging synchronous
login
Like the minicom scripts, I’ve also hardset the GNS console port numbers so I can configure console scripts. It’s very straightforward:
nano br-ccie-frs
telnet 127.0.0.1 2000
chmod 777 br-ccie-frs
Everything is still rolling well. Even though there are no routing protocols or heavy packets running yet, the X2 is handling the 5 routers without a hitch.
It’s taken me a full month to get prepared for the CCIE labs – and subsequently a full month to start studying. A whole month is a lot of time for extra learning, cramming and exam preparation, but it shouldn’t come to effect me too much – but now its time to roll.
Now here’s the first update in many as things get underway…
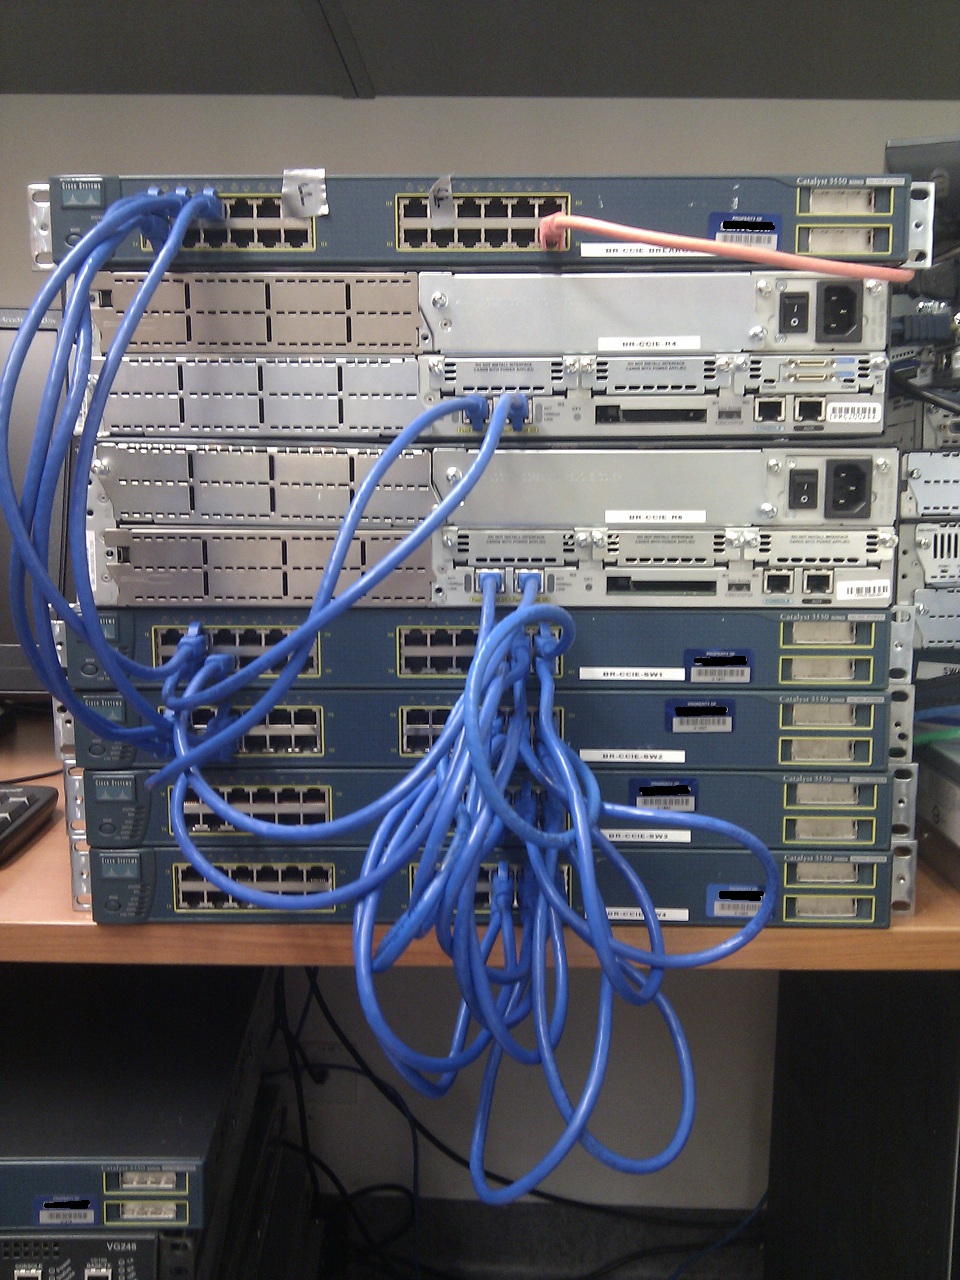
The physical lab has been altered slightly to accomodate for the hardware and GNS setup. It is still based on a mix of physical and virtual equipment in the topology outlined in the Cisco CCIE R&S v4 Practice Lab 1. Unfortunately the 3550’s don’t support auto MDIX like the 3560’s do, so new 0.5M CAT6 cross over cables were purchased to cable the switches together.
Logically I did want to run a seperate management VLAN over the switches to get telnet access to them and save on cabling costs, but I’ve scrapped that idea due to possible issues in killing a switch or vty sessions whilst being remote. The only physical change this has caused is the purchase of new console cables (hardware specs further on).
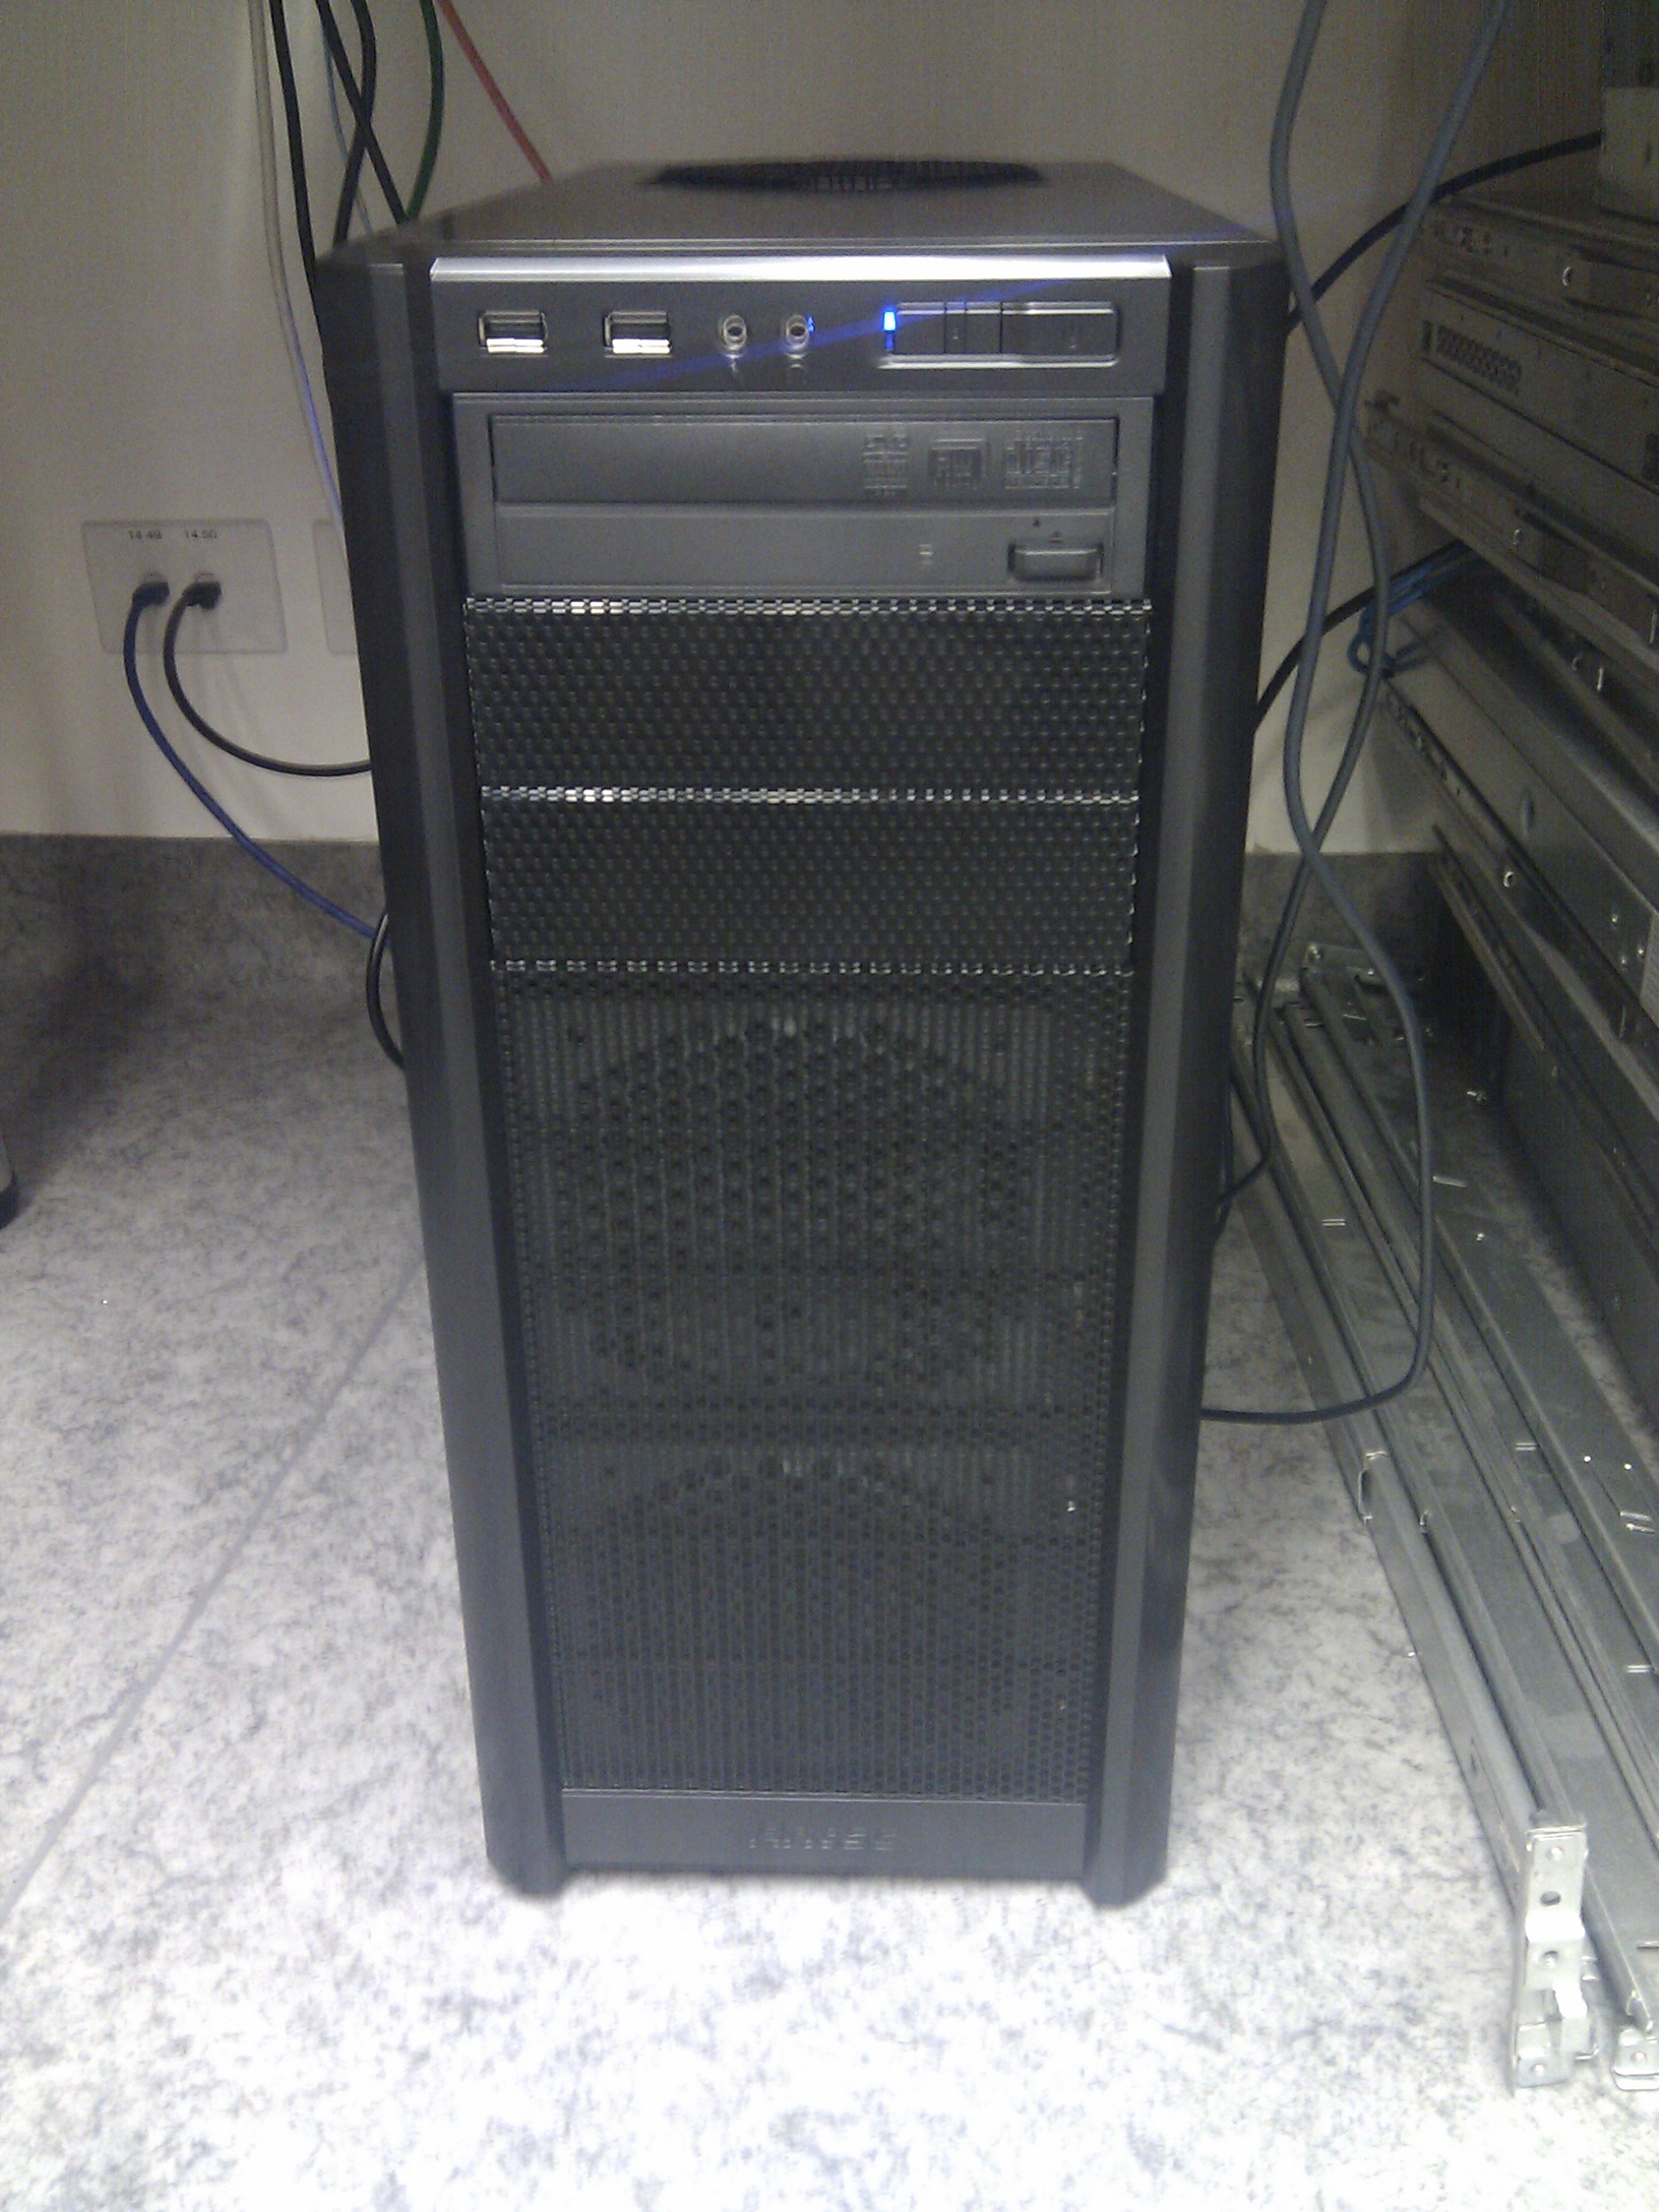
The GNS3 box has been configured up and is running happily. Instead of forking out ~$900 for a new i7 box I’ve reused an old AMD x2 I had lying around. The only parts I needed for this was a new case, PSU and DVD drive, so I opted to try this first to keep costs down in the interrum. If the X2 (with mobo limited to 4gb) can’t handle the GNS load I’ll have to invest in a new i7 down the road (which wouldn’t be too bad as it could multitask as a F@H client when not being used) but for now were with the AMD.
Heres the hardware specs for those interested:
AMD Athlon64 X2 6000+
Asus M2N-MX
4x 1GB Kingston DDR2 in dual channel
D-Link DGE-530TX
As for software – I’ve got everything running inside Ubuntu 11.04 x64 Desktop. I wasn’t sure how external hypervisors linked to a trunked NIC work in GNS3, so I didn’t opt for the server version and instead I’m running GNS on screen. If I can figure out external hypervisors I may change this but for now it’s working well enough. The DGE-530TX worked out of the box with no special driver support needed and the vlan and 80211 packages are happy enough on top of it.
As many threads on the net suggest – GNS needs root permission in order to bind the Linux Ethernet NIO needed for trunk access. Both sudo and gksudo works when launching GNS, but I lost all the pretty skinning and icons – so I’ve logged in locally as root and running GNS from roots x11 session. This is definitely not best practice especially for boxes with internet accessible remote access, but for me this thing is only doing GNS so security issues don’t phase me.
As for console access I’m running 7 Astrotek USB to Serial Converter (205153). This seems to be detected natively however I forgot to check the dmesg output and loaded the prolific pl2303 driver anyway. The devices successfully register as /dev/ttyUSBX and my original thought was to use socat to bind a tcp port to the tty device. This worked to an extent. I’ve played a fair amount with the socat raw device options, but whatever I tried socat still liked to put double crlf and crnl at the end of lines. The major pain in this was I could not do a show run as the ouput was killed by the second crnl. For anyone interested in what I was trying with socat:
socat TCP4-LISTEN:8890 /dev/ttyUSB0,raw,b9600,cs8,parenb=0.
I have instead decided to setup script files that launch a minicom session. The only downside to this is I need multiple ssh sessions to the GNS box with each of them a minicom session, or kill and relaunch the minicom scripts as neeeded. Here’s one of the minicom script examples:
minicom -b 9600 -8 -D /dev/ttyUSB0
The rest of the software setup is pretty generic, I’ve just used tutes from googling on anything I’ve got stuck on regarding linux+GNS3 but the install and configure is pretty straight forward.
As an overview I’m running the below in physical/virtual:
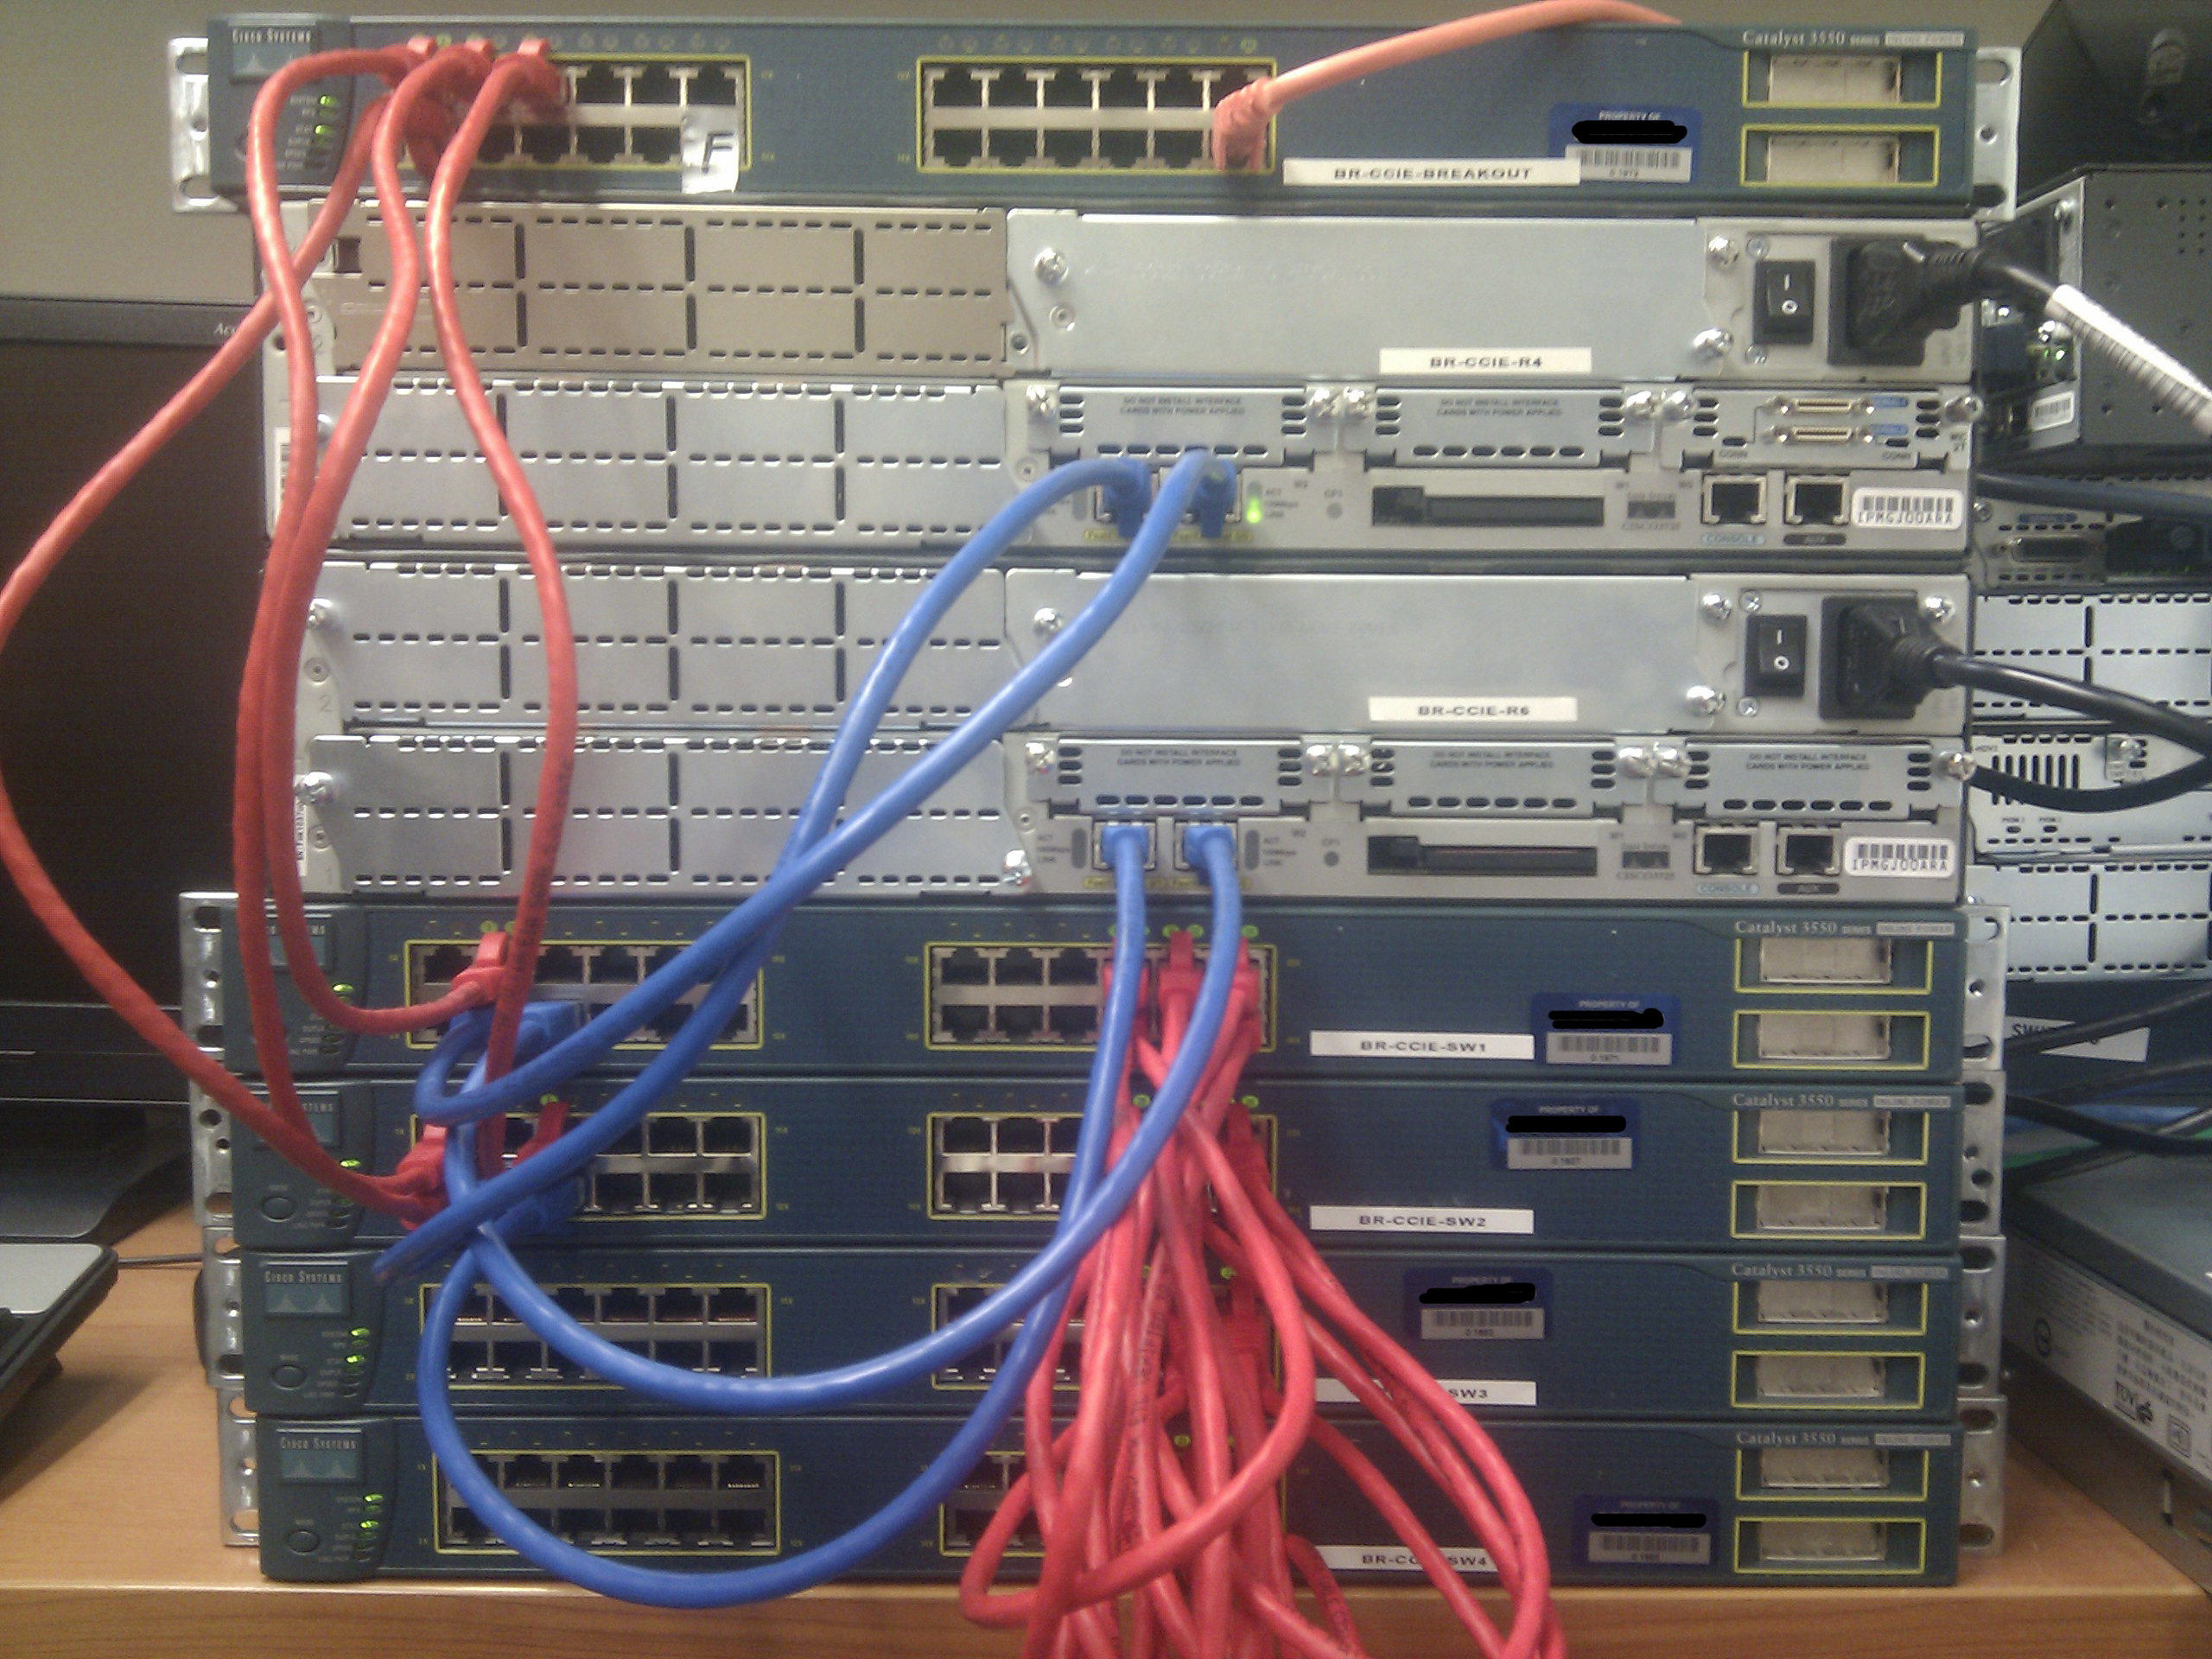
Physical:
3550 – Breakout trunked to GNS PC
3725 – R4
3725 – R6
3550 – SW1
3550 – SW2
3550 – SW3
3550 – SW4
Virtual:
3725 – R1
3725 – R2
3725 – R3
3725 – R5
3725 – Frame Relay Switch
All switches are running c3550-ipbasek9-mz.122-35.SE5 and all routers are running c3725-adventerprisek9-mz.124-15.T14.
Below is the outline of the topology I’m working with. This is a just a physical overview except for the L2 logic when GNS becomes involved.
The total cost of the R&S is slowly rising:
Antec Three Hundred Tower Gaming Case – $65
Corsair CX-500 V2 500W Builder Series Power Supply $79.99
Sony AD7280SGB SATA Internal DOUBLE Layer Multiformat DVD Bunner $26.80
Sunix USB 2.0 PCI Card $15.90
Astrotek USB to Serial Converter x7 $144.20
Cabac 0.5M CAT6 Crossover – Not yet invoiced
Total: $331.89
I’m sure that cost is set to rise, especially if i hit a hardware barrier with either my GNS PC or running the 3550 switches.
I’ll be posting config examples that I’m using to connect everything up and just general rambling on the subject. Keep posted.
Well I’ve been massively lazy over the past year. I finished my CCNP and CCNASec but never did the certs, leaving my original CCNA to rot.
Now its time to study, finish and pass my CCIE R&S – in 6 months.
I’m sure there will be a lot of ranting and rambling here so keep hold while I throw myself at this.
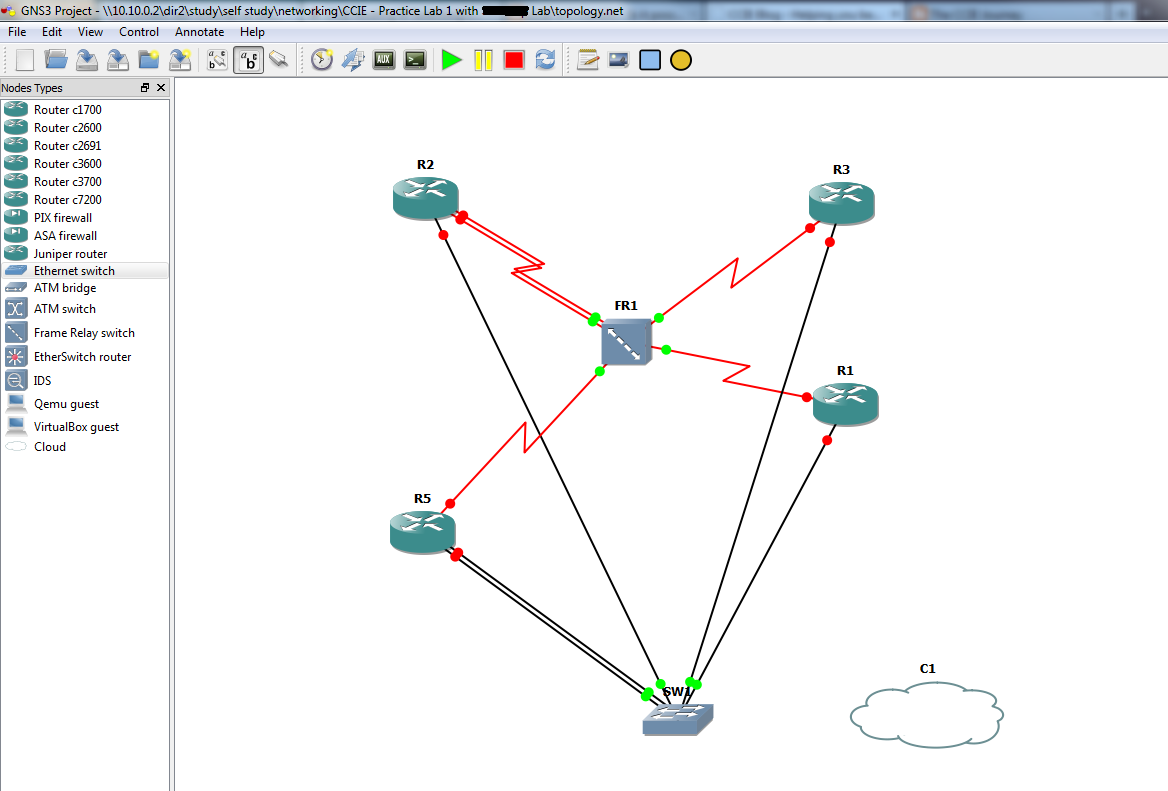
In the meantime heres the first practice lab from the CCIE R&S v4 practice labs using a combo of 4x 3550’s 2x 3725’s and GNS using a trunked breakout switch.
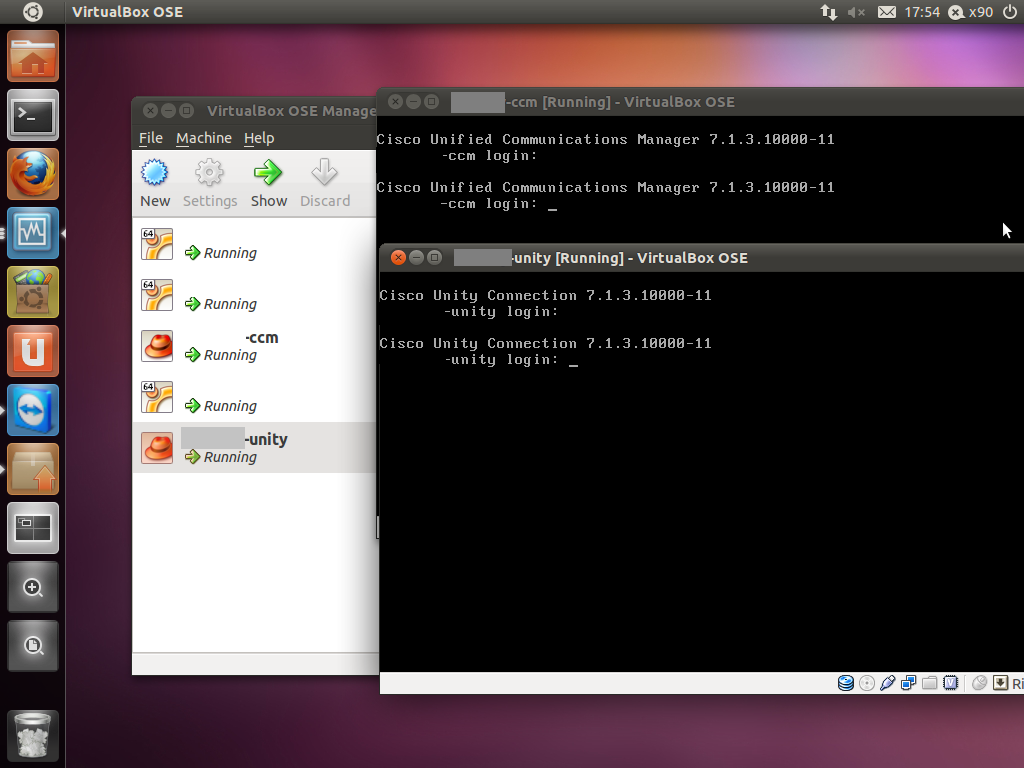
Recently I’ve upgraded my server hardware to support more RAM for the ever-expanding VM list that I’ve got. In the mix of doing this, I thought it would be a great time to install Cisco CallManager 7 in a virtual environment and get rid of CME from my 2621XM. I knew I wanted to move the host environment over to linux as it neatly allocates the 16GB of ram I put in it (rather than Win7 like previous) however I wasn’t sure on what I would use to run my VM’s. As the box I build was completely custom, ESXi wasn’t an option and I needed to run VMWare or (presumably) VirtualBox to get support of CallManager. VMWare haven’t released an update to their Server product in a long time so I was reluctant to load Server back on, so I gave VirtualBox a go. Before reading on, note, I have successfully installed and am currently running CallManager 7.1.3.10000-11 and Unity Connection 7.1.3.10000-11 (yes, its possible). I know 713 is old, I’m in the process of testing 8 and will post details shortly.
Here’s an overview of what I wanted to achieve.
– PSTN ADSL2 connection into modem/router
– PPPoE from 2621XM
– SIP trunk to provider
– IPSEC VPN Server
– Server running VirtualBox
– CCM7 with SIP trunk to 2621XM
– UC7 integrated with CCM7
Future plans are to have the new server run GNS to complete my CCIE R&S lab, so I’ll throw details up when I complete that.
The PSTN->MODEM->2621XM I have already preconfigured, but I’ll whack it here for shitsngigs anyway. It’s not a full config, but I’m sure most of it is self explanatory. NOTE, it also includes translations and dialpeers for the SIP trunk setup explained later.
2621XM+PPPoE+VPN
ip dhcp pool p100
network X.X.X.X 255.255.255.0
default-router X.X.X.X
dns-server 203.0.178.191
option 150 ip CCMIPADDR
!
ip dhcp pool p200
network X.Y.X.X 255.255.255.0
default-router X.Y.X.X
dns-server 203.0.178.191
!
!
vpdn enable
!
vpdn-group 1
! Default L2TP VPDN group
! Default PPTP VPDN group
accept-dialin
protocol any
l2tp tunnel receive-window 256
!
!
!
!
voice service voip
allow-connections sip to sip
sip
bind control source-interface FastEthernet0/1
bind media source-interface FastEthernet0/1
localhost dns:iinetphone.iinet.net.au
!
!
voice class codec 1
codec preference 1 g711ulaw
!
voice class codec 2
codec preference 1 g729r8
!
!
!
voice class h323 1
h225 timeout tcp establish 3
!
!
!
!
!
!
!
!
!
!
voice translation-rule 1
rule 1 /1000/ /02XXXXXXXX/
!
voice translation-rule 2
rule 1 /02XXXXXXXX/ /1000/
rule 2 /XXXXXXXX/ /1000/
!
voice translation-rule 3
rule 1 /^0*/ //
!
!
voice translation-profile sip-incoming
translate called 2
!
voice translation-profile sip-outgoing
translate calling 1
translate called 3
!
crypto isakmp policy 100
encr 3des
authentication pre-share
group 2
!
crypto isakmp client configuration group VPN
key XXX
dns 61.88.88.88
pool VPN_ADDRESSES
acl VPN
netmask 255.255.255.0
!
!
crypto ipsec transform-set VPN_SET esp-3des esp-md5-hmac
!
crypto dynamic-map VPN_MAP 1
set transform-set VPN_SET
reverse-route
!
!
crypto map VPN client authentication list LOCAL_AUTH
crypto map VPN isakmp authorization list LOCAL_AUTH
crypto map VPN client configuration address respond
crypto map VPN 100 ipsec-isakmp dynamic VPN_MAP
!
!
!
!
!
!
bba-group pppoe global
!
!
interface FastEthernet0/0
description LINK TO MODEM WAN SIDE
no ip address
duplex auto
speed auto
pppoe enable group global
pppoe-client dial-pool-number 1
no cdp enable
!
interface Serial0/0
no ip address
shutdown
!
interface FastEthernet0/1
description LINK TO SWITCH LAN SIDE
ip address X.X.X.X 255.255.255.0
ip nat inside
ip virtual-reassembly
duplex auto
speed auto
!
!
interface Virtual-Template1
mtu 1492
no ip address
ppp authentication chap
!
interface Dialer0
ip address negotiated
ip access-group WAN_IN in
ip access-group WAN_OUT out
ip nat outside
ip virtual-reassembly
encapsulation ppp
dialer pool 1
dialer-group 1
ppp authentication chap pap callin
ppp chap hostname XXXX
ppp chap password XXXX
ppp pap sent-username XXXX password XXXX
crypto map VPN
!
ip local pool VPN_ADDRESSES X.X.X.X X.X.X.X
ip forward-protocol nd
ip route 0.0.0.0 0.0.0.0 Dialer0
!
!
!
ip access-list extended NAT
remark DENY LOCAL TO VPN
deny   ip X.X.X.X 0.0.0.255 X.Z.X.X 0.0.0.255
remark DENY VPN TO LOCAL
deny   ip X.Z.X.X 0.0.0.255 X.X.X.X 0.0.0.255
remark PERMIT ALL ELSE
permit ip any any
ip access-list extended VPN
remark PERMIT LOCAL TO VPN
permit ip X.X.X.X 0.0.0.255 X.Z.X.X 0.0.0.255
remark PERMIT VPN TO LOCAL
permit ip X.Z.X.X 0.0.0.255 X.X.X.X 0.0.0.255
!
access-list 101 permit ip any any
dialer-list 1 protocol ip list 101
!
!
!
!
control-plane
!
!
!
!
!
sccp local FastEthernet0/1
sccp ccm CCMIPADDR identifier 1
sccp
!
sccp ccm group 1
bind interface FastEthernet0/1
associate ccm 1 priority 1
!
!
dial-peer voice 1 voip
description iiNet incoming to ccm
translation-profile incoming sip-incoming
destination-pattern ....
voice-class codec 1
session protocol sipv2
session target ipv4:CCMIPADDR
incoming called-number .T
dtmf-relay sip-notify rtp-nte
!
dial-peer voice 2 voip
description ccm outgoing to iiNet
translation-profile outgoing sip-outgoing
destination-pattern 0T
voice-class codec 1
session protocol sipv2
session target dns:sip.nsw.iinet.net.au
dtmf-relay sip-notify rtp-nte
!
!
sip-ua
credentials username 02XXXXXXXX password XXXX realm iinetphone.iinet.net.au
authentication username 02XXXXXXXX password XXXX realm iinetphone.iinet.net.au
no remote-party-id
retry invite 4
retry response 3
retry bye 2
retry cancel 2
retry register 5
timers register 300
mwi-server dns:sip.nsw.iinet.net.au expires 3600 port 5060 transport udp unsolicited
registrar dns:sip.nsw.iinet.net.au expires 3600
sip-server dns:sip.nsw.iinet.net.au
!
VirtualBox
For the linux host, I ended up going with Ubuntu 64bit. I really wanted to get away from Ubuntu and try fedora, but in the end I had a need to get this up and running as soon as possible for work resources, so I defaulted back to Ubuntu.
Installing VirtualBox is relatively straightforward:
wget http://download.virtualbox.org/virtualbox/4.1.4/virtualbox-4.1_4.1.4-74291~Ubuntu~natty_amd64.deb
apt-get install virtualbox-4.1_4.1.4-74291~Ubuntu~natty_amd64.deb
or you can add it to it your sources list using the following url
deb http://download.virtualbox.org/virtualbox/debian natty contrib
CCM7
Installing CallManager into VirtualBox took a bit of research and the following articles were imperative to getting it working:
http://blog.chackraview.net/2010/01/03/gain-root-access-on-cisco-unified-communication-manager/
http://ubuntuforums.org/showthread.php?t=1029144
http://iddles.co.uk/blogs/index.php/2010/02/cisco-cucmcall-manager-running-on-suns-virtual-box/
http://www.davidrickard.net/2008/12/12/callmanager-in-vmware/
http://www.markholloway.com/blog/?p=543
To start the process, the first thing that must happen is for CallManager to be installed in VMWare. Server, player whatever, you just need to install it and copy the vmdk file afterwards. I built all my VM’s using 2048MB of RAM and 80GB SCSI HDD’s. The install process took a fair while but it does successfully complete – as opposed to VirtualBox where it does not find a valid hardware platform at the hardware verification phase and the installation halts.
Once you’ve got the VMDK files from VMWare, create a new VM in VirtualBox with the following specs:
– 2048MB RAM
– EF – IO APIC
– EF – HW clock in UTC time
– EF – PAE/NX
– HWV – VT-x/AMD-V (if your processor supports it. fyi im running on an i7)
– Mount the VMDK on a Lsilogic SCSI controller
– Mount the CentOS disk as outlined in Chackra Blog (note, I used CentOS-5.6-i386-bin-1of7.iso which worked fine)
– Enable Serial Port COM1 (this I found resolved kernel errors that were showing on the VM that I googled and found a link to the Cisco support forum (sorry can’t find link to give credit atm)
Boot the VM off of the CentOS disk follow the VirtualBox hardware config as outlined in the Ubuntu support forums, and then follow Chackra Blog’s guide to gaining root. The below is an except, full cred goes to those on the Ubuntu forums and Chackra’s blog.
– Issue from a root shell:
VBoxManage setextradata "<VM name>" "VBoxInternal/Devices/pcbios/0/Config/DmiBIOSVersion" "6
VBoxManage setextradata "<VM name>" "VBoxInternal/Devices/pcbios/0/Config/DmiSystemVendor" "VMware"
VBoxManage setextradata "<VM name>" "VBoxInternal/Devices/pcbios/0/Config/DmiBIOSVendor" "Phoenix Technologies LTD"
VBoxManage setextradata "<VM name>" "VBoxInternal/Devices/pcbios/0/Config/DmiSystemProduct" "VMware Virtual Platform"
– Once the VM has booted to the CentOS disk type linux rescue
– You don’t need to start networking
– Change to your CCM disk by issuing chroot /mnt/sysimage
– Issue chattr -i /etc/passwd /etc/group /etc/shadow /etc/gshadow
– useradd YOURUSER (NOTE, this user should NOT be the same as your platform or application username. For example my platform and application username is x90, but my linux user is x90root)
– passwd YOURUSER
– chmod 666 /etc/sudoers
– vi /etc/sudoers
– At the end of the file add:
YOURUSER ALL=(ALL) ALL
– chattr +i /etc/passwd /etc/group /etc/shadow /etc/gshadow
– chmod 444 /etc/sudoers
– Restart your VM
If you now SSH to you CCM, log in as the new user that you created and you will notice that it drops you to a regular bash shell instead of the CCM shell. You’re now free to edit files on the box, including those doing the HW verification 😉
Next we need to edit the hardware validation script. The below is an except, full cred goes to Kevster’s blog.
– vi /usr/local/bin/base_scripts/hardware_check.sh
– Look for the check_deployment function and edit accordingly:
function check_deployment()
{
local tmp_deployment

initProductLibrary
tmp_deployment="$deployment"

# Check the deployment
#    isHardwareValidForDeployment $tmp_deployment
#    rc=$?
#   if [ $rc -ne 0 ]; then
#         log info "$tmp_deployment deployment Not Supported"
#         return 1
#    fi
# Deployment is supported by this hardware
log info "$tmp_deployment deployment Is Supported"
return 0
}
Restart the VM. NOTE, both my CCM and UC do not shut down cleanly – they both get to a point and produce a massive amount of errors. Once it hits this stage, I force shut the VM. So far, I’ve never had a problem with doing this.
Once the VM restarts, it will take a long while before the services become ready (or at least for me). Unity Connection especially takes 15mins ish to fully start and register with CCM.
Now onto the CCM->2621XM SIP trunk.
Take a look at the config above to see how the dial-peers and translations work. NOTE, i’m using dummy internal numbers, that are translated to the real number at the SIP GW. This is why there are translation rules on the GW. I could probably achieve this in CUCM, but this is the way I’ve done it for now. Also note that I’m using 0 as my dialout code, so this is stripped through a translation too.
The SIP trunk in CUCM is actually one of the easiest parts of the setup. It’s really just a matter of building the RP, RL and RG information and adding a new SIP trunk with the local interface of the router as the SIP server. As long as you’ve got allow-connections sip to sip in your voice service, there shouldn’t be any reason why you can’t route calls out via the external SIP provider.
Using this config, I’ve successfully registered my 7940 handset and IP communicator locally and over VPN and been able to route calls. Voicemail works without a problem, however I haven’t done anything too funky yet, mainly just testing integration of the ports. From what I can see, processor usage is reasonably minimal and RAM usage against 16GB is negligible, so it should be able to handle the 10 DLU’s included with the VM copy without a problem. However if more is needed, I’m sure if you think about the way Cisco does it’s licensing you’ll be able to go past the 10 without a problem.
Last night we upgraded one of our CallManager 7 clusters to a new minor version to resolve issues and to apply the usual bug fixes. We were moving from 7.1.3.33024-1 to 7.1.5.30000-1, which in the past we had not noticed any issues with.
In preparation, we preloaded 7.1.5.30000-1 about a week before the upgrade was scheduled to take place to reduce time in the outage window. After the upgrade had completed, we noticed that we were missing data, or that data had returned to previous values. The most obvious changes were to route patterns mobile connect setups (due to end user visibility), however other data loss may have also occurred.
We looked at the system and realised that our missing or modified data was any changes that had occurred in the week that the upgrade had been preloaded. It seemed that a database snapshot had been taken when we preloaded 7.1.5.30000-1 and that any changes made to 7.1.3.33024-1 had been ignored once the upgrade was applied.
We trolled through the install logs but could not find any errors during the upgrade or reason as to why this occurred.
The Cisco site doesn’t have any upgrade documentation for 7.1, but a similar doc from 6.1(1) states: Your configuration information migrates automatically to the upgraded version in the active partition. http://www.cisco.com/en/US/docs/voice_ip_comm/cucm/cucos/6_1_1/cucos/iptpch7.html#wp1040186
Needless to say we will not be preloading future updates and that everything will be performed inside of the outage window to minimise data loss.
What happens if you want to communicate with a network that you don’t have a route for? In a normal situation you would just install a new route across the network, either statically or via a dynamic protocol like EIGRP or OSPF.
However what do you do if this isn’t an option? I had this problem the other day because the remote network was owned by another company and we didn’t want to request for routes to be installed or to run a routing protocol. However there was a mutual network that could access both ends. We decided to run up a NAT scenario, however for end to end communication to be successful we need to NAT both the source and destination addresses in each packet.
The diagram below should show things a bit better. In our situation we had Call Manager servers we needed to access, but the 10.10 network couldn’t hit the 10.20 network. So we NATted up on the 10.15 network.
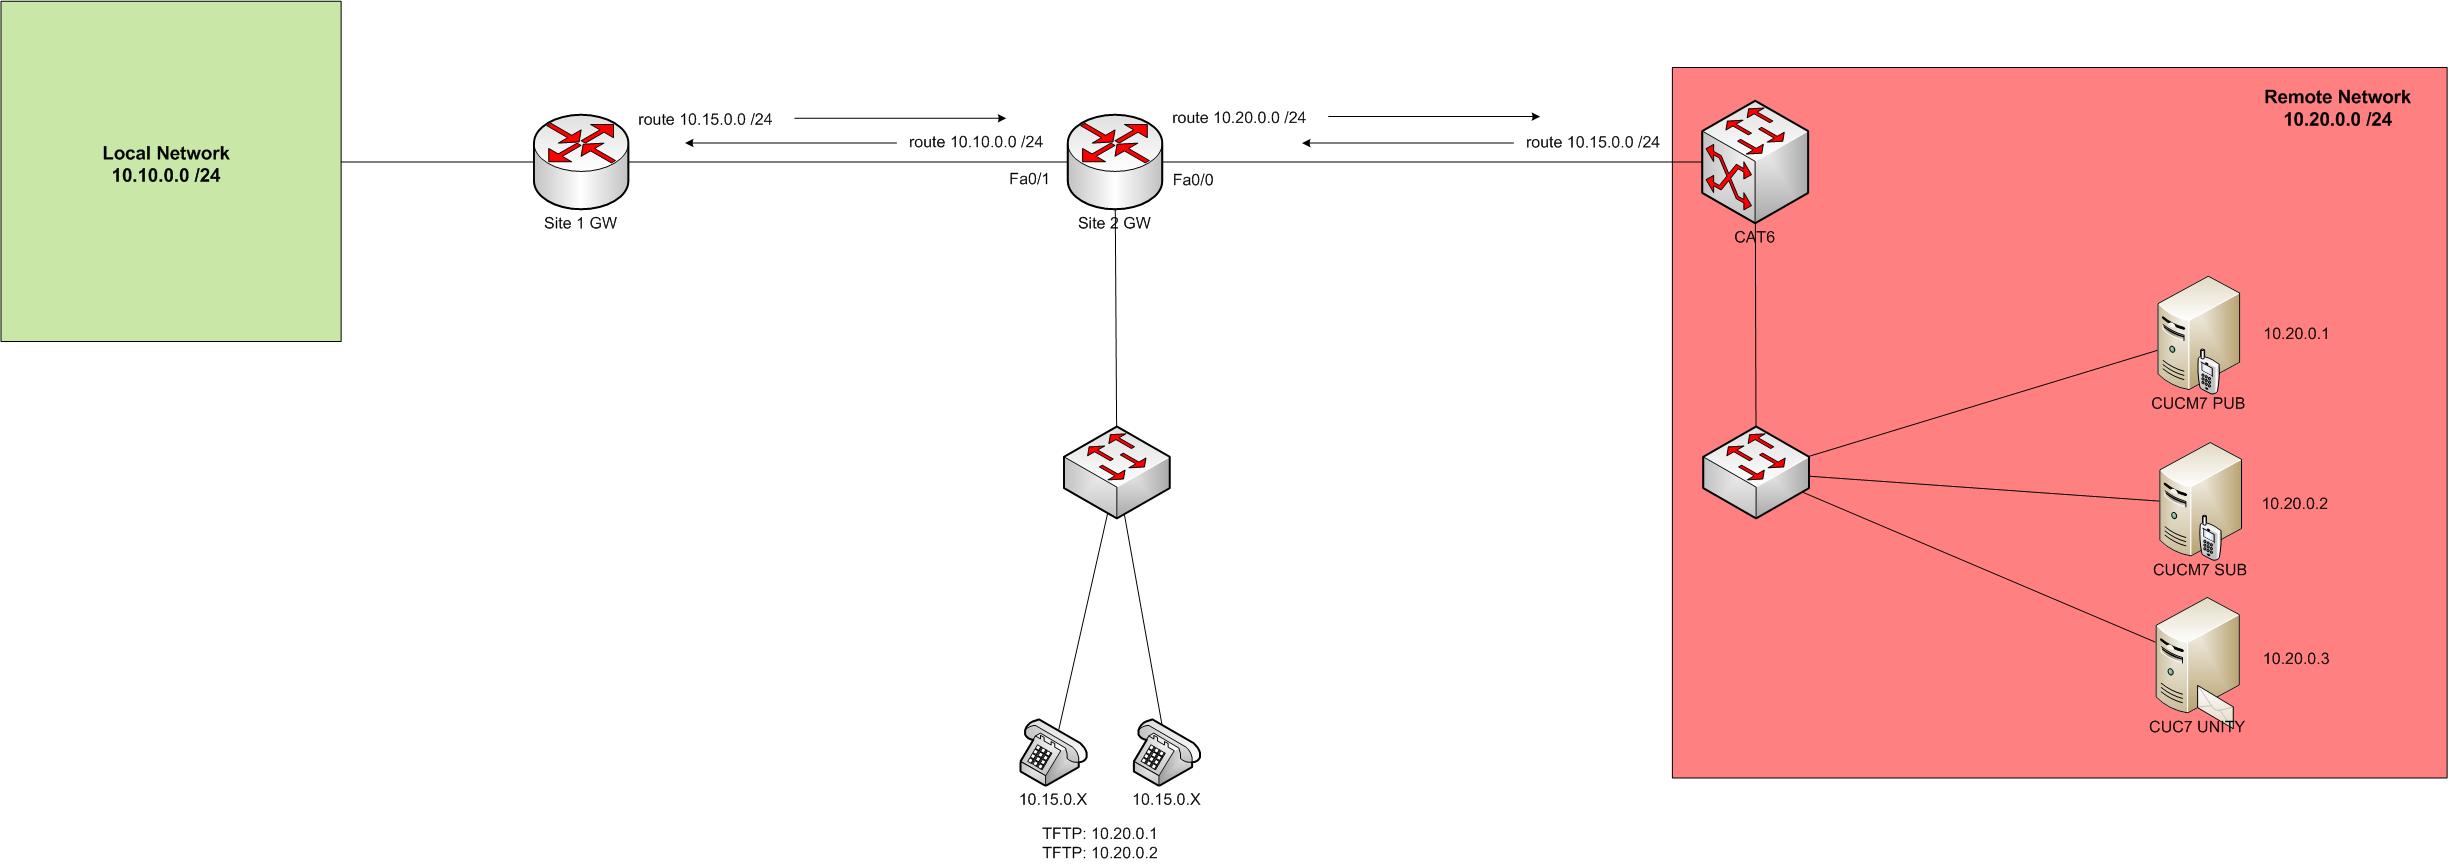
Here’s how we achieved the NATting.
ip nat pool VOICE1 10.15.0.1 10.15.0.1 netmask 255.255.255.0
ip nat inside source list NAT_ACL_VOICE1 pool VOICE1 overload
ip nat pool VOICE2 10.15.0.2 10.15.0.2 netmask 255.255.255.0
ip nat inside source list NAT_ACL_VOICE2 pool VOICE2 overload
ip nat pool VOICE3 10.15.0.3 10.15.0.3 netmask 255.255.255.0
ip nat inside source list NAT_ACL_VOICE3 pool VOICE3 overload
ip nat outside source static 10.20.0.1 10.15.0.1
ip nat outside source static 10.20.0.2 10.15.0.2
ip nat outside source static 10.20.0.3 10.15.0.3
ip route 10.15.0.1 255.255.255.255 10.20.0.1
ip route 10.15.0.2 255.255.255.255 10.20.0.2
ip route 10.15.0.3 255.255.255.255 10.20.0.3
ip access-list extended NAT_ACL_VOICE1
remark PERMIT LOCAL NETWORK
permit ip 10.10.0.0 0.0.0.255 host 10.15.0.1
deny ip any any
ip access-list extended NAT_ACL_VOICE2
remark PERMIT LOCAL NETWORK
permit ip 10.10.0.0 0.0.0.255 host 10.15.0.2
deny ip any any
ip access-list extended NAT_ACL_VOICE3
remark PERMIT LOCAL NETWORK
permit ip 10.10.0.0 0.0.0.255 host 10.15.0.3
deny ip any any
A quick run down on how I *think* it’s working, correct me if I’m wrong.
To change the source addressing information we create a NAT pool with one valid IP (our NATted IP). To filter this from NATting all traffic we apply a NAT ACL onto the pool and overload it (PAT).
To change the destination addressing information we create an outside static NAT.
Because of the way outside NATting works, it will route the packet before NATting it. Eventually one of our routes will match the remote network but this won’t apply the NAT properly. To get around this we force a longest match route, which will always match and NAT properly.
Finally we just need to activate our interfaces for NATting.
int fa0/1
ip nat inside
int fa0/0
ip nat outside
This may not be the cleanest way to do this (and it’s pretty tedious making a new pool for every address you need) and I may have got the actual details about what is happening where not 100%, but this example is running in production now on one of my networks without any dramas.
Who would ever have thought I would have more issues with the bloody SIP trunk between CME and iiNet?
My CME has been offline for a good 6 months because I had unrelated IOS issues and got lazy fixing the proper config.
Today I dusted off my CME config for SCCP with a SIP trunk and got everything running smoothly. Inbound calls worked perfectly, 2 way audio, happy days. However outbound calls weren’t working. The phone would simply sit trying to call, no ringing tone, but after a minute or two I would get something similar to a fast busy.
After debugging with debug ccsip messages I soon found the reason why outbound wasn’t working. The way the SIP registration process works is inbound calls are determined by CME’s registration status. If you issue a show sip-ua reg stat it will show you if the SIP trunk is registered or not. If it is, great, inbound *should* work. However outbound is slightly different. Upon each call CME issues a INVITE which should acknowledged by a 100 Trying from the SIP provider. The provider will then issue SIP/2.0 401 Unauthorized as a challenge to authenticate in which you must ACK and INVITE again. This second invite will contain the response to the challenge. After you send the INVITE there should be another 100 Trying and then something like 183 Session Progress to say that everything is now working.
My problem was that after my INVITE with the challenge response I would never receive Trying, so CME would spam INVITE over and over again and then eventually time out.
In the middle of the ccsip messages debug is info about RTP and codecs. As it’s running over WAN I’m running G729 and had originally set the codec as g729br8. br8 is an annex B edition with built in VAD (which doesn’t sound too bad). In the debug i noticed: a=fmtp:18 annexb=yes. I figured by stating it there that it might have supported it, but I decided to try g729r8 anyway. As soon as I did this I started receiving the proper 100 and 183. Rock and roll.
SO YOU WOULD THINK IT WAS ALL OVER RIGHT?!?
No.
I then tested to make sure everything was good, inbound and outbound call flows. Now outbound was good, but whenever I tried calling in the call would not ring and hit straight through to iiNet’s voicemail. So I did another debug and now it showed: SIP/2.0 488 Not Acceptable Media. That’s weird right, because I was just using r8 as outbound? No worries, so I tried adding br8 as the second preference codec. Now when I tried to call out I received a message from iiNet saying that “I could not dial out at this time”
So I swapped things back and forwarded a few times and the conclusion I came to was I could only make outbound calls using r8 and receive inbound calls using br8. After messing with dial peers for most of the night with intermittent success I got frustrated with it and just changed everything over to g711alaw. No love on the oubound calls again. g711ulaw however seemd to work perfectly in all scenarios.
I’m so over getting this to work that I can’t be bothered at this stage to find out why 729 would only work in certain directions or when alaw doesn’t when in both situations iiNet say they support both. Maybe something for another day.
This is the list of IOS hardening suggested by Cisco as per the CCNP2 curriculum. This combined with the common security ACL in the last post should be a good basis for keeping the network boundary tight.
BootP
Default: enabled
Description: This service permits the router to act as a BOOTP server for ther network devices. Such a service is rarely needed in modern networks, and should be disabled.
(config) no ip bootp server
CDP
Default: enabled
Description: CDP periodically advertises information between Cisco devices, such as the type of device and Cisco IOS version. Such information could be used to determine vulnerabilites and launch specific attachsl. Unless needed inside the network, this service should be disabled globally or disabled on unneccessary interfaces.
(config) no cdp run
(config-if) no cdp enable
Configuration auto-loading
Default: Enabled (globally and interfaces)
Description: This service permits a router to automatically load a configuration file from a network server upon boot. This service should remain disabled when not needed
(config) no service config
FTP Server
Default: Disabled
Description: This service permits the router to act as an FTP server for specific files in flash memory. It should remain disabled when not needed.
(config) no ftp-server enable
TFTP Server
Default: Disabled
Description: This service permits the router to act as a TFTP server for specific files in flash memory. It should remain disabled when not in use.
(config) no tftp-server file-sys:image-name
NTP service
Default: Disabled
Description: This service both receives a time-of-day clock from an NTP server and allows the router to act as an NTP server to NTP clients. Correct time is necessary for accurate time stamps when logging messages. This service should be disabled if not needed, or restricted to only devices that require NTP services.
(config) no ntp server ip-address
Packet assembler/disassembler (PAD) service
Default: enabled
Description: This service allows access to X.25 PAD commands in an X.25 network. Such a service is rarely needed in modern networks and should be disabled
(config) no service pad
TCP and UDP minor services
Default: Enabled before 11.3 disabled after 11.3
Description: These services execute small servers (daemons) in the router, typically used for diagnostics. They are rarely used and should be disabled.
(config) no service tcp-small-servers
(config) no service udp-small-servers
Maintenance Operation Protocol (MOP) service
Default: Enabled (most ethernet interfaces)
Description: This service is a Digital Equipment Corporation (DEC) maintenance protocol. Such a service is rarely needed in modern networks and should be disabled.
(config-if) no mop enable
Simple Network Management Protocol (SNMP)
Default: Enabled
Description: This service permits the router to respond to queries and configuration requests. If not used, this service should be disabled. If needed, restrict access to the router via access controls lists (ACL) and use SNMPv3 for additional security features.
(config) no snmp-server enable
HTTP Configuration and Monitoring
Default: Device dependent
Description: This service allows the router to be monitored and configured from a web browser. SDM uses secure HTTP (HTTPS). If not used, this service should be disabled. If needed, restrict access to the router via ACLs and use HTTPS for encrypted data transfer.
(config) no ip http server
(config) no ip http secure-server
Domain Name Service (DNS)
Default: Enabled (client services)
Description: Cisco routers use 255.255.255.255 as the default address to reach a DNS server for name resolution. If not used, this service should be disabled. If needed, explicitly set the address of the DNS server.
(config) no ip domain-lookup
ICMP Redirects
Default: Enabled
Description: This service causes the router to send an ICMP redirect message when a packet is forwarded out the interface it arrived on. An attacker can use such information to redirect packets to an untrusted device. This service should be disabled when not needed.
(config) no ip icmp redirect
(config-if) no ip redirects
IP Source Routing
Default: Enabled
Description: This service allows the sender to control the route that a packet travels through a network. Such a service can permit an attacker to bypass the normal forwarding path and security mechanisms in a network. Because most network devices should not attempt to dictate their preferred path through the network, this service should be disabled.
(config)no ip source-route
Finger service
Default: Enabled
Description: The finger protocol (port 79) retrieves a list of users from a network device, which includes the line number, connection name, idle time and terminal location. Such information is also seen in the show users Cisco IOS command and can be used for reconnaissance attacks. This service should be disabled when not needed.
(config) no service finger
ICMP unreachable notification
Default: Enabled
Description: This service notifies a sender of invalid destination IP subnets or specific addresses. Such information can be used to map a network . This service should be disabled.
(config-if) no ip unreachables
ICMP mask reply
Default: Disabled
Description: This service sends the IP subnet mask when it is requested. Such information can be used to to map a network. This service should be disabled on interfaces to untrusted networks.
(config-if) no ip mask-reply
IP directed broadcasts
Default: Enabled (Enabled Cisco IOS prior to 12.0, disabled Cisco IOS later than 12.0)
Description: A directed broadcast can be used to probe or deny service to (via a DoS attack) an entire subnet. The directed broadcast packet is unicast until it reaches the router that is responsible for the segment. At that time, the packet becomes a broadcast for the specific segment. This service should be disabled.
(config-if) no ip directed-broadcast
IP identification service
Default: Enabled
Description: The identification protocol (RFC 1413) reports the identity of the TCP connection initiator. Such information can be used in reconnaissance attacks. This service should be disabled.
(config) no ip identd
TCP keepalives
Default: Disabled
Description: TCP keepalives help clean up TCP connections when a remote host has stopped processing TCP packets (such as after a reboot). This service should be enabled to help prevent certain DoS attacks.
(config) service tcp-keepalives-in
(config) service tcp-keepalives-out
Gratuitous ARP
Default: Enabled
Description: This service is the primary means used in ARP poisoning attacks. Unless needed, this service should be disabled.
(config) no ip arp gratuitous
Proxy ARP
Default: Enabled
Description: This service permits the router to resolve layer 2 addresses. This feature is only useful if the router is acting as a layer 2 bridge. Because this is unlikely in modern networks, this service should be disabled.
(config) no ip arp proxy
After browsing my CCNA Security books I noticed that it recommends blocking a large range of ports used for different services on the router and that are insecure on end devices. After compiling them all together, here is a working ACL that can be implemented.
Keep in mind to change the RFC1918 (implemented to conform with RFC2827) blocking depending on the topology and that this may block services that you want running.
remark DENY TCPMUX
deny tcp any any eq 1
deny udp any any eq 1
remark DENY ECHO
deny tcp any any eq 7
deny udp any any eq 7
remark DENY DISCARD
deny tcp any any eq 9
deny udp any any eq 9
remark DENY SYSTAT
deny tcp any any eq 11
remark DENY DAYTIME
deny tcp any any eq 13
deny udp any any eq 13
remark DENY NETSTAT
deny tcp any any eq 15
remark DENY CHARGEN
deny tcp any any eq 19
deny udp any any eq 19
remark DENY TIME
deny tcp any any eq 37
deny udp any any eq 37
remark DENY WHOIS
deny tcp any any eq 43
remark DENY BOOTP
deny udp any any eq 67
remark DENY TFTP-DC OK
deny udp any any eq 69
remark DENY FINGER
deny tcp any any eq 79
remark DENY SUPDUP
deny tcp any any eq 93
remark DENY SUNRPC
deny tcp any any eq 111
deny udp any any eq 111
remark DENY LOC-SRV
deny tcp any any eq 135
deny udp any any eq 135
remark DENY NB-NS
deny tcp any any eq 137
deny udp any any eq 137
remark DENY NB-DGN
deny tcp any any eq 138
deny udp any any eq 138
remark DENY NB-SSN
deny tcp any any eq 139
deny udp any any eq 139
remark DENY SNMP
deny tcp any any eq 161
deny udp any any eq 161
remark DENY SNMP TRAP
deny tcp any any eq 162
deny udp any any eq 162
remark DENY XDMCP
deny udp any any eq 177
remark DENY NETBIOS
deny tcp any any eq 445
remark DENY REXEC
deny tcp any any eq 512
remark DENY RLOGIN WHO
deny udp any any eq 513
remark DENY RSH RCP
deny tcp any any eq 514
remark DENY SYSLOG
deny udp any any eq 514
remark DENY LPR
deny tcp any any eq 515
remark DENY TALK
deny udp any any eq 517
remark DENY NTALK
deny udp any any eq 518
remark DENY UUCP
deny tcp any any eq 540
remark DENY NEW-WHO
deny tcp any any eq 550
deny udp any any eq 550
remark DENY IRC
deny tcp any any eq 667
remark DENY MS UPNP SSDP
deny tcp any any eq 1900
deny udp any any eq 1900
deny tcp any any eq 5000
deny udp any any eq 5000
remark DENY NFS
deny udp any any eq 2049
remark DENY XWINDOW
deny tcp any any range 6000 6063
remark DENY NETBUS
deny tcp any any range 12345 12346
remark DENY BACKORIFICE
deny tcp any any eq 31337
deny udp any any eq 31337
remark PERMIT NEEDED ICMP
permit icmp any any parameter-problem
permit icmp any any packet-too-big
permit icmp any any source-quench
remark DENY UNNEEDED ICMP
deny icmp any any
remark DENY UNROUTABLE ADDRESSES
deny ip any 0.0.0.0 0.255.255.255
deny ip any 10.0.0.0 0.255.255.255
deny ip any 127.0.0.0 0.255.255.255
deny ip any 172.16.0.0 0.0.15.255
deny ip any 192.168.0.0 0.0.255.255
deny ip any 224.0.0.0 15.255.255.255
Today I had an issue provisioning 3 new AIR-LAP1142N-N-K9’s with the NME-AIR-WLC6-K9 module.
The AP’s and controller were all setup ok, but for some reason the AP’s didn’t want to register via CAPWAP. I had one previous working AP (which after the fix I dunno how it managed to work) that had registered. Via CDP it showed that the working AP was running C1140-K9W8-M while the busted AP’s were all running C1140-RCVK9W8-M. The recovery image is supposed to become active when the main image fails to load so I thought it may have been an issue I needed to console in to fix. Luckily it wasn’t.
All AP’s received DHCP on the right VLAN and everything else was looking fine (ACL’s etc) it was just the registration phase that didn’t work. After talking with some other engineers we found the issue was as simple as the option 43 on DHCP. It had previously been set to an ASCII option instead of HEX. Even though the Cisco docs said to set it as a HEX TLV we had it working previously on ASCII. After we hit it back to HEX all the AP’s registered without any problem.